
Coffee Shop Simulator Tutorial in Unreal Engine 4
Coffee Shop Sim (C++ & BP) - Chapter 5 - Moving to Unreal Engine 5 & Managing Customers!
In this final chapter, we will manage the coffee shop, when to open and close it and the customers.
I will also show you how to upgrade from Unreal Engine 4.27 to Unreal Engine 5.0
In the last chapter, I said we would move on with Unreal 4.27, but... it has been a while, and I am already working on Unreal 5! So I decided to work on this version from now on.
Don't worry; upgrading from 4.26 or 4.27 is not a hassle; nothing breaks except a small thing, and you don't have to upgrade if you don't want to! If you decide to download the zip for this chapter, you would have to use Unreal 5; if you follow along with your project, you can stay on the same version.
Upgrading from UE4.26 or UE4.27 to Unreal 5
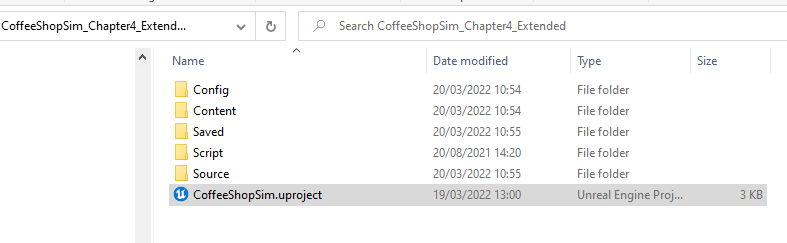
Let's take the CoffeeShopSim_Chapter4_Extended, where we left off last time.
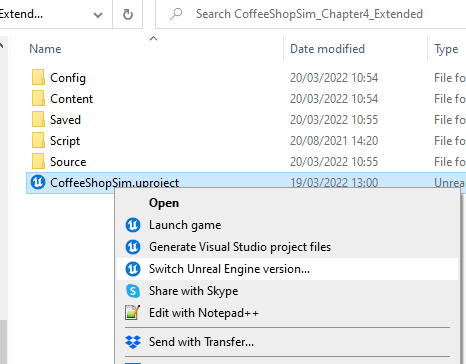
Inside the root folder, you will see the CoffeeShopSim.uproject. Right-click on that file and select Switch Unreal Engine version...
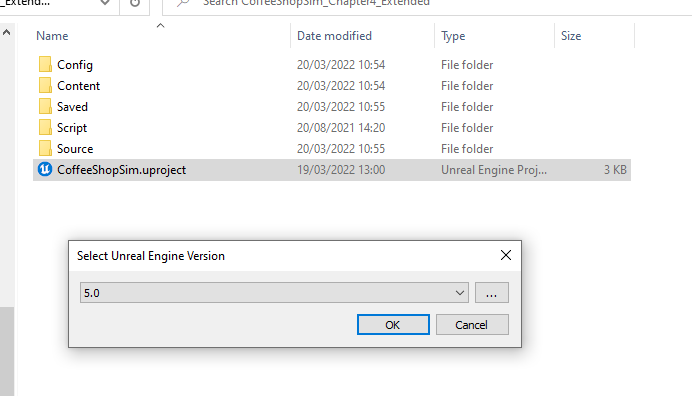
In the next pop-up, select the 5.0 version
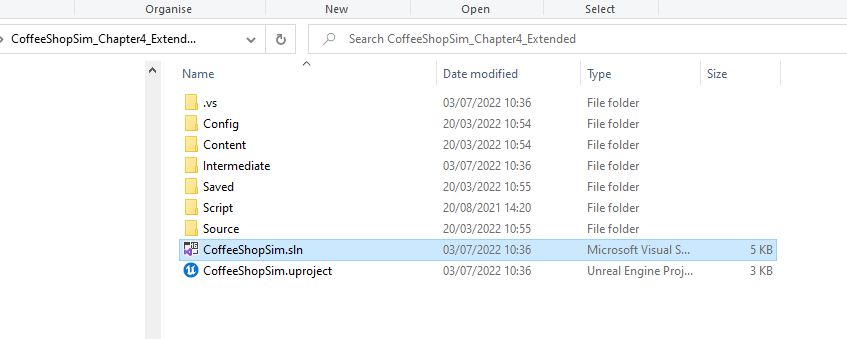
If everything goes well, you should have the project converted, and the file .sln (the visual studio project) should be there.
You can open the visual studio file and compile it as usual.
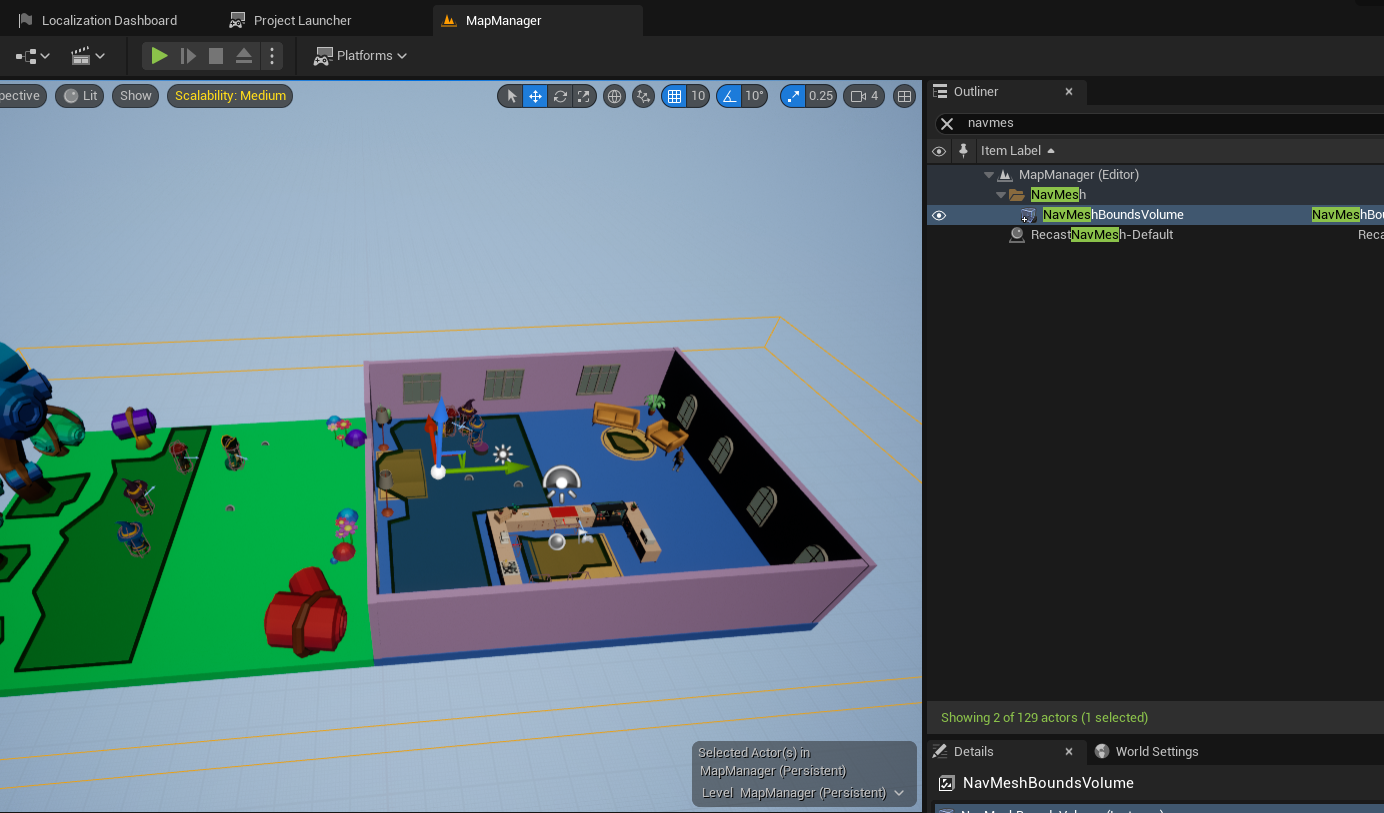
The game should normally work; if you have any issues with the navigation or the Ai not moving towards the counter, I suggest removing the old NavMeshBoundsVolume from the Map Manager and creating a new one.
Shop Manager Actor
In this chapter, we will manage when we open and close the coffee shop and the customers.
We need a manager actor who connects the coffee shop with the customers, the counter, locations in the coffee shop and the player.
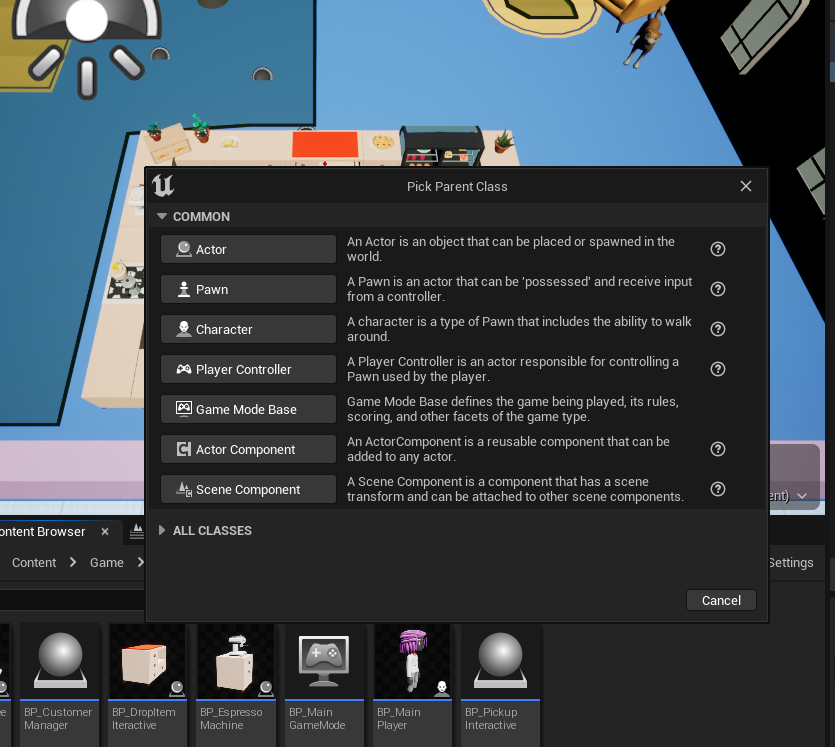
First, create a new blueprint and extend it from Actor. We will create a C++ class soon.
Tip, Disable the Tick: The first thing I do whenever I create a new blueprint is disable the Tick; if I know this particular Actor will not use the tick, or I don't need it from the start, it will help with performance later.
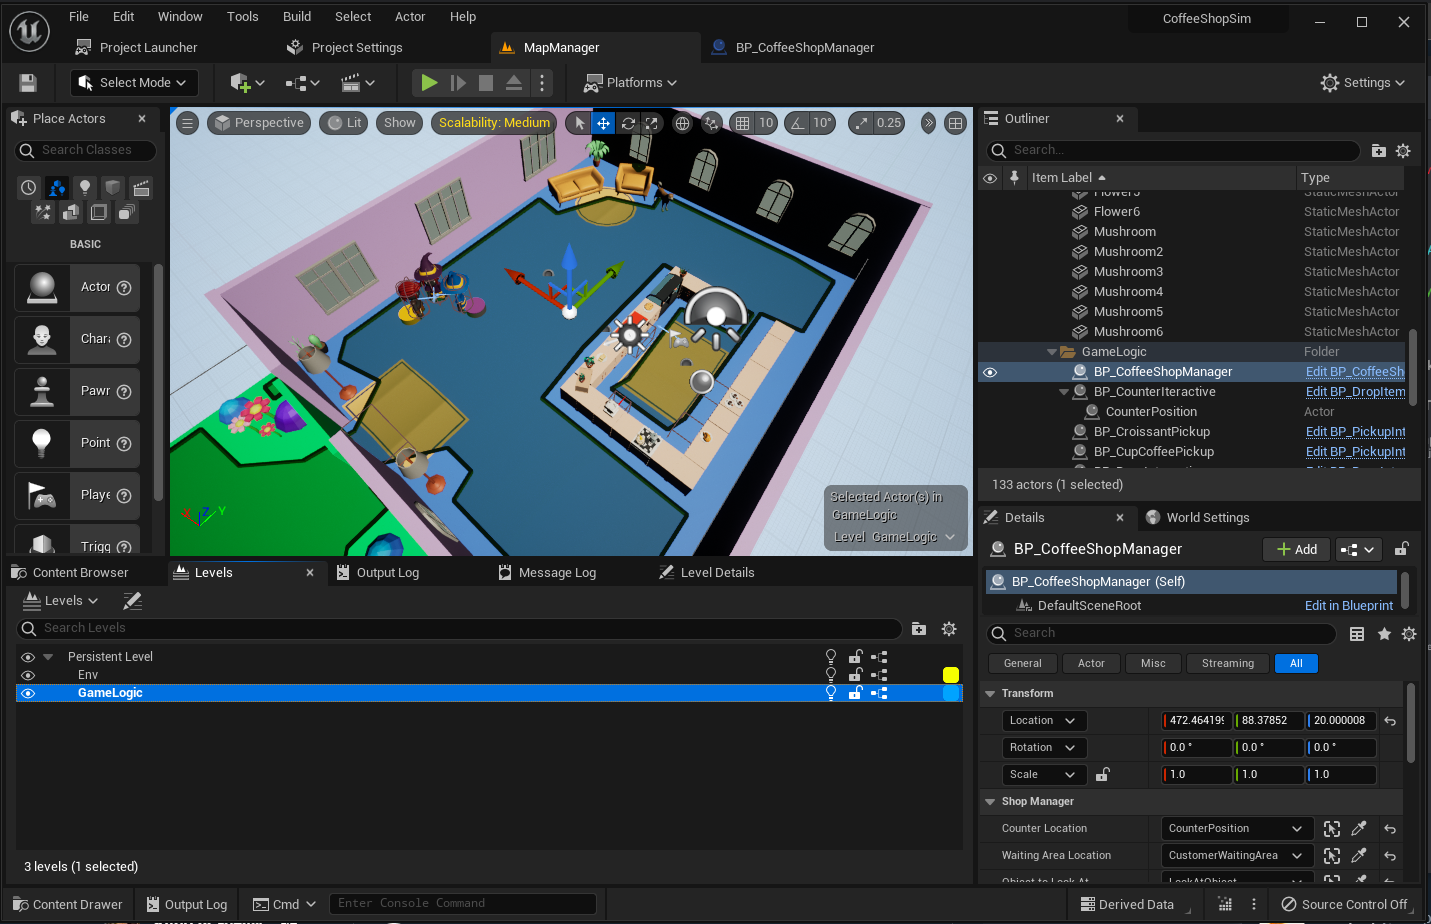
Drag this new Actor Blueprint BP_CoffeShopManager anywhere on your main Map. It doesn't matter where you locate it. I usually create a GameLogic map and use it for any actor with this type of logic. I set this map as Always loaded.
Let's create the C++ ShopManager extending from Actor to use it as a parent of this blueprint and add some variables, logic and events. Call it ShopManager.
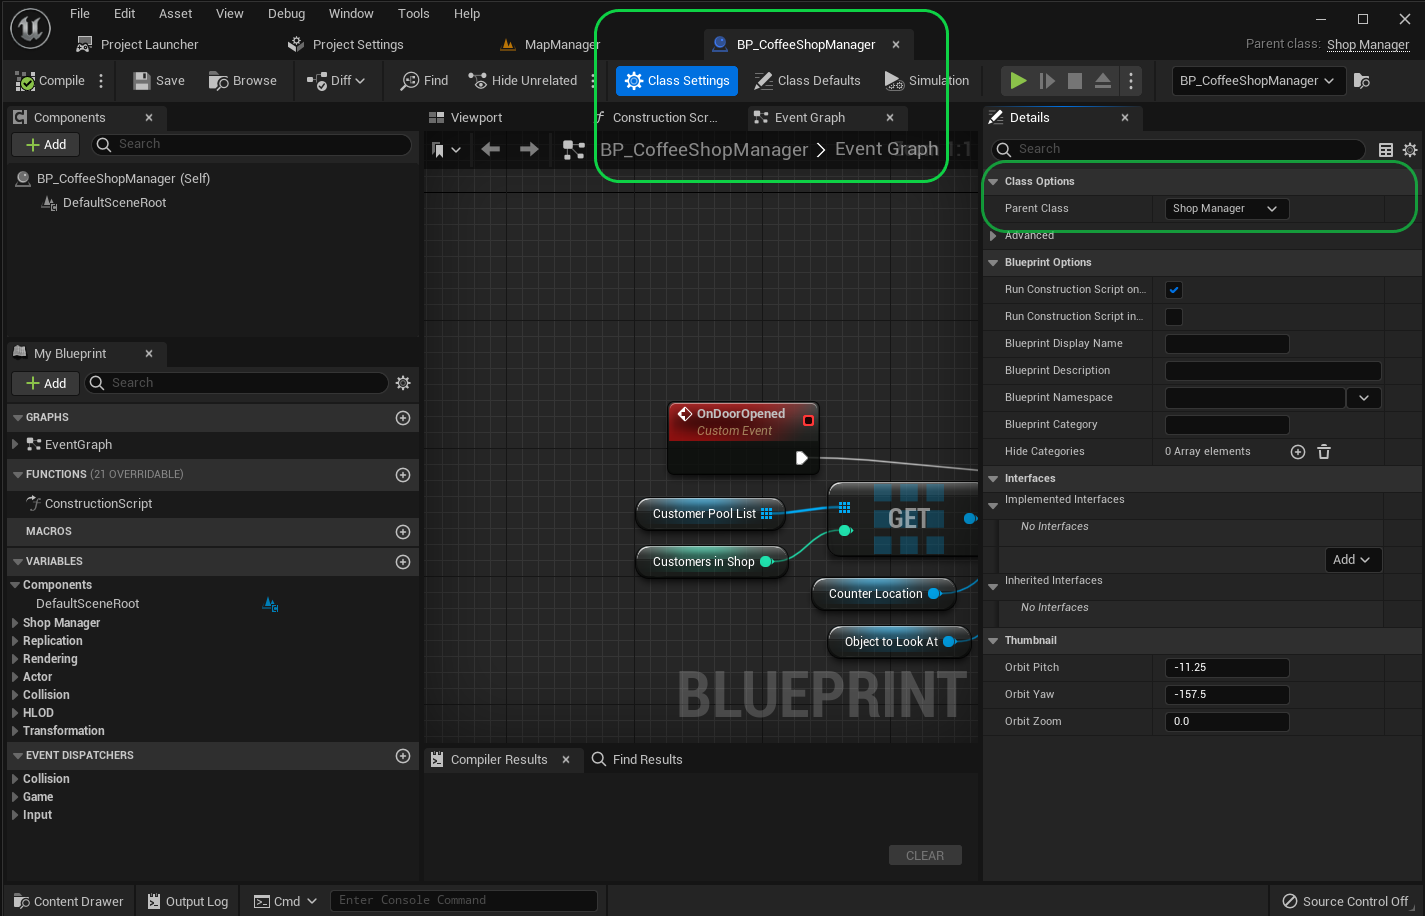
As soon as it compiles and this new C++ Actor class is ready, change the parent class of the BP_CoffeShopManager on the Class Settings
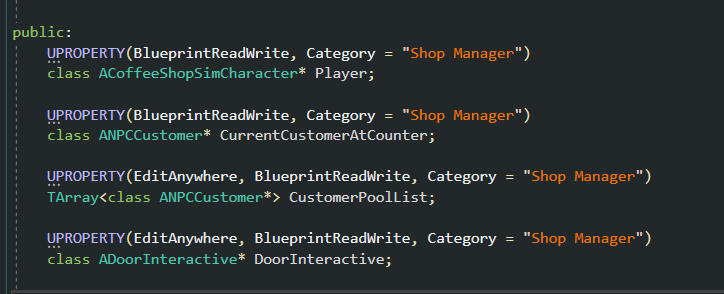
To handle some aspects of the shop, we will need some properties:
Reference to the Player: ACoffeeShopSimCharacter* Player.
We will fetch this reference on BeginPlay
Reference to the customer at the counter: ANPCCustomer* CurrentCustomerAtCounter.
We will set this reference on the behaviour tree of the NPC
A list of customers: TArray<class ANPCCustomer*> CustomerPoolList.
We will set this list on the map.
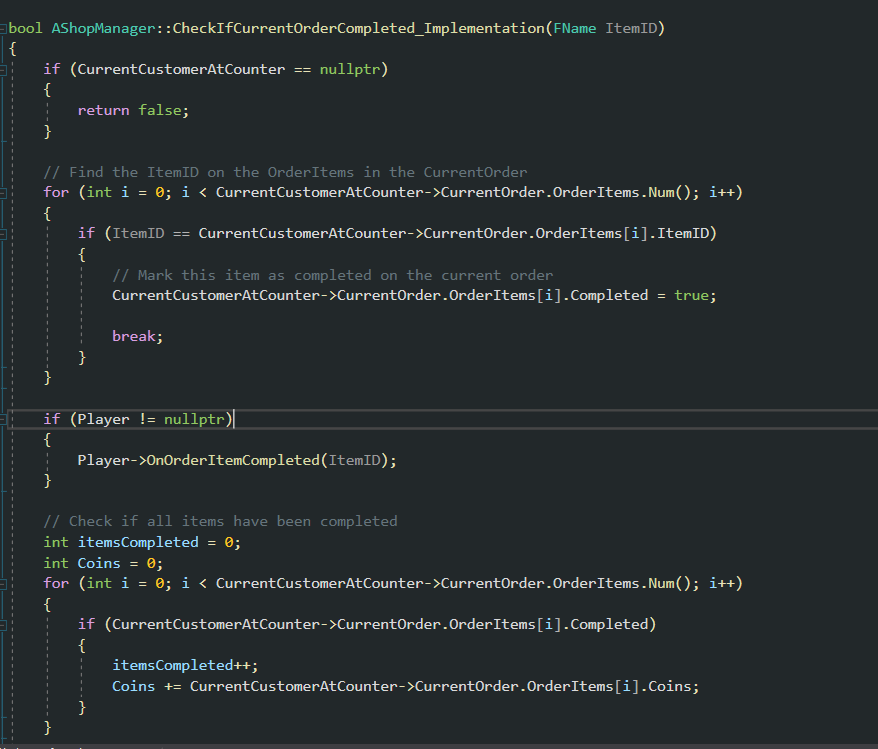
We are also going to add BlueprintCallable called CheckIfCurrentOrderCompleted.
In the previous chapter, we created an actor component attached to the CoffeeShopSimGameMode to handle the shop.
Using Actor Components is fantastic when you need to divide functionality into small pieces, but it's not so great when you need to have references from a map.
Therefore, I removed this component and moved the function CheckIfCurrentOrderCompleted to this actor instead.
CheckIfCurrentOrderCompleted's implementation hasn't changed, so grab the code from the ShopManagerComponent and paste it into the function's body.Make sure to replace CurrentCustomer for CurrentCustomerAtCounter.
I recommend deleting the component class UShopManagerComponent* ShopManagerComponent; on the ACoffeeShopSimGameMode, and creating the component on the constructor.
If you want, you can keep the component, but this might confuse you.
If you remove this component from the GameMode, you will have to fix a few things on blueprints, which will do anyways.
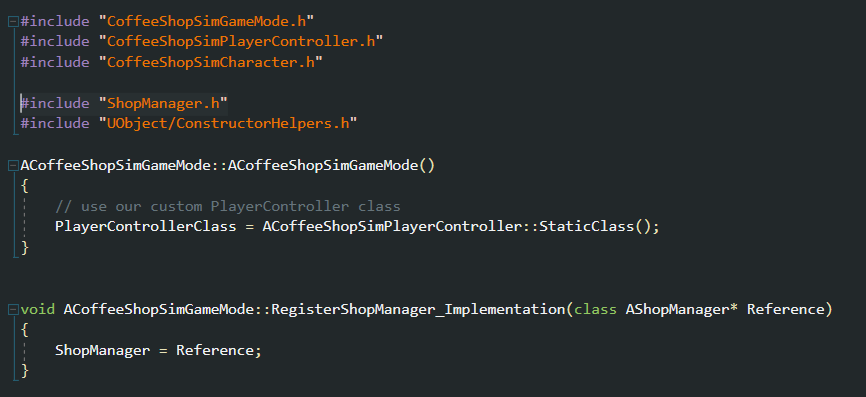
As we've removed the component from the GameMode, it is a good idea to have a public reference to the ShopManager actor on the GameMode.
One technique I always use is creating a Register method on the GameMode and calling it on the BeginPlay of the object. Let's do that.
In the GameMode, create a public reference to the ShopManager actor and the method RegisterShopManager. If you think you might use these methods on Blueprint, you can make them a BlueprintCallable and add the Implementation of the function. I often make them BlueprintCallable because I often need to expose them in Blueprint.
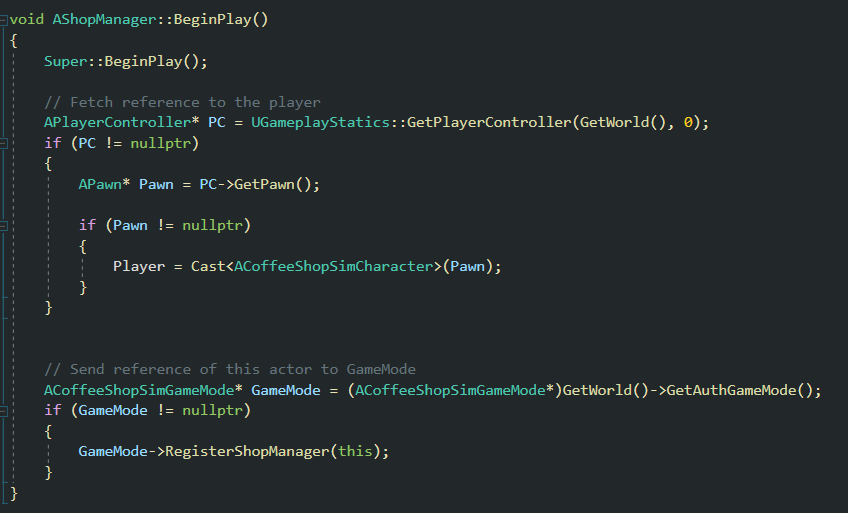
Go back to ShopManager.cpp, and let's call this new method on the BeginPlay.
Make sure you also add the reference to the Player using the GetPlayerController and GetPawn()
Don't forget to include #include "CoffeeShopSimGameMode.h" at the top
We are ready to compile, and after this is completed, you will have a few blueprint errors, which we can fix easily.
[FIX COMPILE ERRORS]
The BTTask_OrderToShopManager has lost the reference to ShopManagerComponent from GameMode. We are not going to use this task anymore as we are going to change the logic here. Simply remove this task from the BT_Customer and the object itself on folder AI
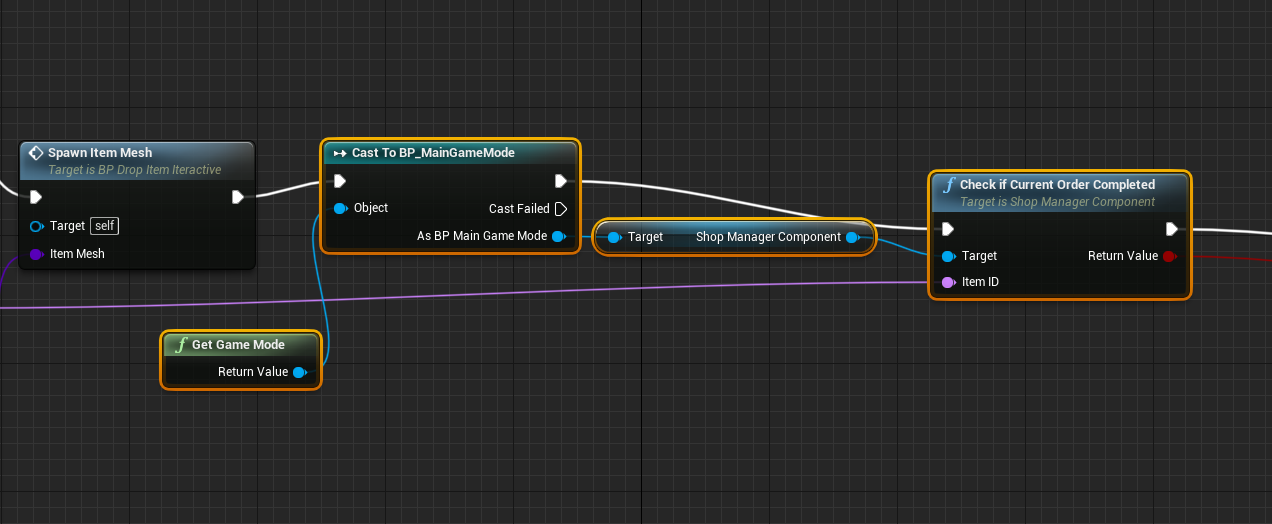
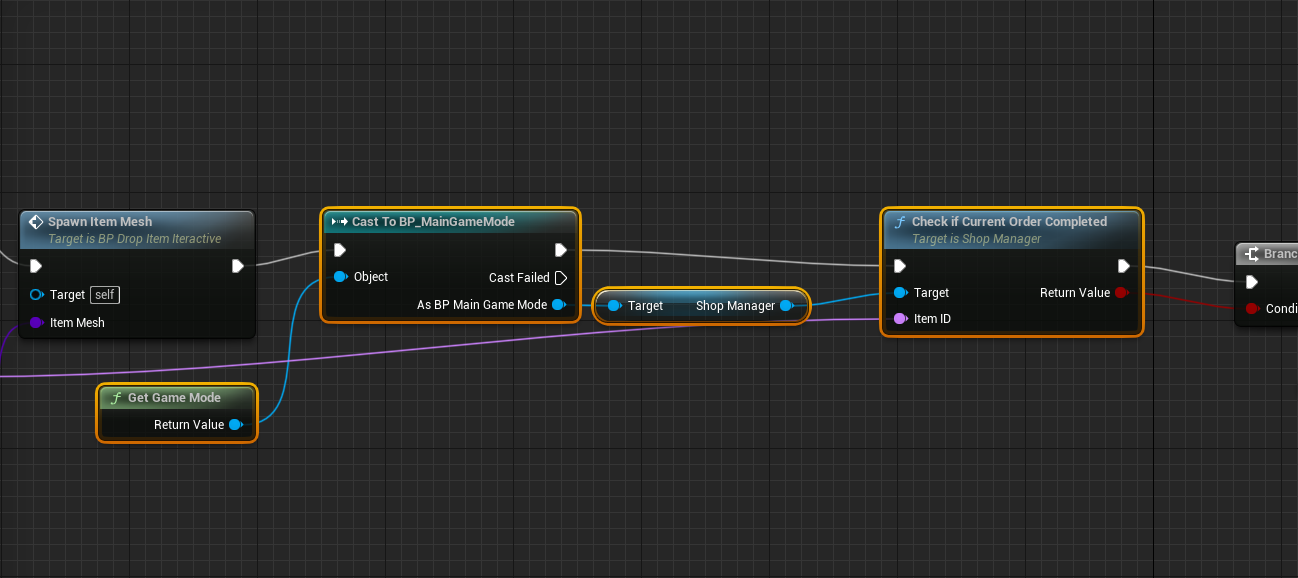
The BT_DropItemInteractive is asking you for the ShopManagerComponent, which no longer exists. Simply remove this, and get ShopManager instead.
Then pull a cable from ShopManager object and find CheckIfCurrentOrderCompleted.
Reconnect all the previous cables.
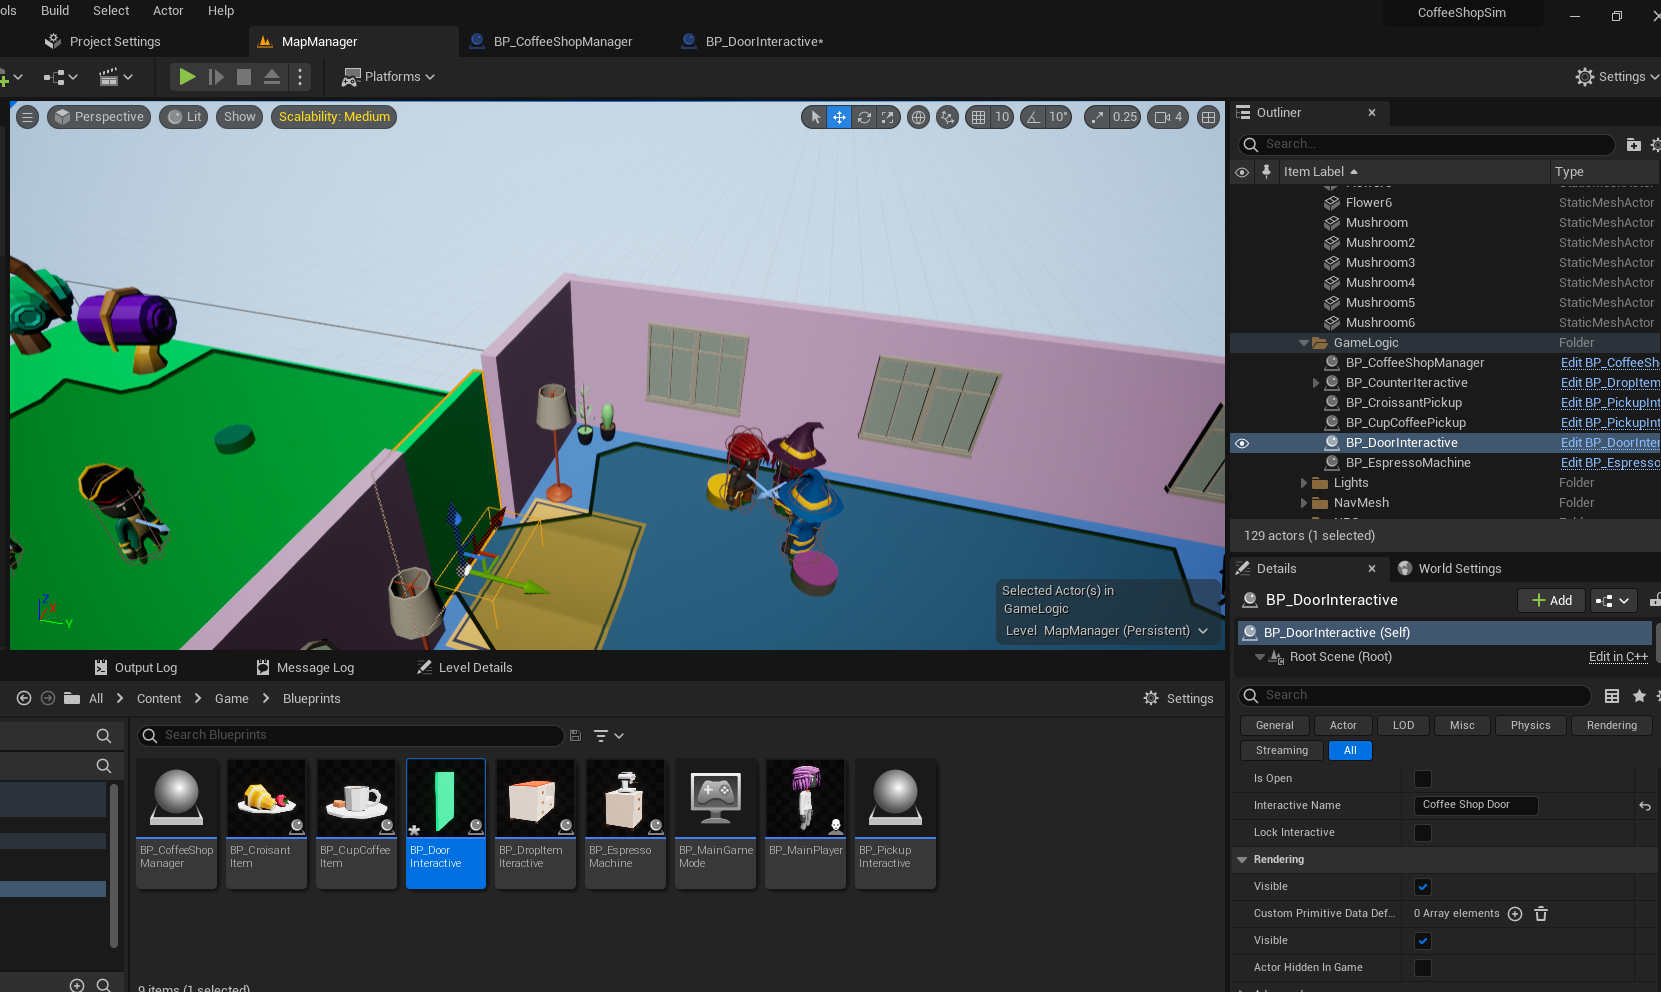
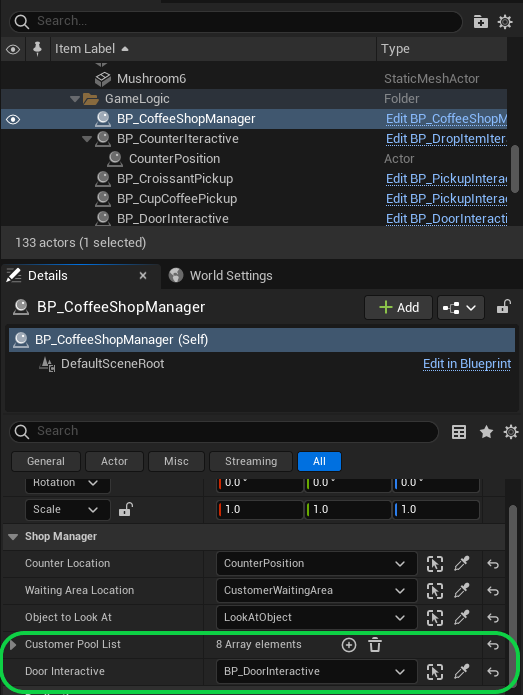
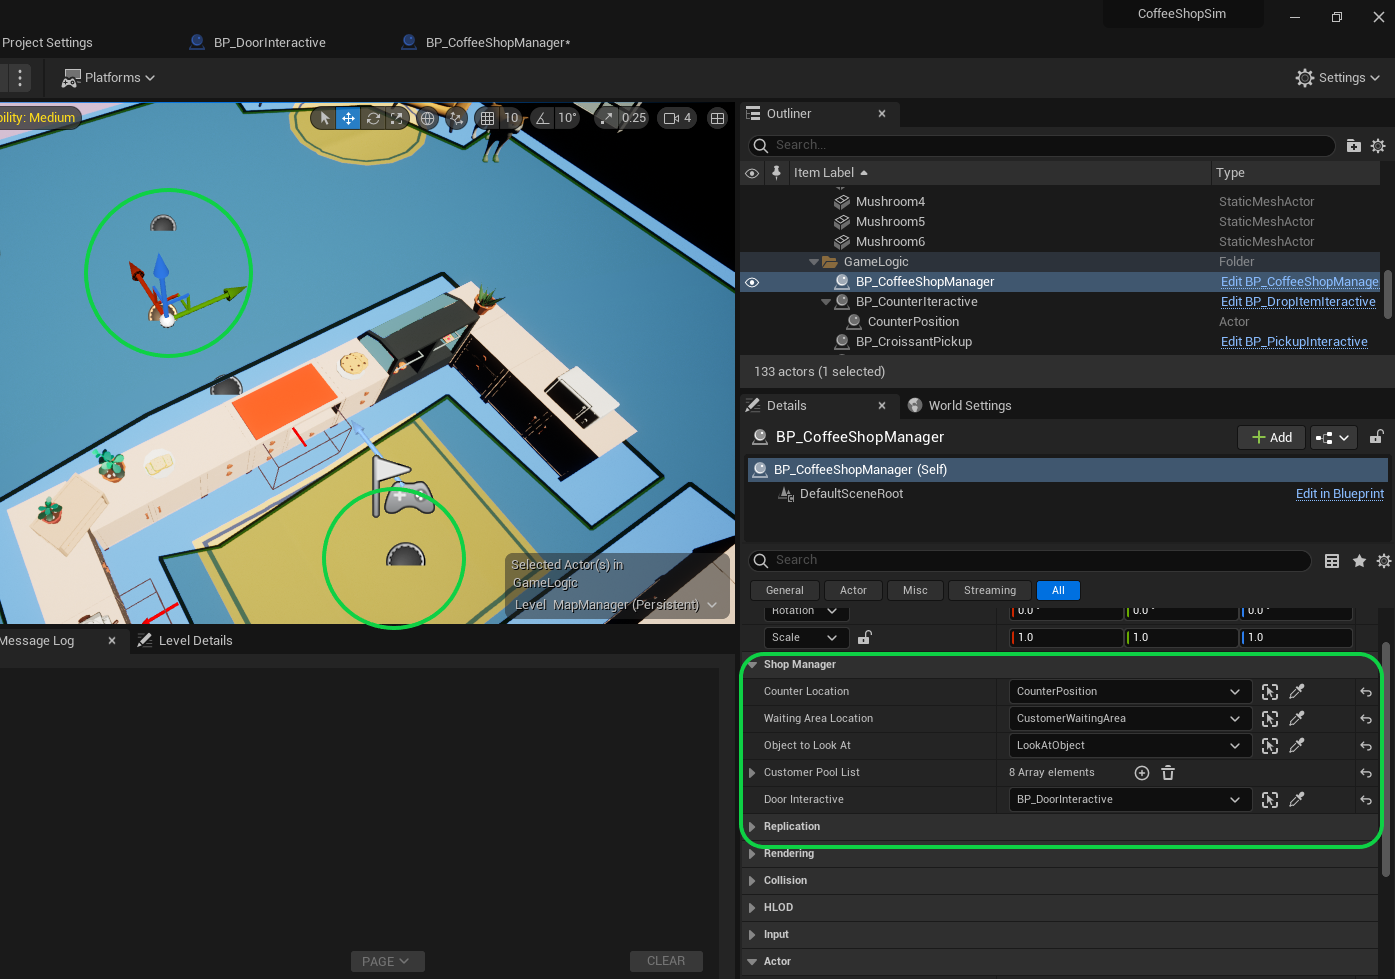
With these previous compile errors sorted, we can continue with the BP_CoffeShopManager. We can fill the CustomerPoolList, selecting various references on the Map.
Make sure the BP_CoffeShopManager actor is on the same Map as the customers.
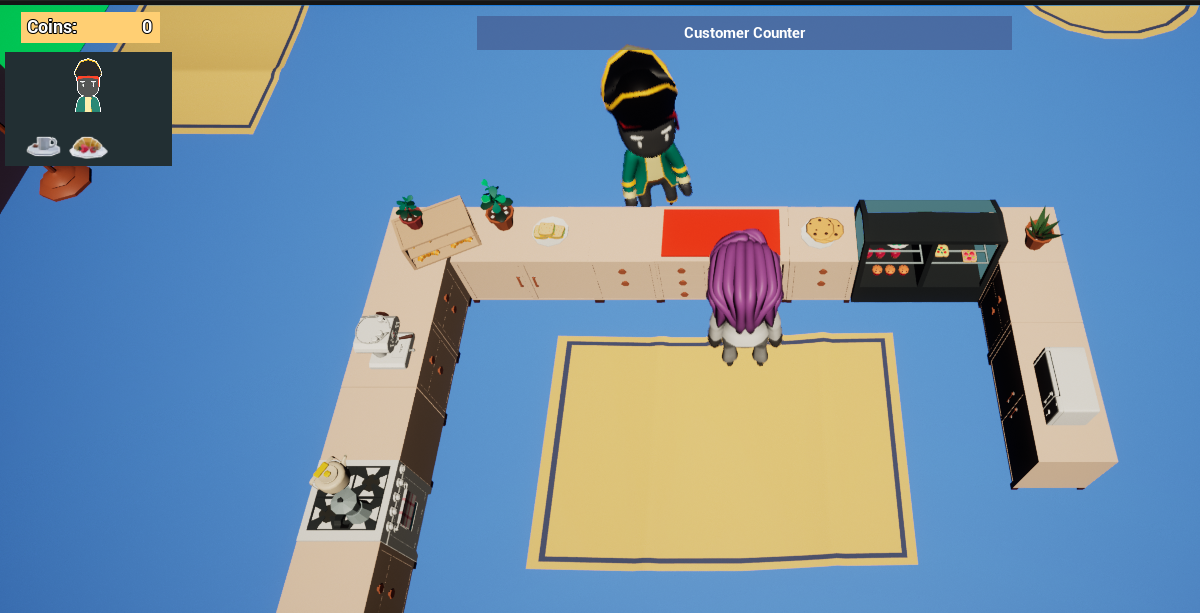
On the GameLogic map, I have 3 customers that I can assign to this list; we will ask to go to the waiting area or the counter.
You can have as many customers as you want and play with this list to manage your shop.

The Coffee Shop Door interactive
The next element we will create is a door the player can open and close.
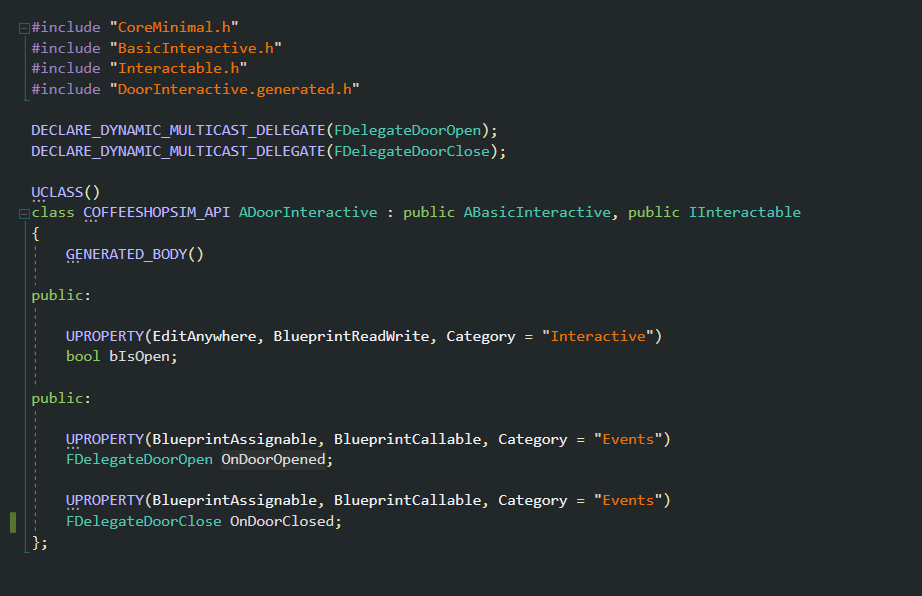
We will handle this object on the blueprint, but we will have a DoorInteractive C++ class extending from ABasicInteractive, and implements the interface IInteractable, so we can this actor an interactable that the player is able to interact with.
This C++ class will have the following UPROPERTY:
- UPROPERTY bool bIsOpen: To indicate whether the door has been opened or not.
- Multicast Delegate OnDoorOpened: We can subscribe to this event with other actors.
- Multicast Delegate OnDoorClosed: We can subscribe to this event with other actors.
We also need to extend th
We won't do any operations on the C++, the rest will be handled on the blueprint.
Create a Blueprint based on this C++ class, and represent the door however you want.
I made a simplified version with 2 meshes, with no collision (this is important, so we don't block the navmesh), and I adjusted the trigger.
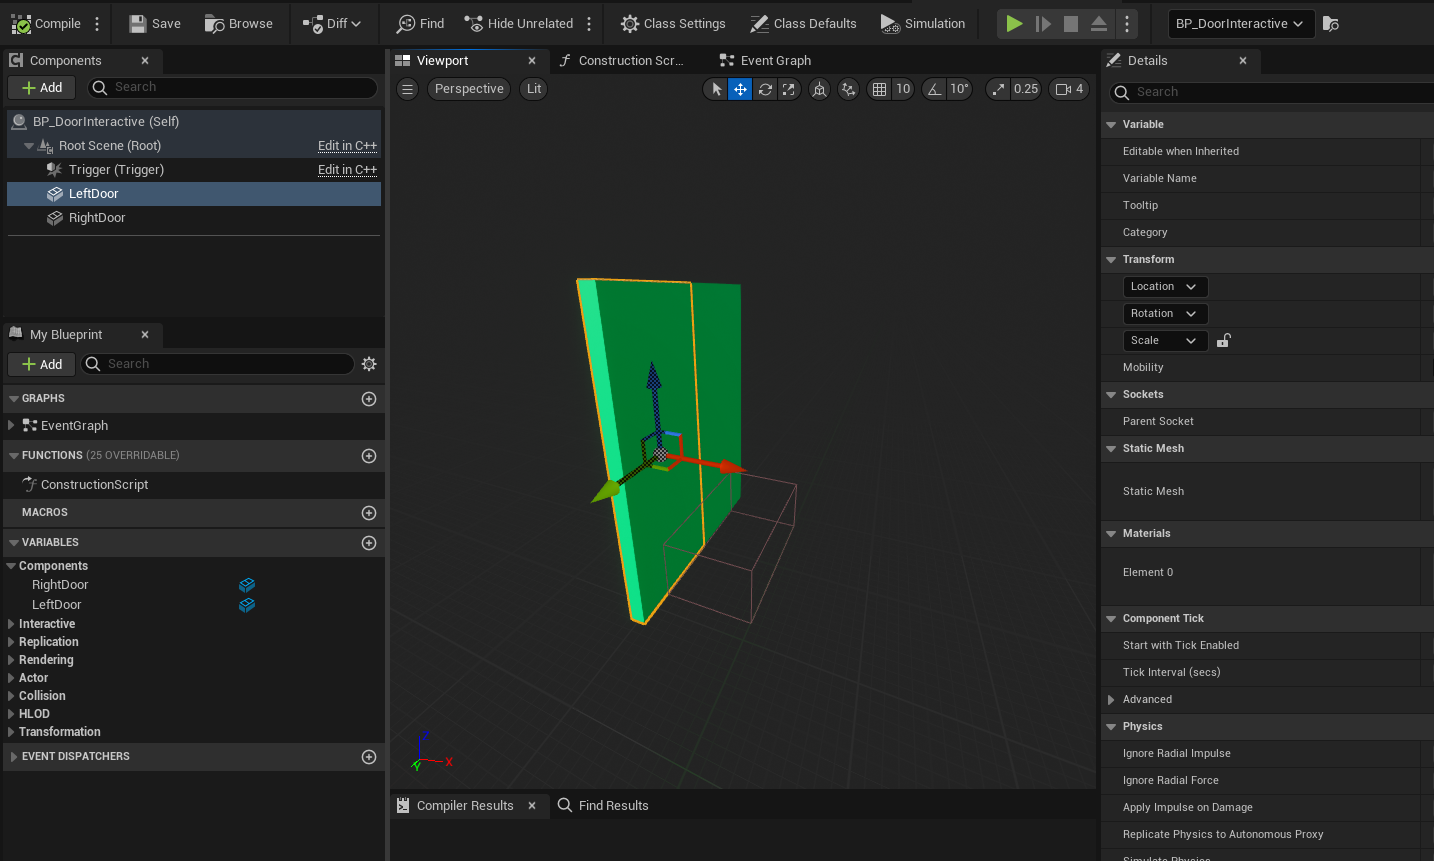
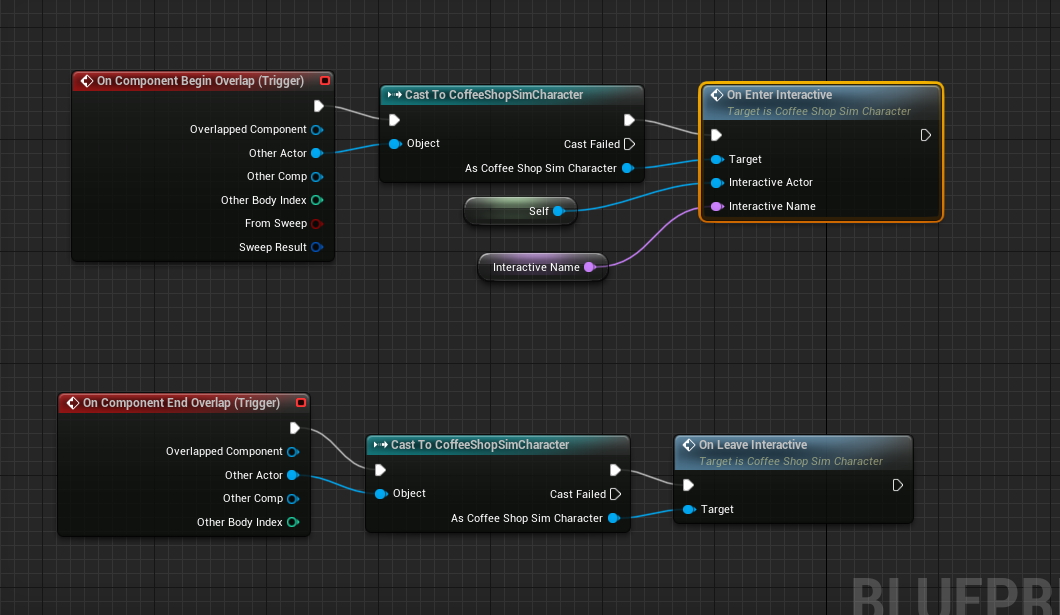
Open the Event Graph of BP_DoorInteractive, and let's add logic.
First, we need to add the events OnComponentBeginOverlap and OnComponentEndOverlap.
Drag a pin from On OtherActor and cast to CoffeShopSimCharacter, then call the method OnEnterInteractive and OnLeaveInteractive.
If you remember from previous lessons, we use references on the character to keep track of interactives.
Door Logic: OnInteract
Let's implement the OnInteract event so we can add the logic.
The initial state of the door is closed since the coffee shop is closed in the morning!
If the door is closed (bIsOpen == false):
- We blook the interactive with the variable LockInteractive.
- We open the door with an animation, effect or whatever you prefer
- We wait a few seconds for that effect to end.
- We set bIsOpen to true.
- We Call the delegate OnDoorOpened, so any other actor subscribed to this event will get notified, and finally, we unlock the interactive
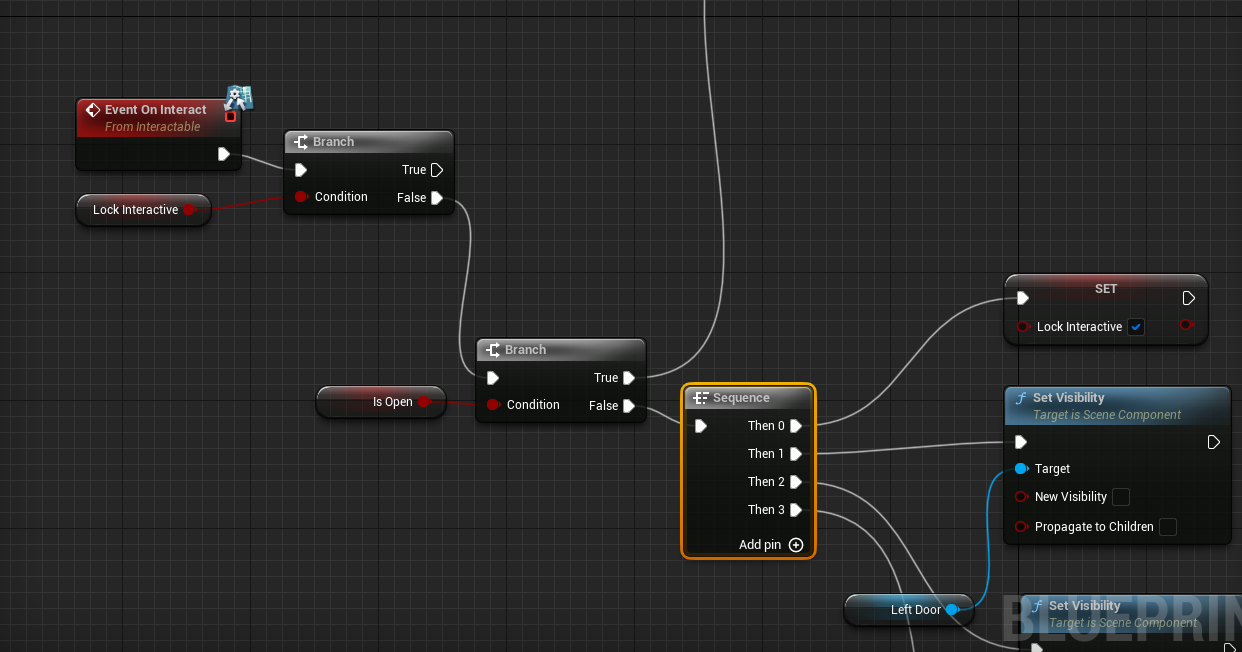
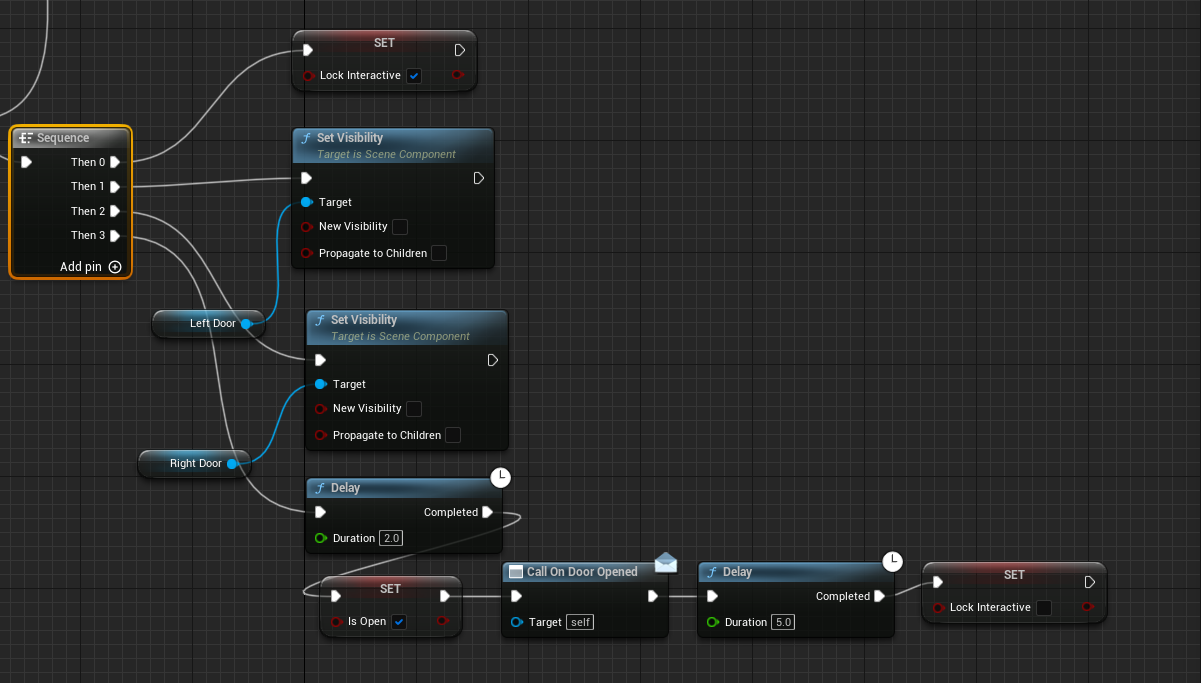
If the Door is opened (bIsOpen == true):
- We lock the interactive
- We call the delegate OnDoorClosed
- We wait a few seconds and show a close animation on the door
- We set the variable bIsOpen to false

If we test this now, we will only see the doors open and closing but nothing else.
The next step is to continue our logic on the BP_CoffeShopManager
Coffee Shop Manager: Door reference and events
Open the CoffeeShopManager C++ and add a public reference to the DoorInteractive.
After compiling, set the reference on the BP_CoffeeShopManager with the Door we have on the map.
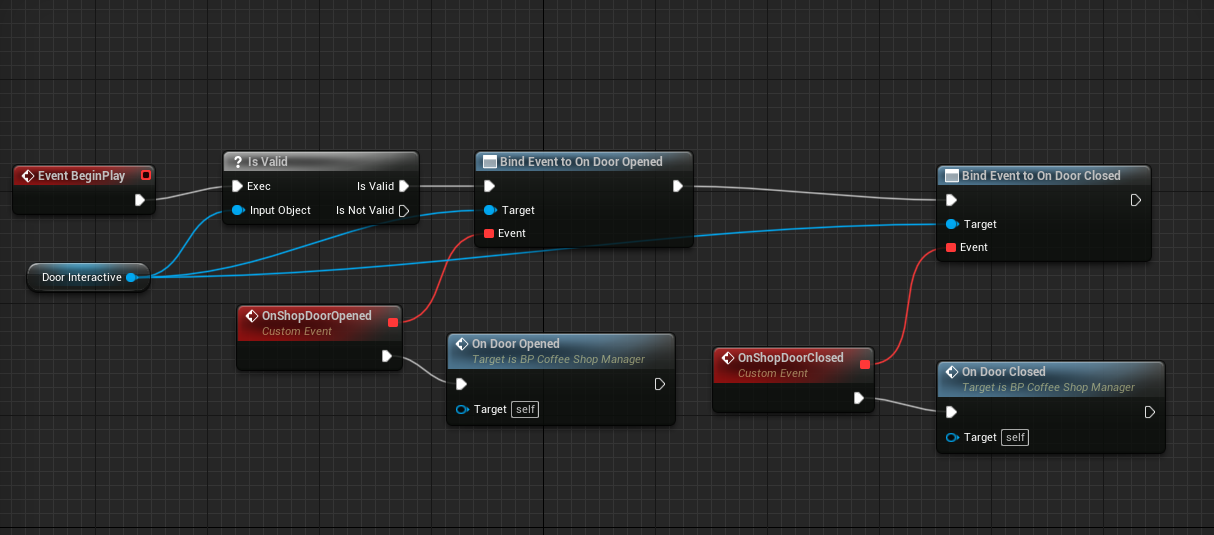
Open the EventGraph of BP_CoffeeShopSimulator and subscribe to both OnDoorOpened and OnDoorOpened events on the Begin Play.
To complete this tutorial we will need to modify the Basic Customer logic, including the behaviour tree and add 2 enums
Changing the NPCCustomer behaviour
If you open the NPCCustomer.h C++ you will see that we have CustomerInfo, CurrentOrder and an integer OrderStatus to track the order status for customers at the counter.
Using integers is fine, but they can be very confusing, and I prefer to use enums.
We will change the integer for an enum, which will break the behaviour tree, but that's ok because we will change the logic of the Customer a little bit.
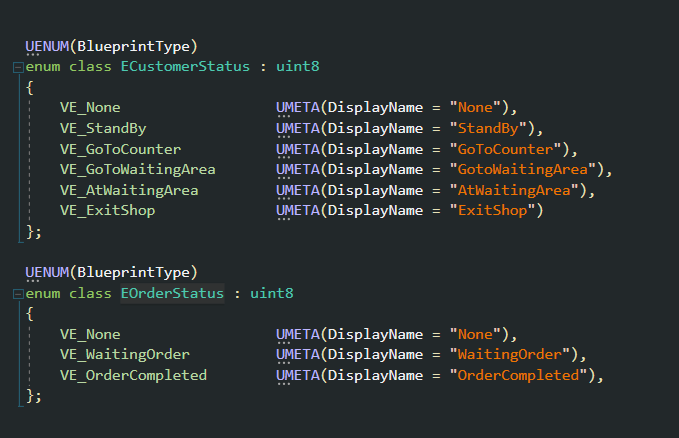
Open Definitions.h, and let's declare:
- ECustomerStatus: Enumerate to indicate what's happening with the Customer. We will use this enumeration to perform different actions on the Customer (when they are outside, when they are waiting...)
- EOrderStatus: This enumeration will tell us the exact status of the order when a customer is waiting at the counter.
Open NPCCustomer.h and change int32 OrderStatus for EOrderStatus. Make sure to include #include "Definitions.h" at the top.
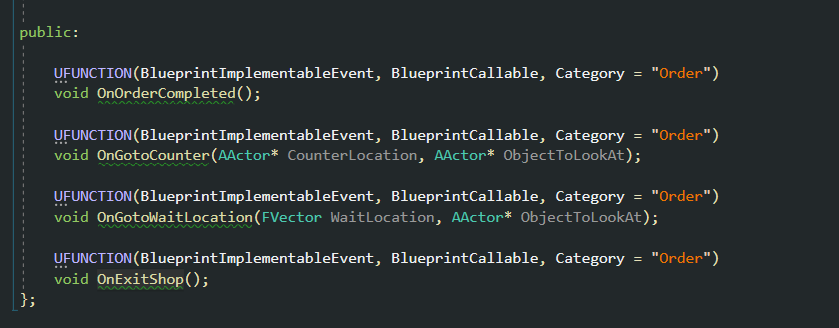
We are going the following BlueprintImplementableEvents, which will use from the ShopManager:
- OnOrderCompleted: We already have this, indicating whether or not the current order was completed.
- OnGotoCounter: We will call this event from ShopManager when the event door opened is launched. We will send the first customer to the counter location and tell them to rotate towards the counter (this is optional)
- OnGotoWaitLocation: This event will also be called from ShopManager when the doors are opened, we will send a few other customers to a random waiting area inside the coffee shop.
- OnExitShop: Event called from ShopManager when the event closed door is called.
We don't need anything else; after compiling, we will need to fix errors and use this logic.
Let's go back to BP_CoffeeShopManager EventGraph and implement the events OnDoorOpened and OnDoorClosed that we subscribed on BeginPlay.
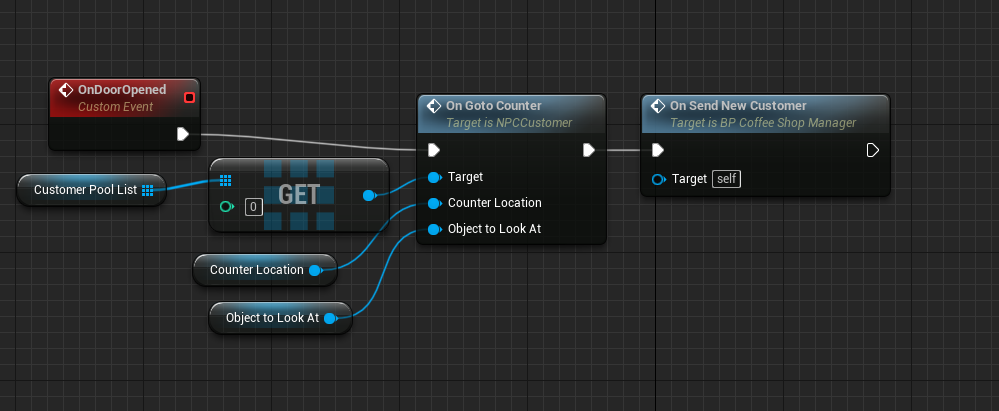
OnDoorOpened event:
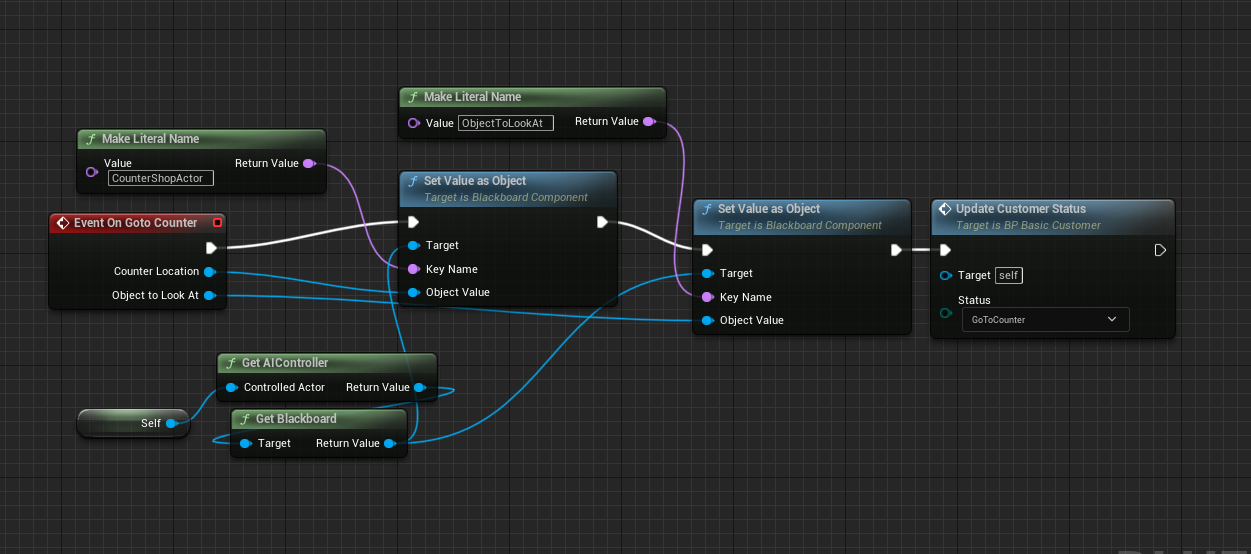
We take the first actor of CustomerPoolList, and we call OnGotoCounter. The CustomerPoolList should be a list of NPCCustomer, so we can the Implementable event we've just added on NPCCustomer.
The OnGotoCounter is expecting a CounterLocation and an Object to LookAt. These are nothing else than an actor placed on the map. The CoffeShopManager has a reference to this object.
- CounterLocation: The actor is placed in front of the counter
- ObjectToLookAt: The actor is also placed around the counter, so the customers rotate towards it.
- WaitingAreaLocation: The actor is placed inside the coffee shop that we will use for the rest of the customers.
Create these three actors and link the references on the map.
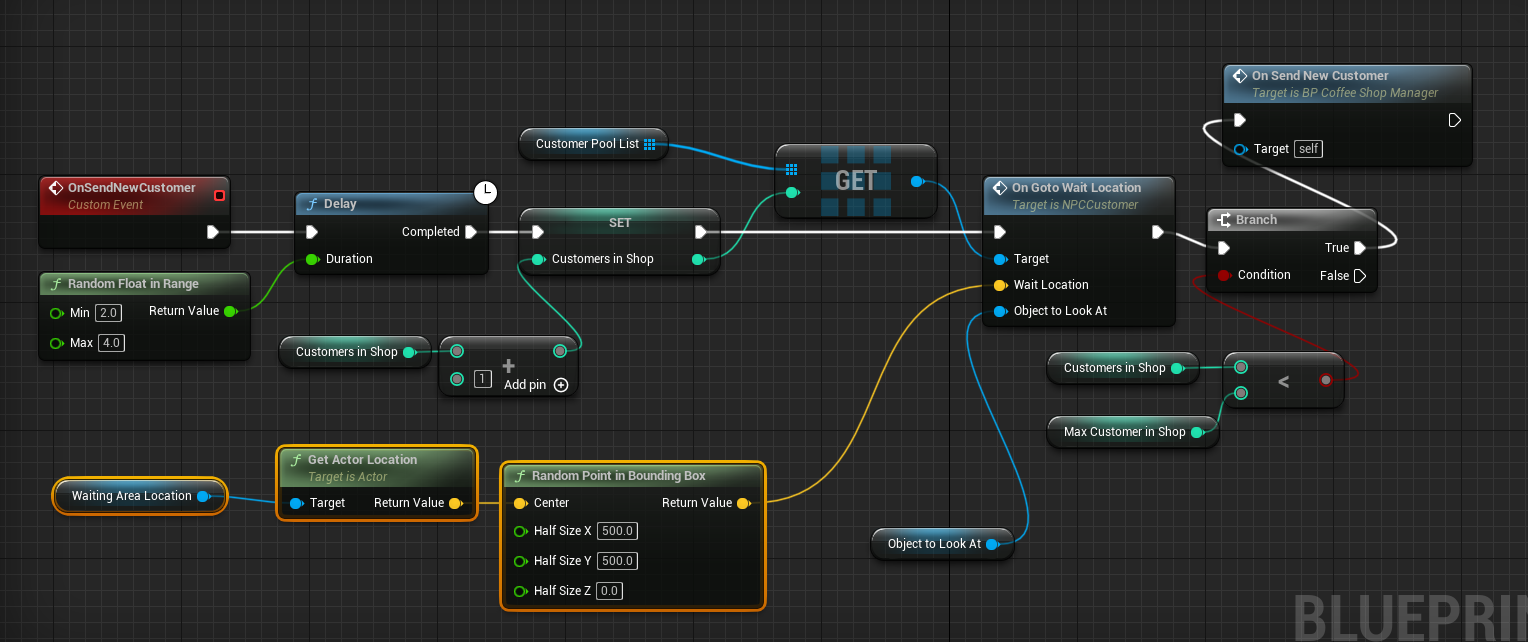
I've created the Event OnSendNewCustomer, to send customers 1,2,3 to a random location on a WaitingAreaLocation.
For these next 3 customers, we could duplicate the same action 3 times:
- Random Delay when the next customer is selected
- Select the next customer from CustomerPoolList
- Get a RandomPointInBoundingBox from the WaitingAreaLocation Actor
- Call OnGotoWaitLocation on that selected next customer
In the following picture, I called OnSendNewCustomer 3 times. We can't use a normal for loop with the node Delay; this is an alternative that works fine.
You can either copy what I've done or duplicate it from the Delay node up to OnGotoWaitLocation 3 times.
To implement my option, you will need an integer variable (created on the blueprint) to keep track of the number of customers in the shop so that you can select the correct customer from the CustomerPoolList.
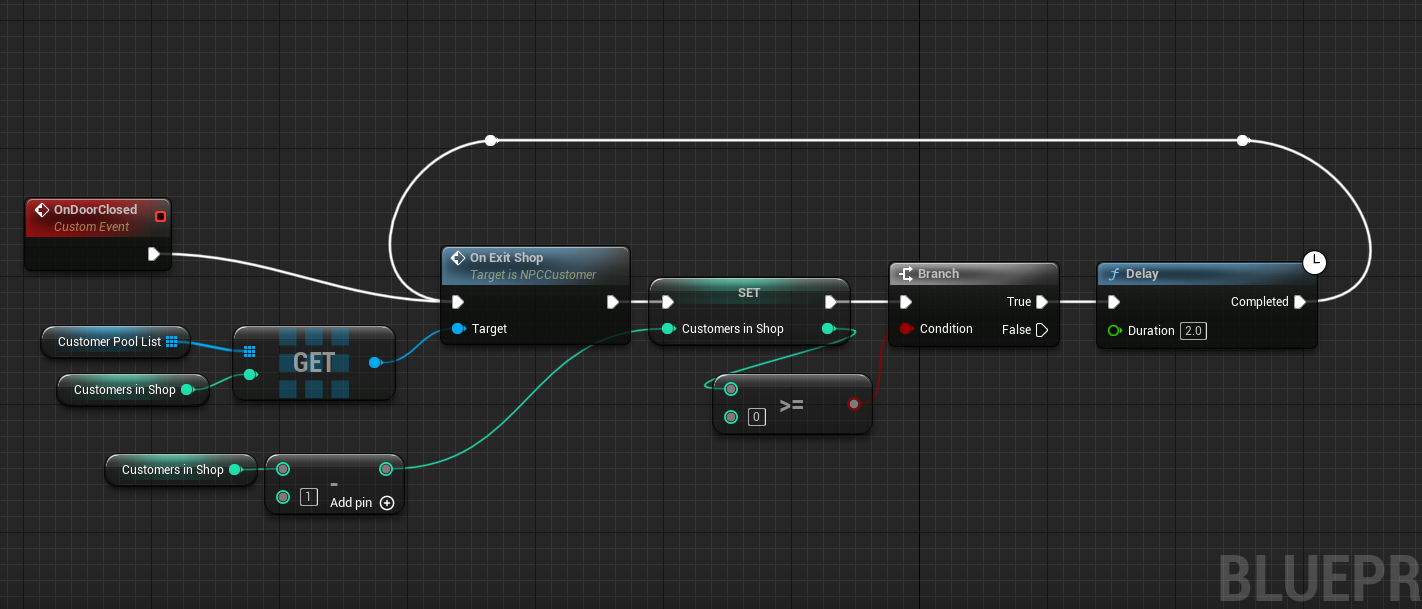
OnDoorClosed event:
This event is much more straightforward; we only need to call the method OnExitShop on the NPCCustomer with the number of customers we have in the shop (the CustomerInShop variable will be handy here).
Fixing and Modifying the NPCCustomer BehaviourTree
The next and final step is to adapt NPCCustomer BehaviourTree and use the CustomerStatus and OrderStatusto to handle their behaviour.
- CustomerStatus: We will use this property to send the customer to the outside of the shop or the waiting area, or the counter.
- OrderStatus: We will use t his property for the customer that is currently on the counter waiting for their order.
We have to clean and update the Blackboard and add new variables. We also need to upgrade the BasicCustomer and implement the new events. Let's start with the BlackBoard.

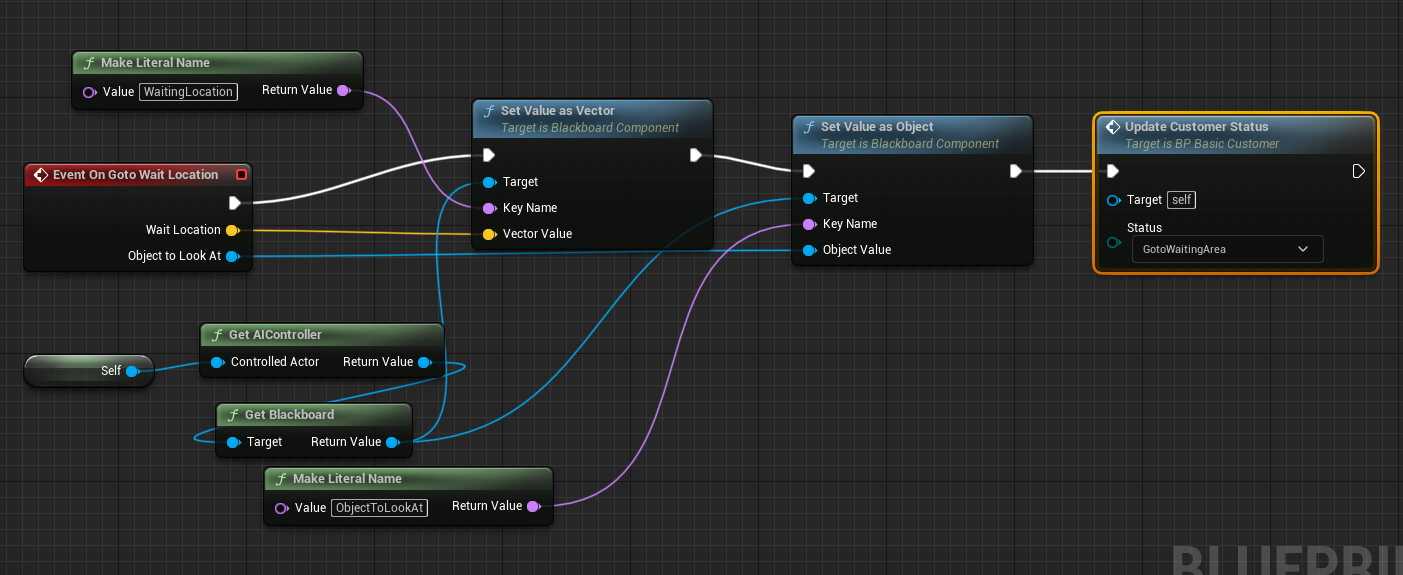
OnGotWaitLocation Event
This is very similar to the OnGotoCounter; we receive the WaitLocation vector and the ObjectToLookAt from the ShopManager.
In this case, we set the CustomerStatus to GotoWaitingArea.
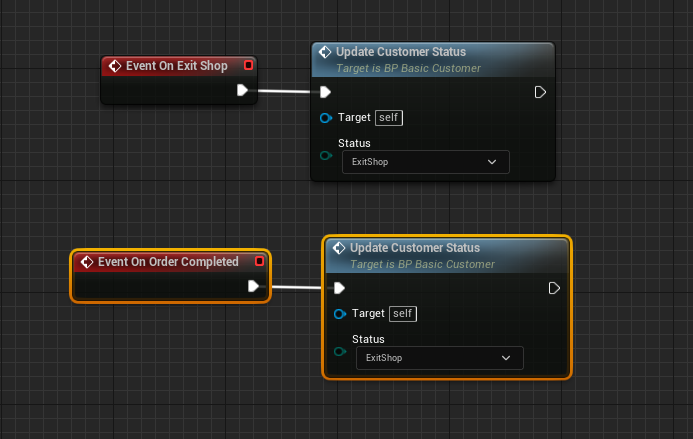
Finally, the events OnExitShop and OnOrderCompleted simply set the CustomerStatus to ExitShop.
We are ready to update the Behaviour Tree and use the Customer Status to handle the behaviour of the Customers
Updating the Customer Behaviour Tree
Our current behaviour tree is going to change drastically. We will use the CustomerStatus to decide what to do with every customer on the CustomerPoolList.
Here is an overview of each state:
- CustomerStatus StandBy: This is the initial and default state whenever the customer is outside the coffeeShop.
- CustomerStatus on ExitShop: We send the customer to the start location. The first customer will be at the counter waiting for their order, and the rest will be in the waiting area.
- CustomerStatus on GoToCounter: When we send the first customer on the list, they will be in this state, and a series of sequences will occur.
- CustomerStatus on GotoWaitingArea: When the 2,3,4 customer is sent to the random location in the waiting area, and as soon as they reach this location, they change to AtWaitingArea
- CustomerStatus on AtWaitingArea The customer is waiting to be served or sent to the exit after closing the doors.
The CustomerStatus StandBy Sequence
From the Root of the BehaviourTree pull a Selector Node and create a new sequence for the CustomerStutos on StandBy.
You will need to add a Decorator of BlackBoardType and select the Blackboard Key Customer Status.
As a KeyValue you will select StandBy.
Set the Notify Observer to On Value Change, and the Observer Aborts to Lower Priority so it will cancel any other sequences happening on the right side.

The CustomerStatus ExitShop Sequence
This sequence is very similar to the previous one; use the same Blackboard key but this time select ExitShop.
Set the Observer Aborts to Lower Priority as well.
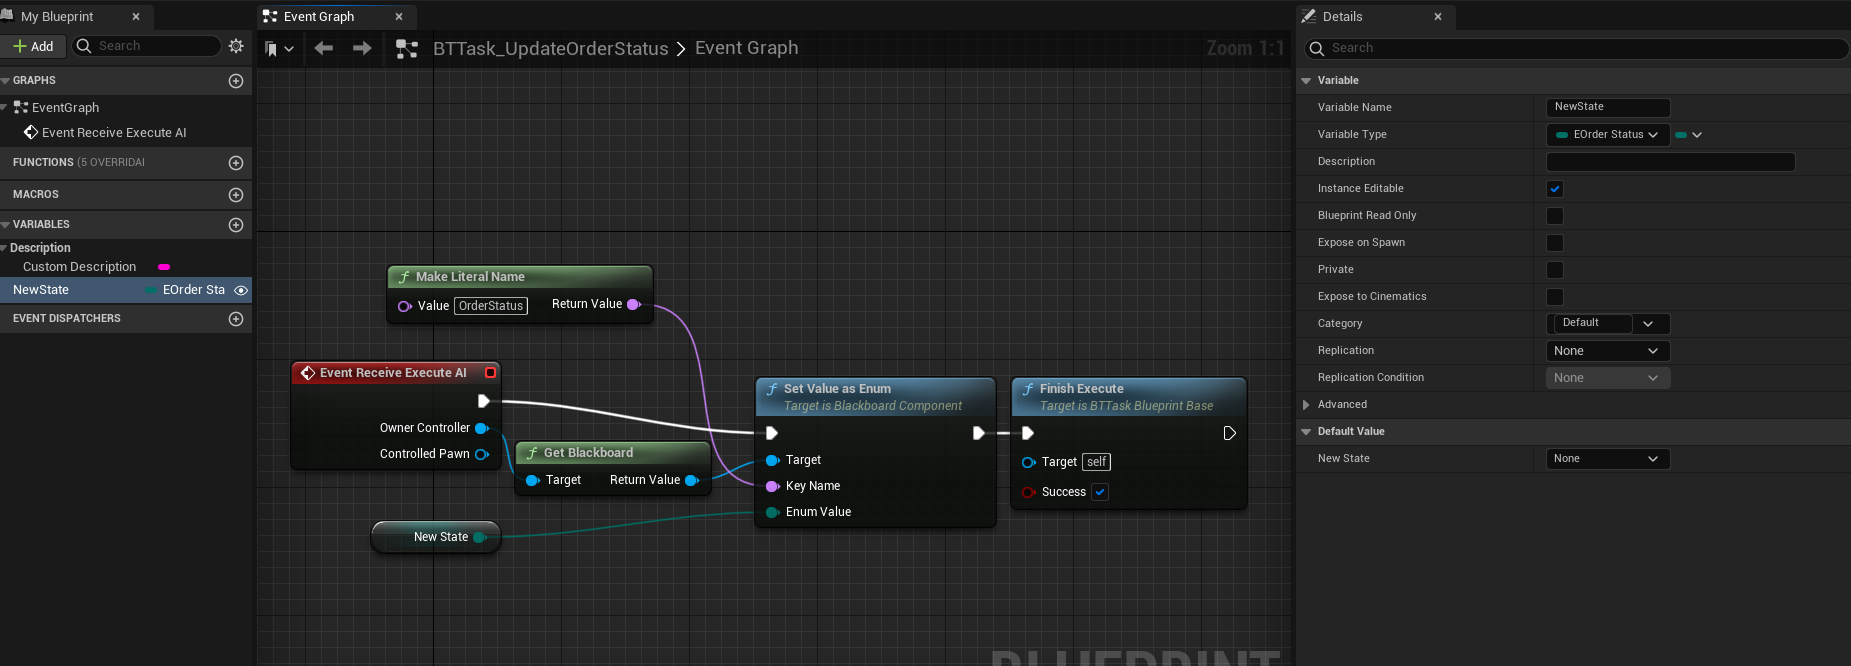
This sequence is going to call for 2 new tasks:
- BBTask_UpdateOrderStatus: This task will update the OrderStatus on the BlackBoard only. It will receive a NewState set to None as a parameter on this sequence. This will clean up the OrderStatus before completing the sequence and avoid problems.
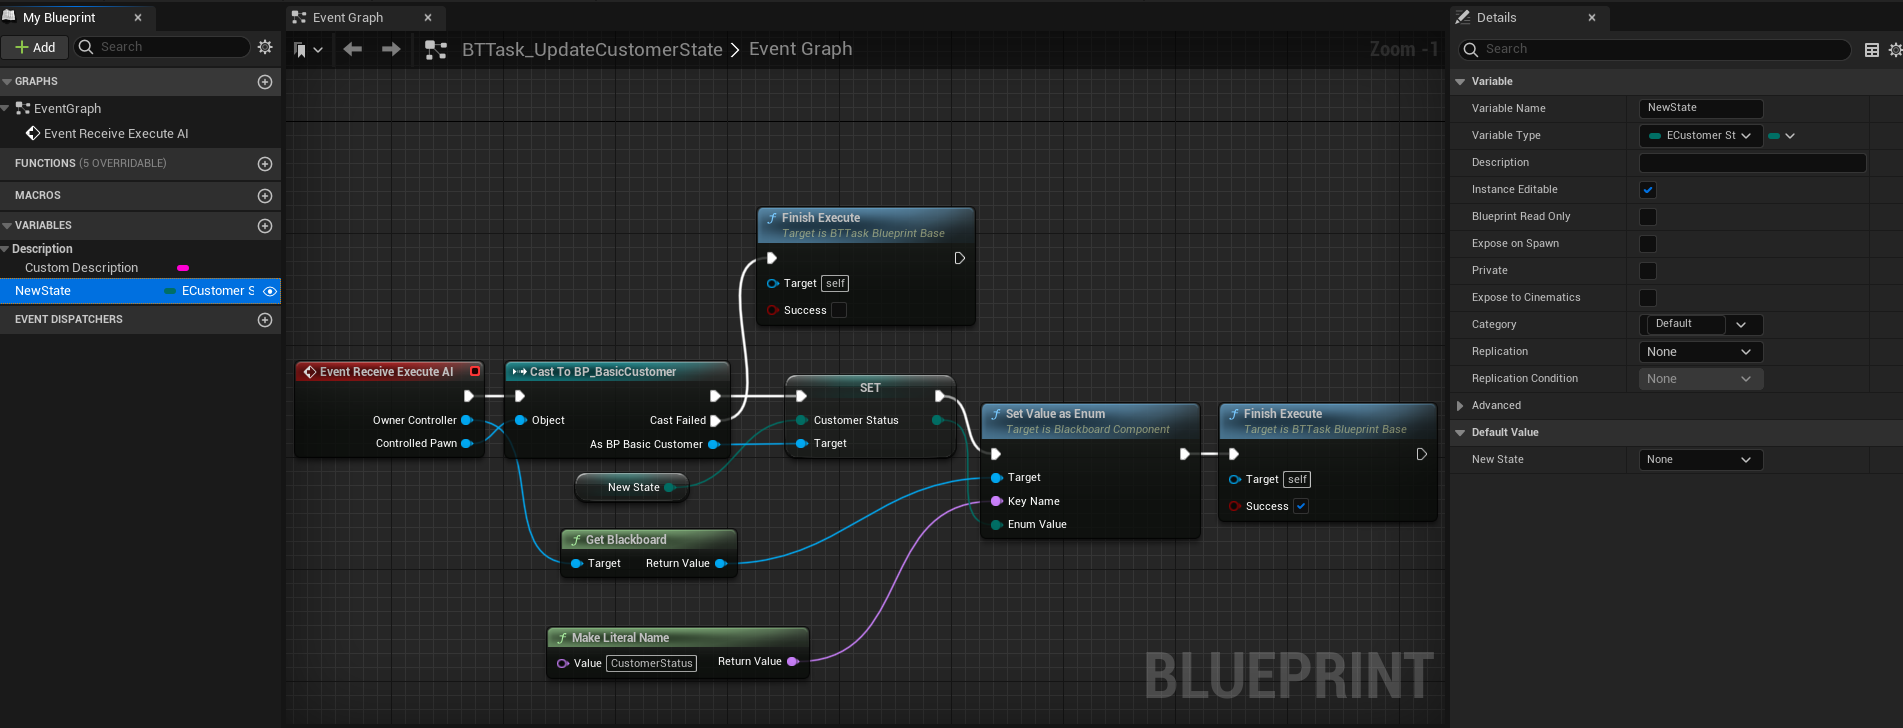
- BBTask_UpdateCustomerStatus: This task will update the CustomerStatus on the Blackboard and the Blueprint Customer. It will receive the new State as a parameter, set to StandBy on this sequence, so the customer will move to our previous sequence after completing this one.
We add the node MoveTo StartLocation on this sequence so we can send the customers to the started location (outside the coffee shop)
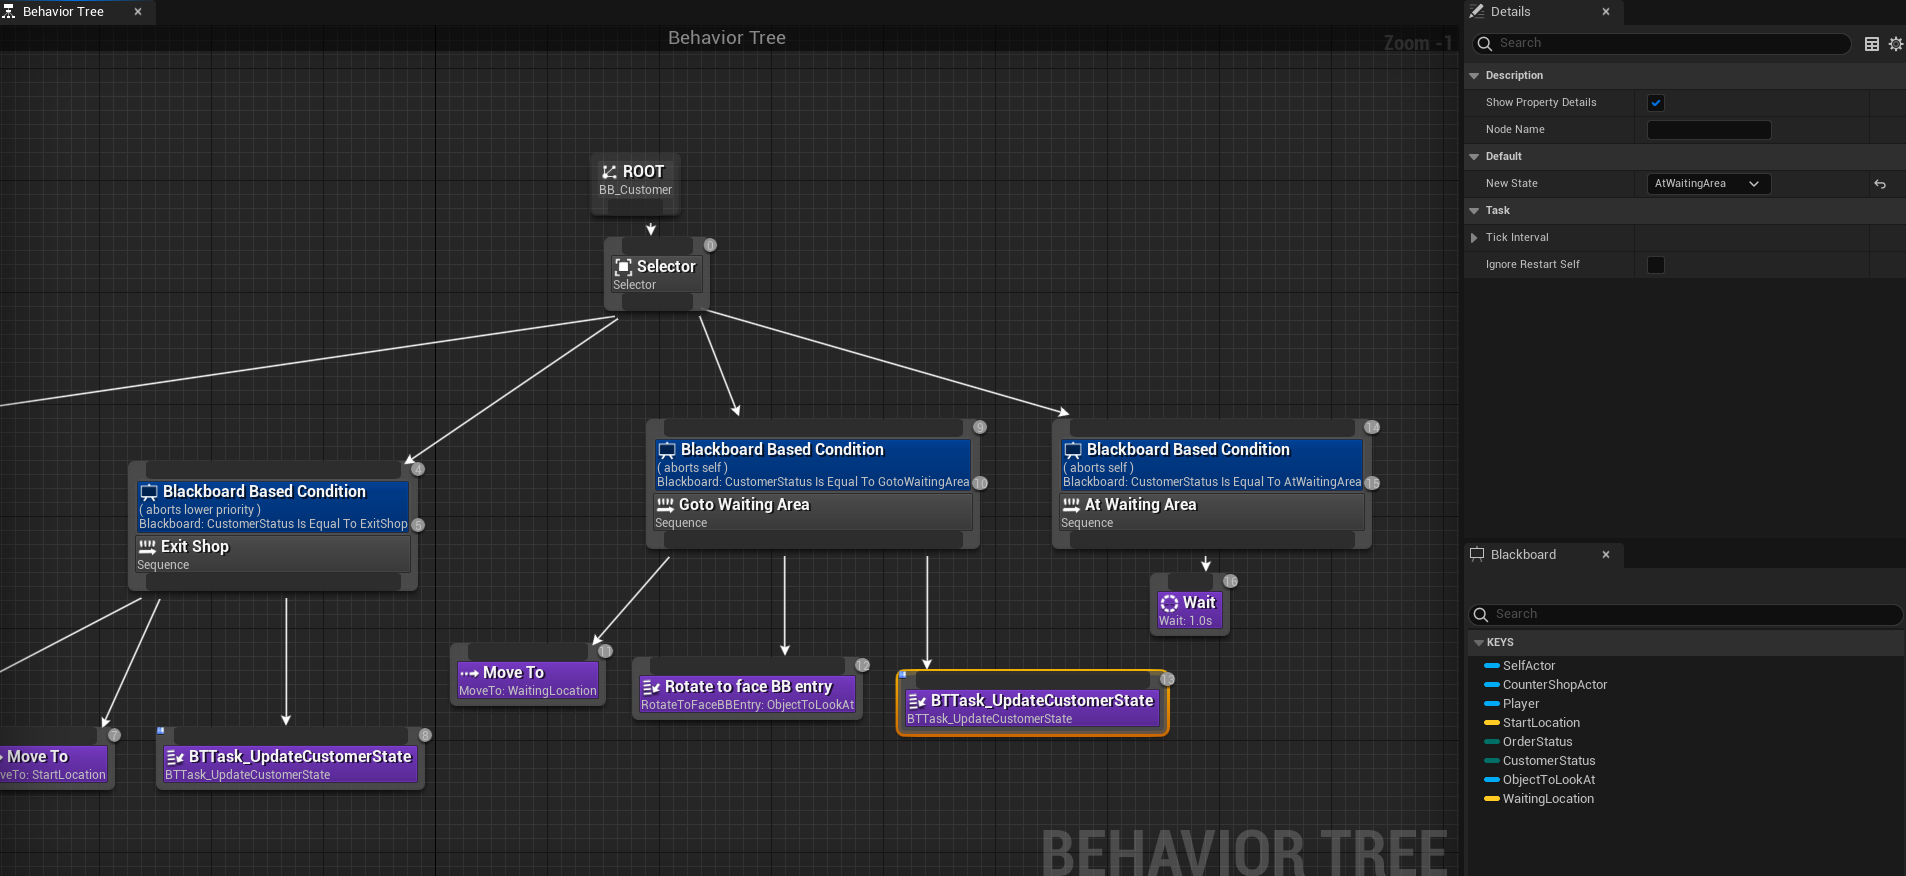
The CustomerStatus GotoWaitingArea CustomerStatus AtWaitingArea Sequences
These 2 sequences are straightforward; they also use the Blackboard decorator set to GotoWaitingArea and AtWaitingArea.
They both go on the right side of the ExitShop Sequence.
The GotoWaitingArea sequence first has the MoveTo WaitingLocation Vector, a random location we got from the ShopManager.
Then it rotates towards the ObjectToLookAt, and after that, we use the BTTask_UpdateCustomerStatet set to AWaitingArea, so the behaviour tree changes to the sequence on the right, which only have a wait.
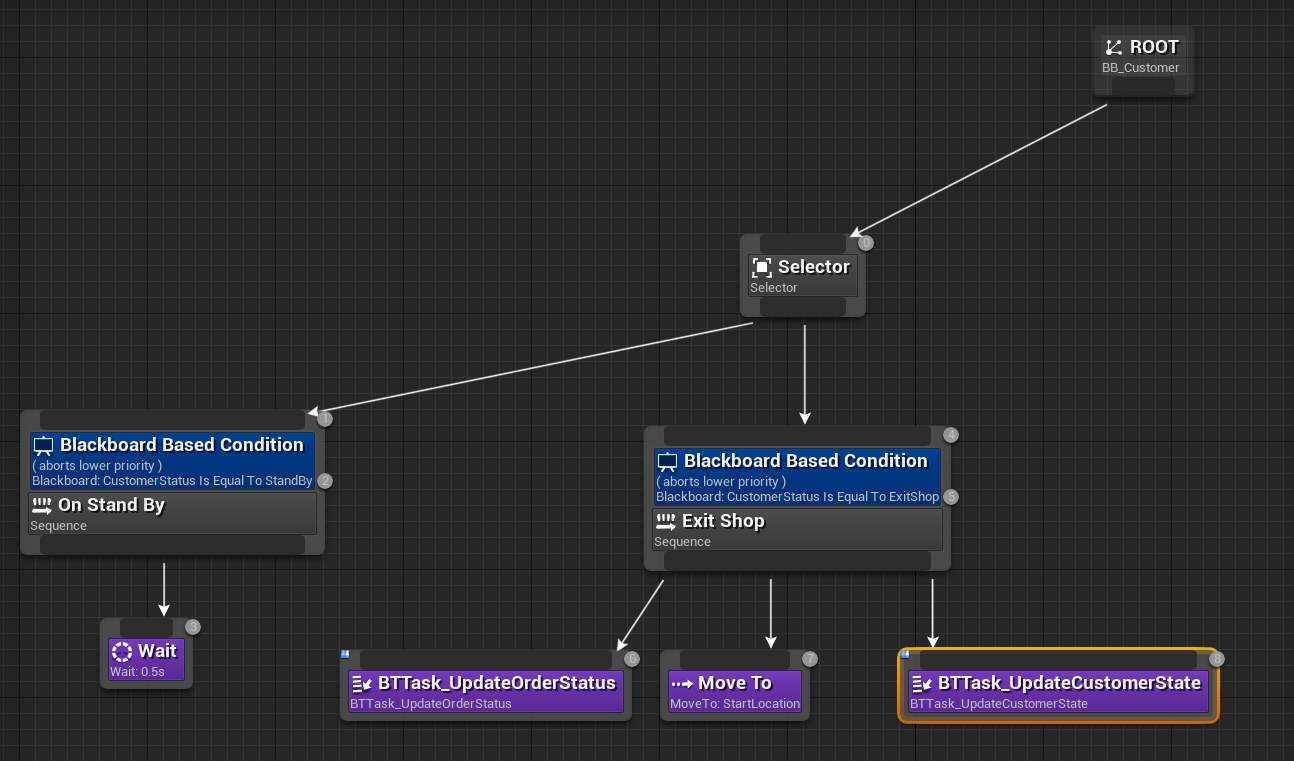
The CustomerStatus GoToCounter Sequence
This is the most complex sequence; it goes between the ExitShop and GotoWaitingArea, as you can see in the following picture:
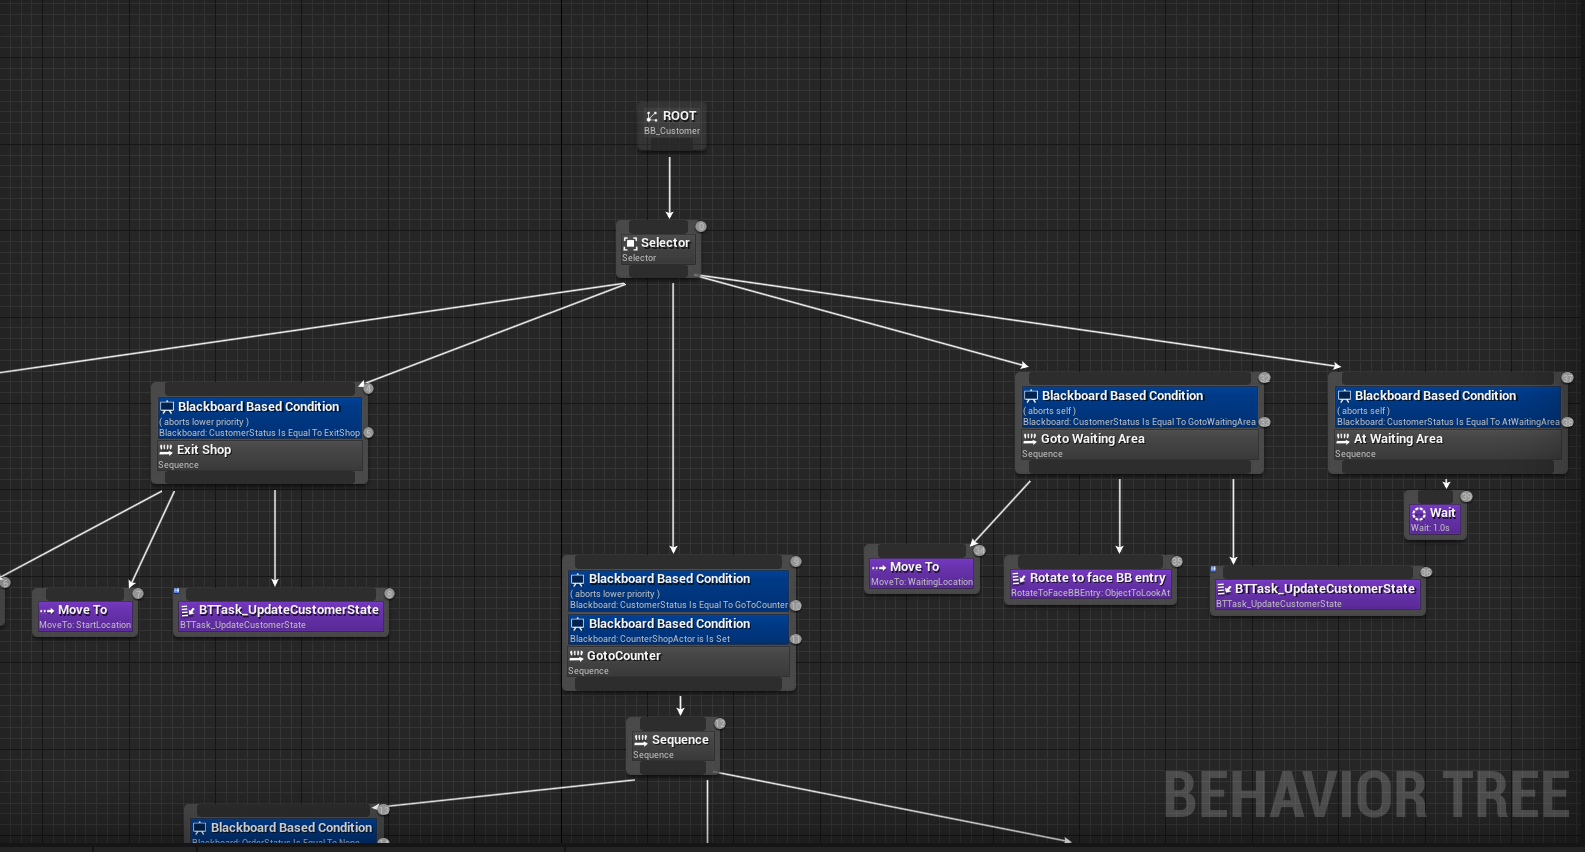
This sequence is divided into various sequences; we handle each state with the Blackboard variable OrderStatus:
OrderStatus None:
This is the part where the customer is walking toward the counter. As soon as they reach the CounterShopActor, it will face the ObjectToLookAt.
After that, we use the task BTTask_SendOrderToPlayer which will send the current order to the player. We had this node on our previous versions.
Finally, it uses the BTTask_UpdateOrderStatus set to WaitingOrder so we can change to the next step:

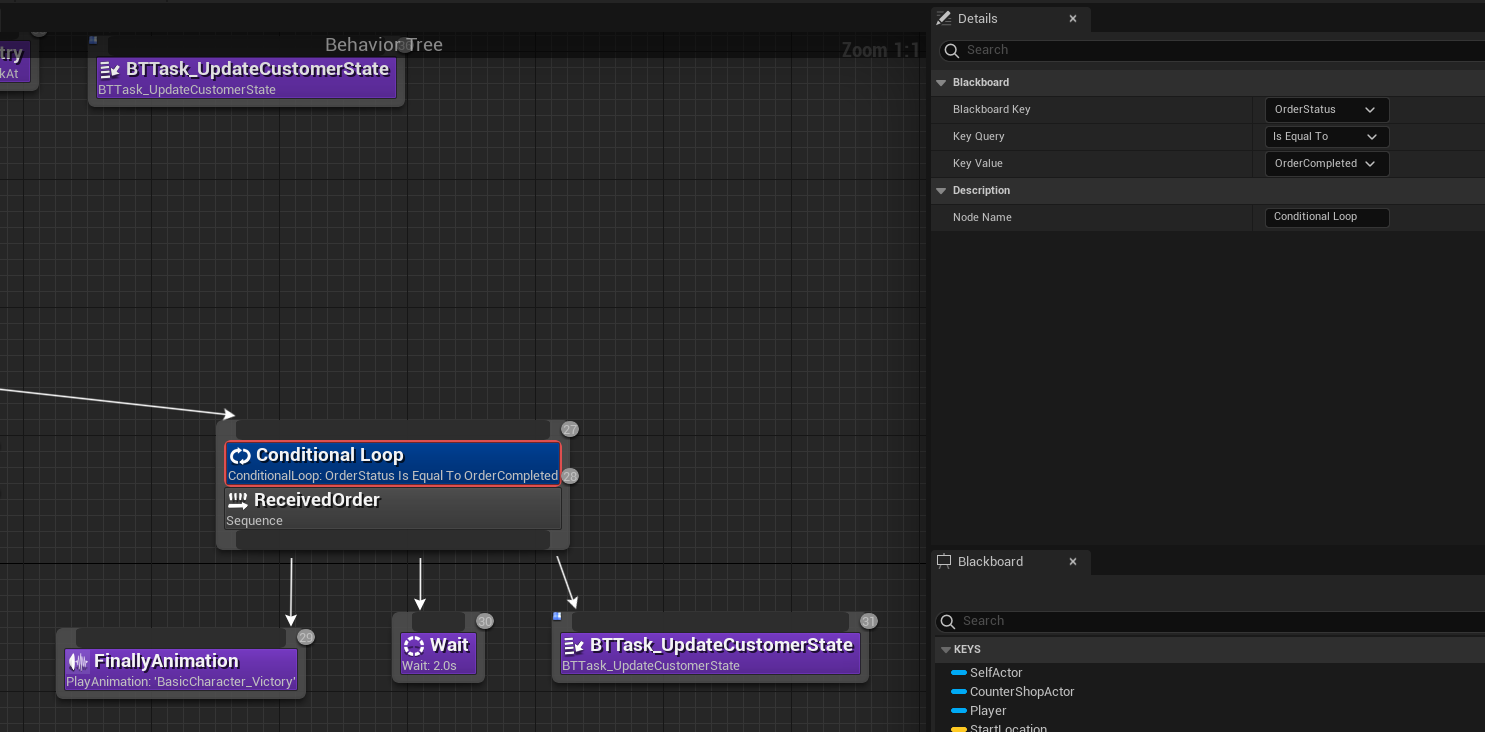
OrderStatus WaitingOrder:
This sequence uses a Conditional Loop Decorator using the OrderStatus set to WiatingOrder.
The Conditional Loop Decorator will make this sequence loop repeatedly until the OrderStatus changes or a high-priority blackboard variable like CustomerStatus changes.
This sequence shows the customer playing animation in front of the counter every 2 seconds. The customer is a bit impatient, let's be honest!

OrderStatus OrderCompleted:
This last sequence will happen if the Player fulfils the customer's order before close.
If the order is fulfilled, the OrderStatus will be changed to OrderCompleted from the Player, and it will notify this behaviour tree.
If that's the case, the customer will play a victory animation (finally, their order is ready), and after a few seconds, the BTTask_UpdateCustomerState will be updated to ExitShop, so the behaviour is sent to the ExitShop sequence, and the customer will be sent to the start location.
And that is the end of this series of tutorials! I hope you enjoyed this small project as much as I have.
Leave a comment
Log in with itch.io to leave a comment.