
Coffee Shop Simulator Tutorial in Unreal Engine 4
Coffee Shop Sim (C++ & BP) - Chapter 4 - Dispatching customer's orders and earning money!
 In this chapter, we will finish with the customer's orders logic.
Download the CoffeShopSim_Chapter4.zip file with the final result. We are using Unreal 4.27.2; make sure you use the same version, or it won't compile properly.
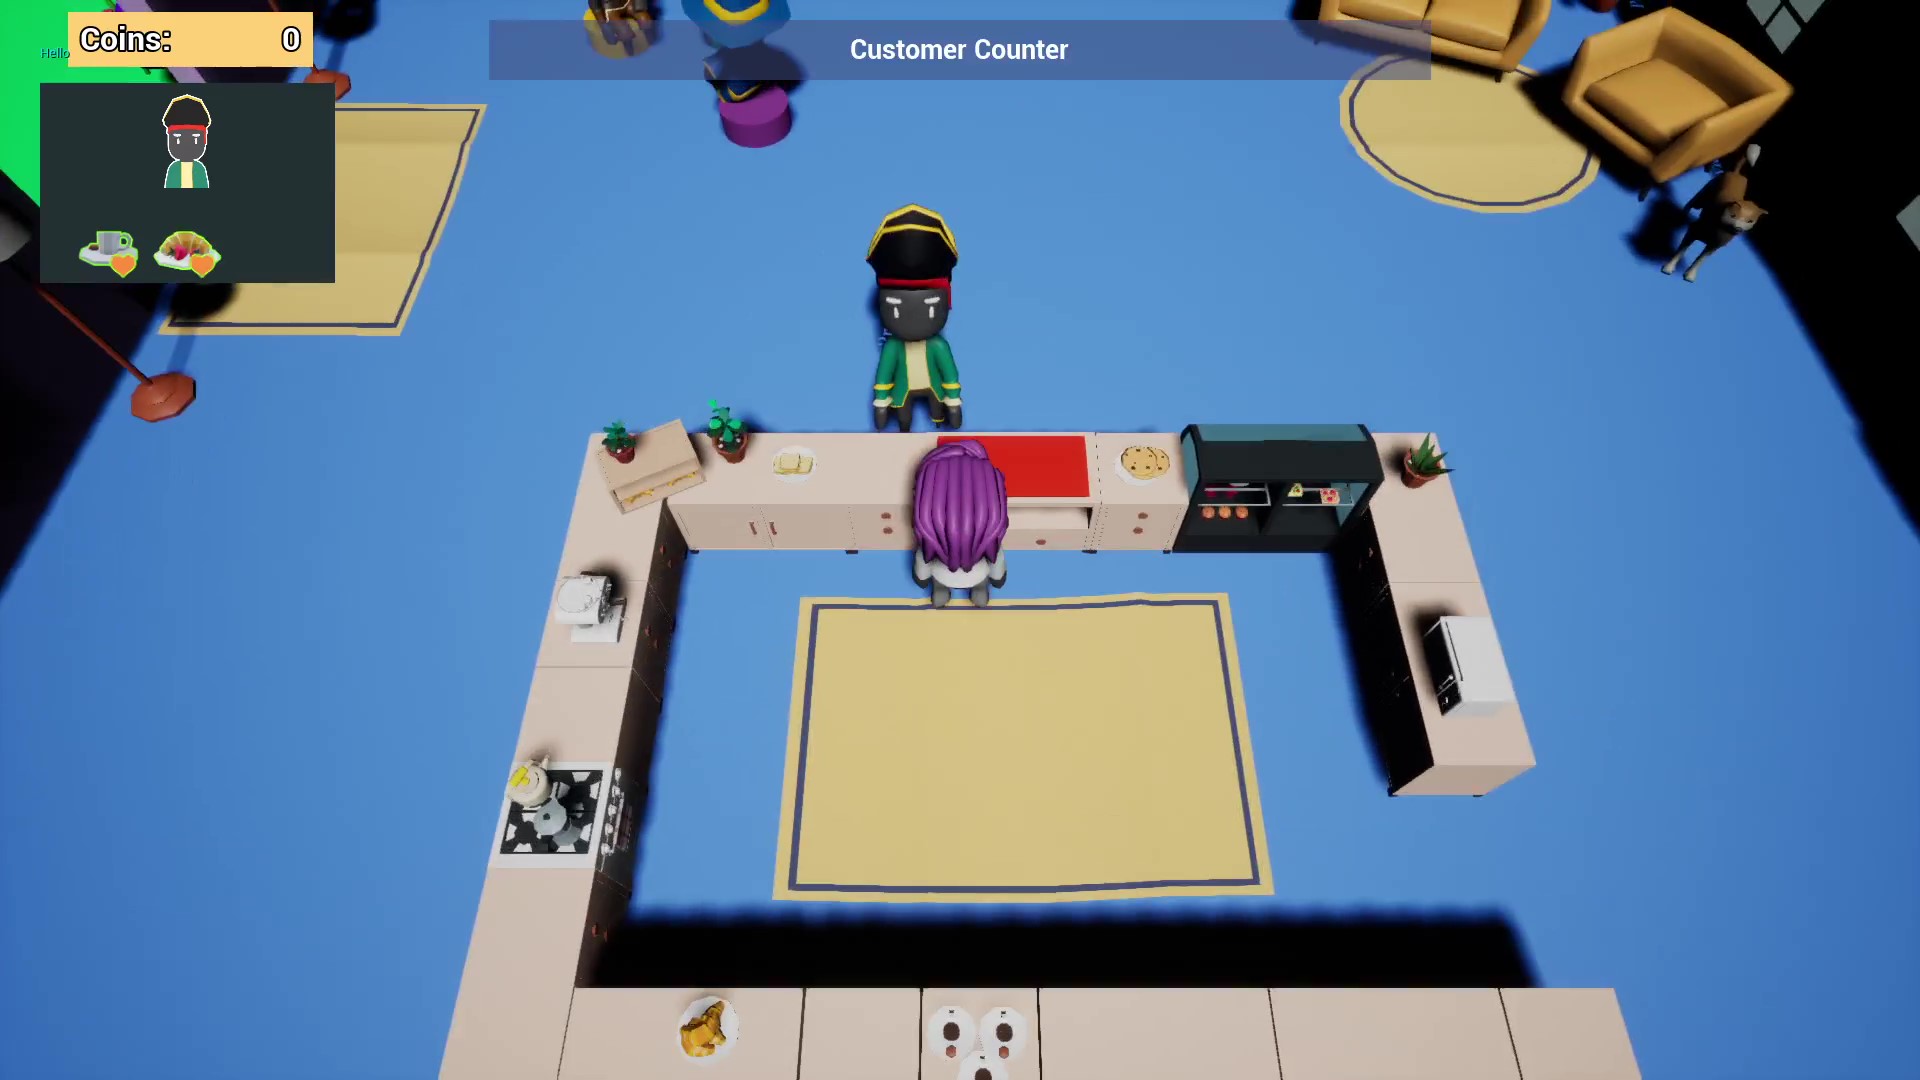
In the current game, the NPC gets to the counter, asks to be served a maximum of 3 things and waits.
The Player can pick different items and leave them on the counter.
The next steps:
- Whenever the Player leaves a new item on the counter, there is an event of detecting if it's part of the current Order
- If the Player leaves all the correct items, the Order will be dispatched, and the Player earns money
- The customer NPC will go back to their initial position.
We are going to create an actor component ShopManagerComponent, that will manage most of this logic.
This component will be attached to the GameMode, the easiest place to reach other actors.
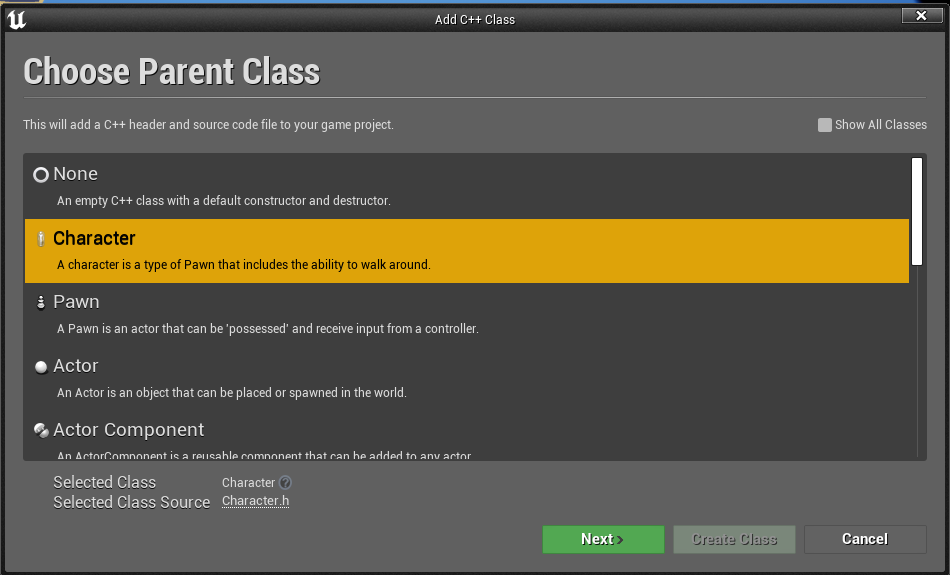
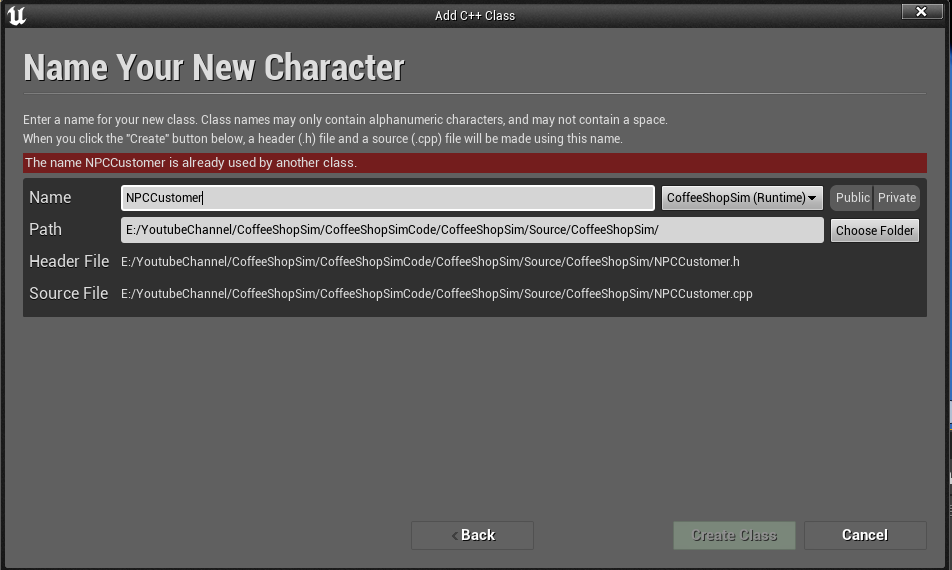
We are also going to create an NPCCustomer class. As you remember, the NPCs are characters, but we will connect a few things through C++ for that. It's worth creating the class and reparent the BasicCustomer.
Creating an NPCCustomer Character class and reparenting our current customer Blueprints
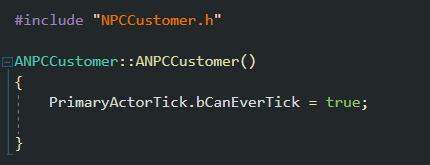
Let's start with the creation of NPCCustomer class extending from Character.
When the compiler ends, remove BeginPlay, Tick, and SetupPlayerInputComponent. We don't need any of that.
We will add the variables we had on the BP_BasicCustomer: CustomerInfo, CurrentOrder, OrderStatus.
We will also add a BlueprintImplementableEvent OnOrderCompleted(), which will be handy later when completing orders.
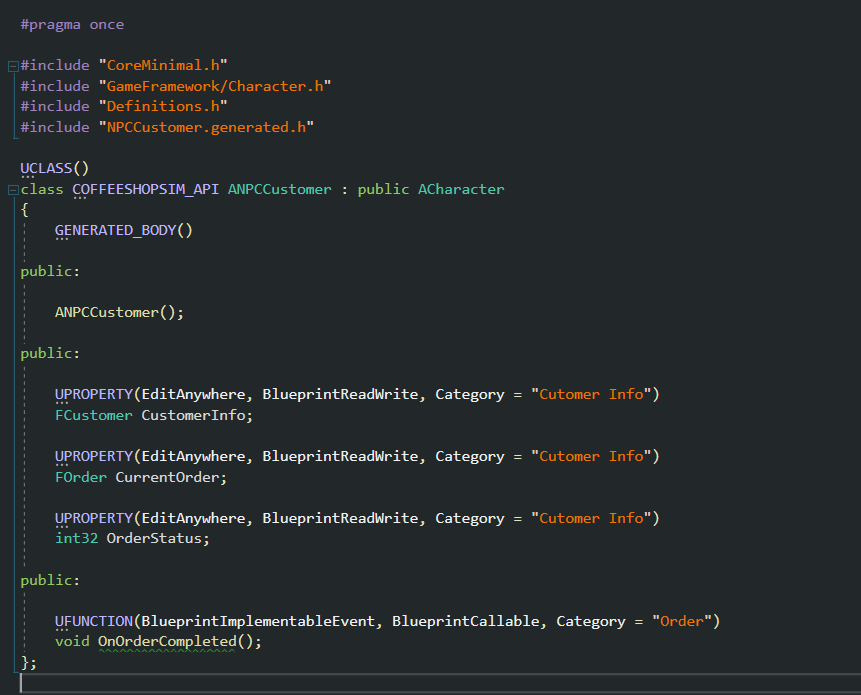
The cpp is empty, we don't anything here:
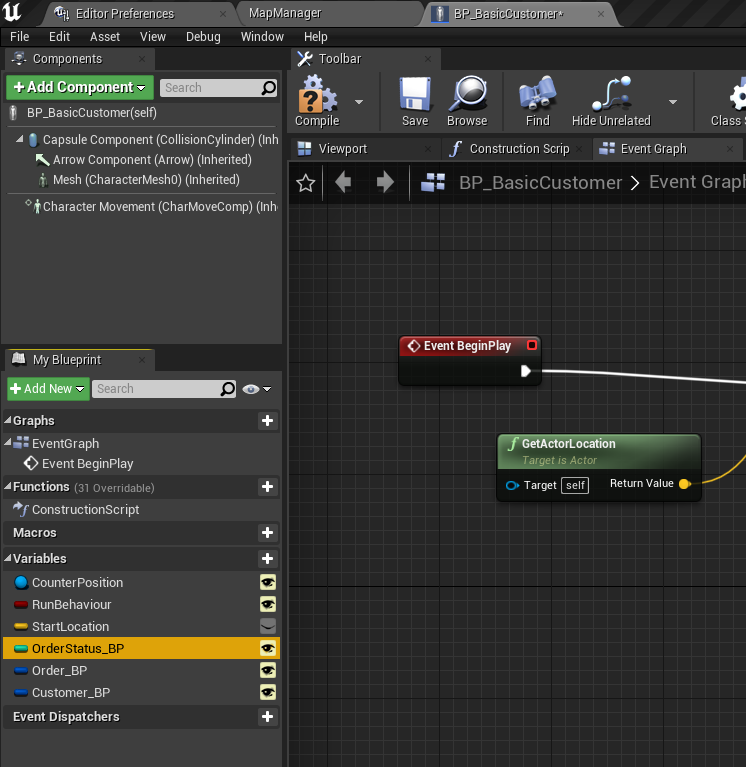
As we will reparent our current BP_BasicCustomer, the existing variables we created on BP will be overridden by the ones on the C++ class.
We will have to fix a few things:
- Setup the variables on the BP again.
- Find all the references of these variables and use the ones on C++ instead.
A little trick, you can rename the variables on BP and add _BP, so you differentiate the BP from the C++ class ones.
First, open the BP_BasicCustomer and add _BP on all of them:
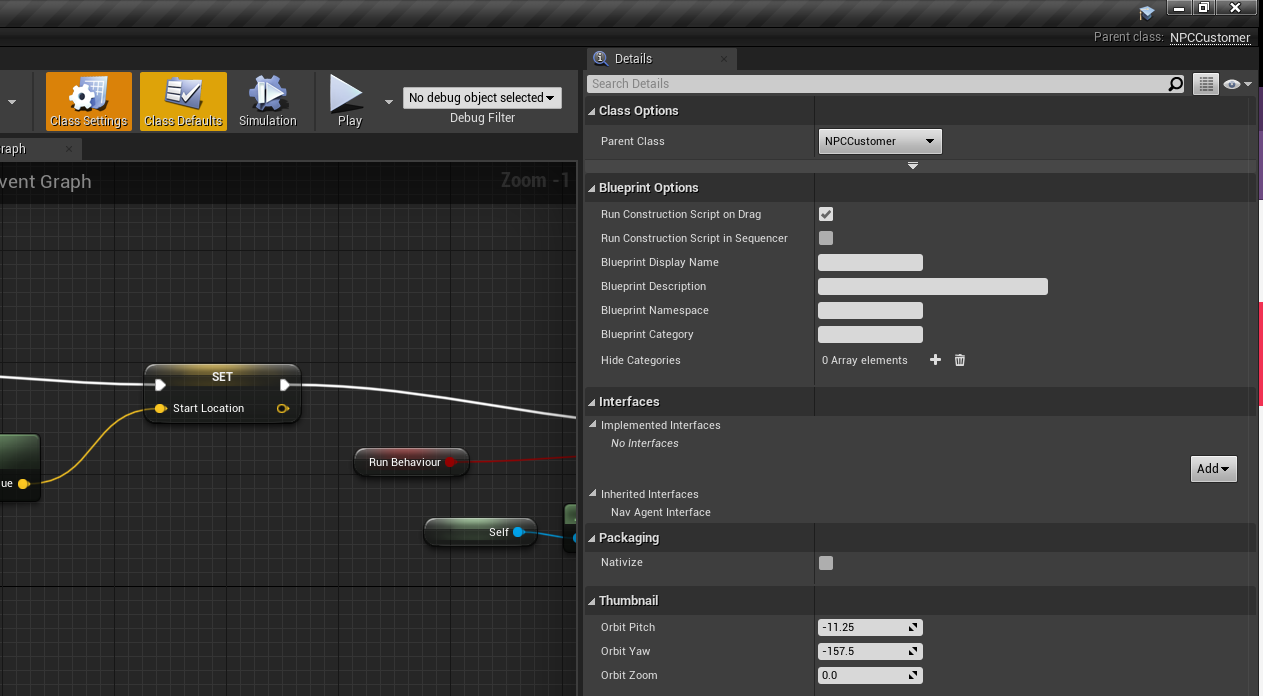
Next, click on Class Settings, on Parent Class on the Class Option, select NPCCustomer.
On the Variables panel, you should see the C++ variables and the BP ones.
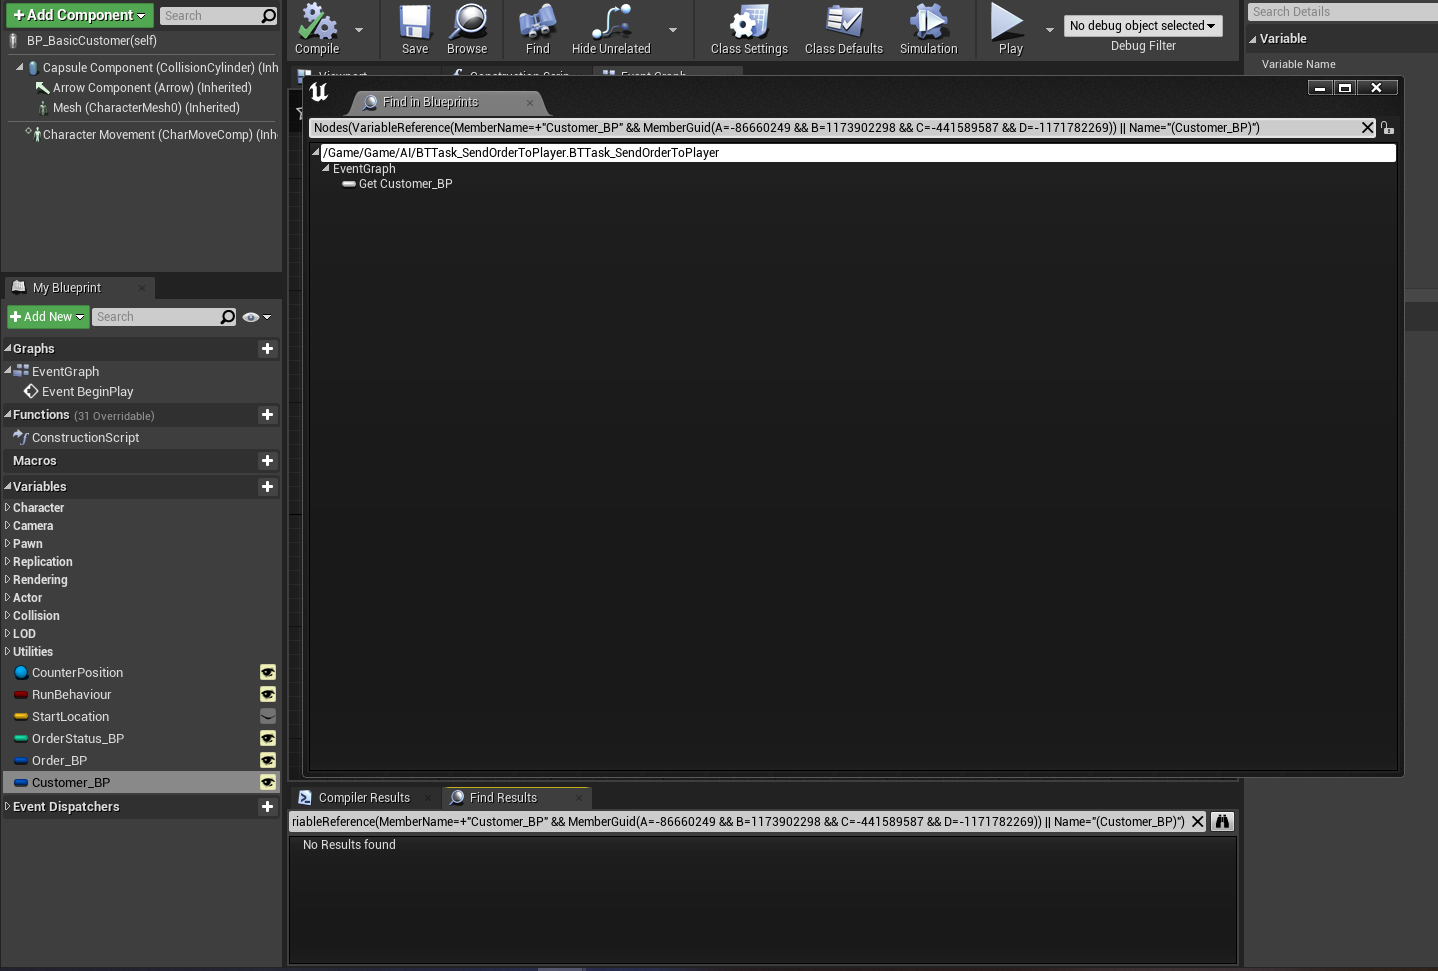
We should select each _BP variable, find all the references, and substitute them for the C++ ones.
You will find these variables on the BP_BasicCustomer Event Graph and BTTask_SendOrderToPlayer.
When you finish with them, you should configure these variables on the map.
Tip: To find all references, you can use the binoculars icon on the FindResults screen.
The ShopManagerComponent
Let's move on now to the ShopManagerComponent, this actor component will be added to the GameMode, which is a great element that can be accessed from any actor.
This manager will be connected to the player the current customer, and it will be accessible from the counter, the ADropInteractive actor we previously created to dispatch items.
Before we start populating this manager, open the CoffeeShopSimGameMode.h to add the component on the constructor:
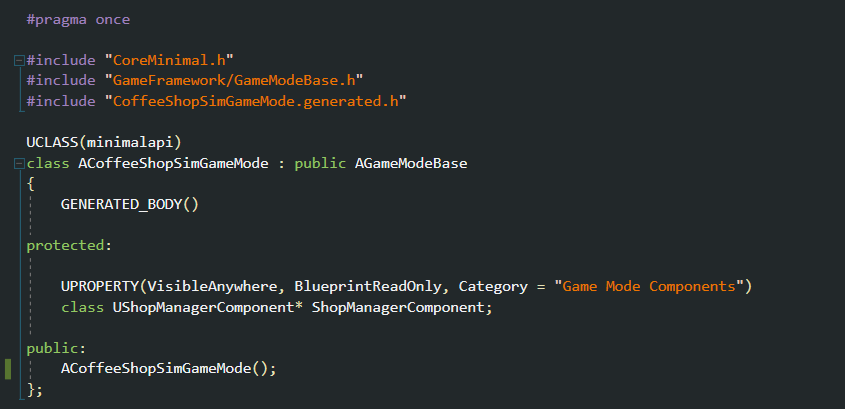
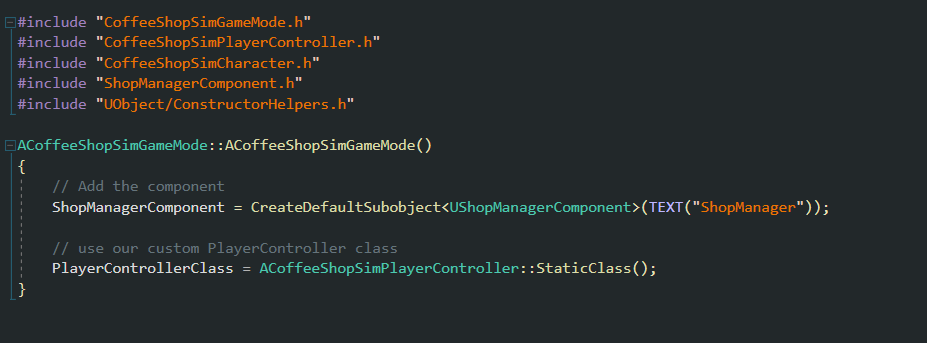
If you compile and open the BP_MainGameMode, you should see the ShopManagerComponent on the left Components panel:

Let's go back to the Component code and add a reference to the Player and the CurrentCustomer.
We can use these references to control the logic of the current order, the player and the current customer.
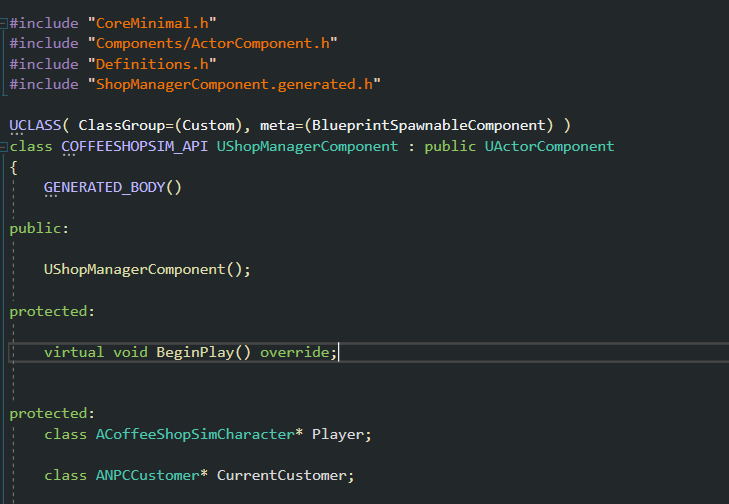
We can use these references to control the logic of the current order, the player and the current customer.
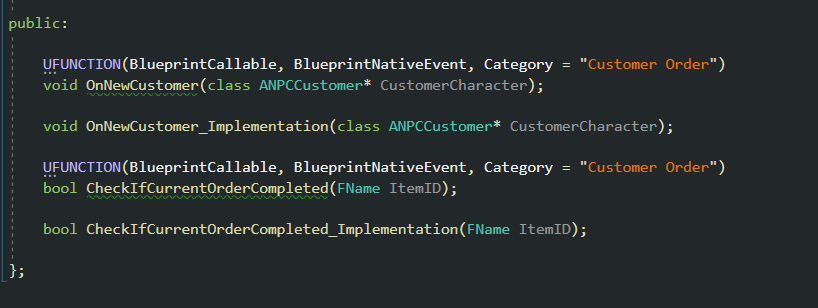
Create 2 BlueprintCallable methods, both will be called from Blueprint later on.
- OnNewCustomer: Will be called whenever a new customer reaches the counter.
- CheckIfCurrentOrderCompleted: Every time the player drops an item on the counter, will be called. This method receives an ItemID.
Open the ShopManagerComponent.cpp and initialize the Player reference on the BeginPlay with UGameplayStatics::GetPlayerController:

The OnNewCustomer_Implementation is a simply normal setter.
Before moving to the editor, add the body of CheckIfCurrentOrderCompleted, but leave it empty for now:

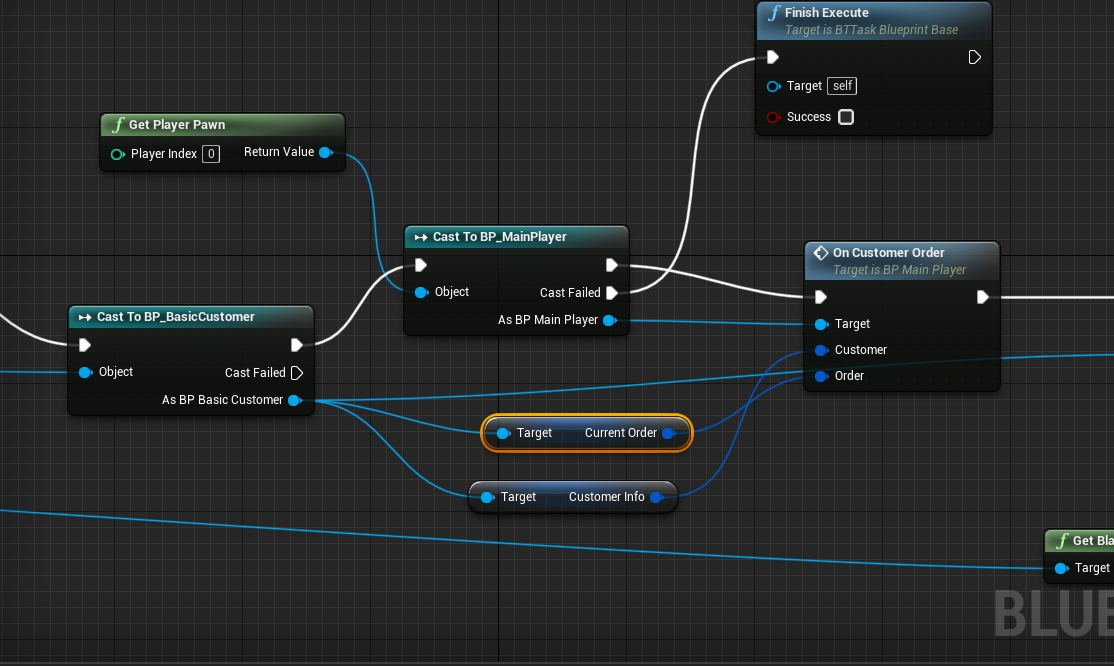
Now, we have to send a reference to this component to the current customer as soon as they reach the counter.
This logic is part of the behaviour tree of the customers.
We will create a new task to send the customer reference to the shop manager component.
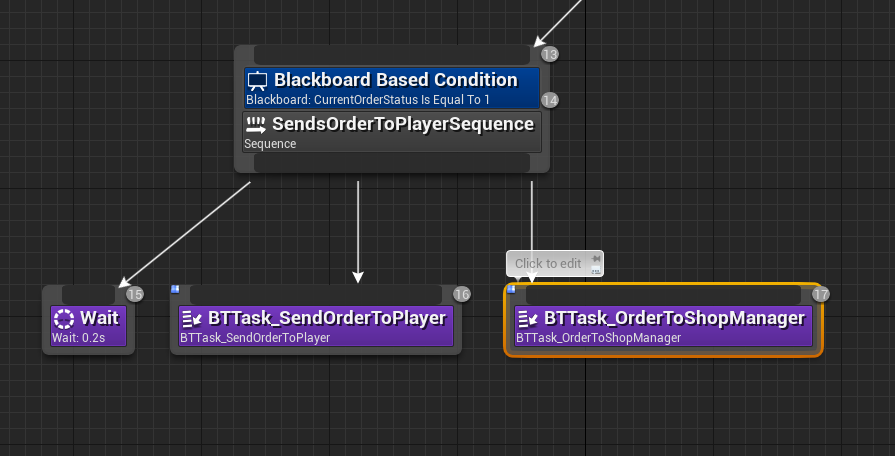
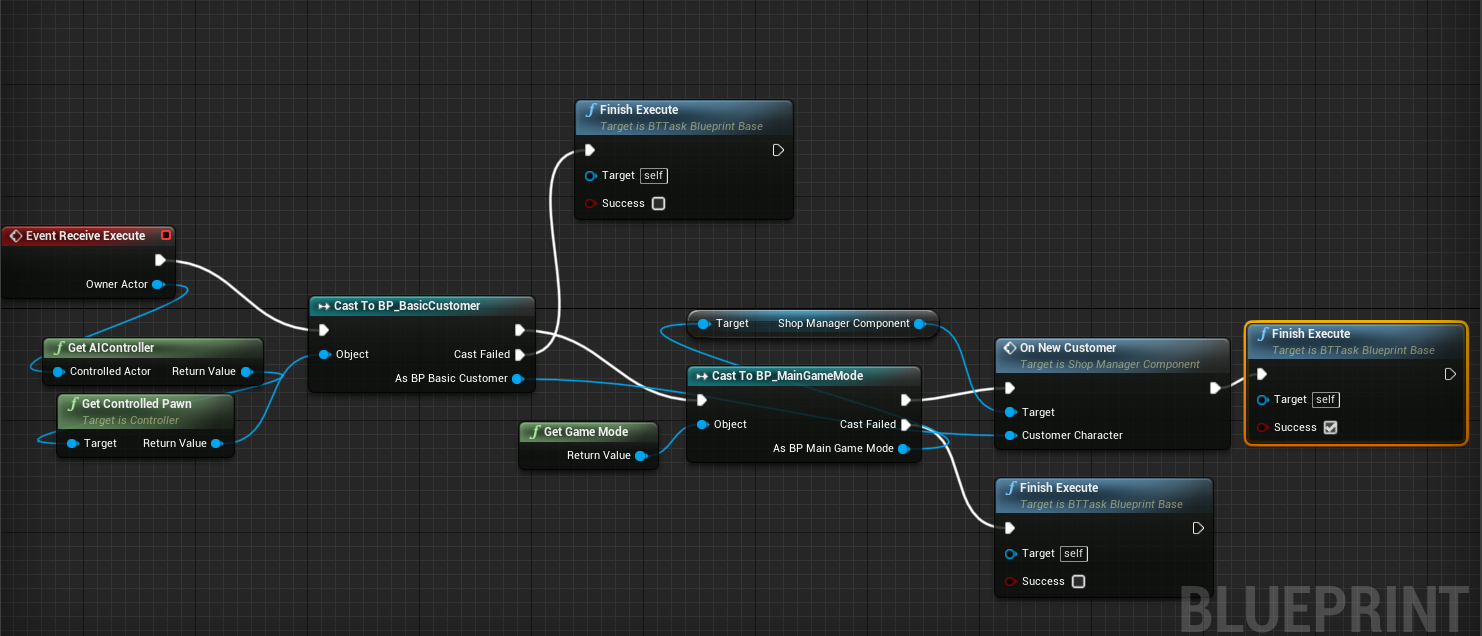
This new task is very simple. We only need to get the current game mode, cast it to BP_MainGameMode and access the ShopManagerComponent, and finally call the OnNewCustomer:
We are all set to move on to the next piece, dispatching the customer order!
Now it's time to call the function CheckIfCurrentOrderCompleted from the BP_DropItemInteractive, the counter for the customer order.
We can pick up to 3 items from different item pickups blueprints and drop them on the counter if you remember.
Every time we drop one item, the counter will spawn the correct item mesh. This is where we left off in the last chapter.
We are going to do a few actions on this step:
- Every time the player drops an item, we call CheckIfCurrentOrderCompleted
- CheckIfCurrentOrderCompleted will return true if all of the items drop are in the current customer order. It will return false if they are not.
- When the function returns true, we will destroy the spawned meshes,
CheckIfCurrentOrderCompleted, will do the rest for us:
- The player will be informed of each item dropped.
- The Customer will be informed when their order is completed and returned to their initial location.
We could improve in the future if we drop items before the Customer has reached the counter, the method won't work. There is an easy way to fix that, but I will leave you to try yourself when this tutorial is completed.
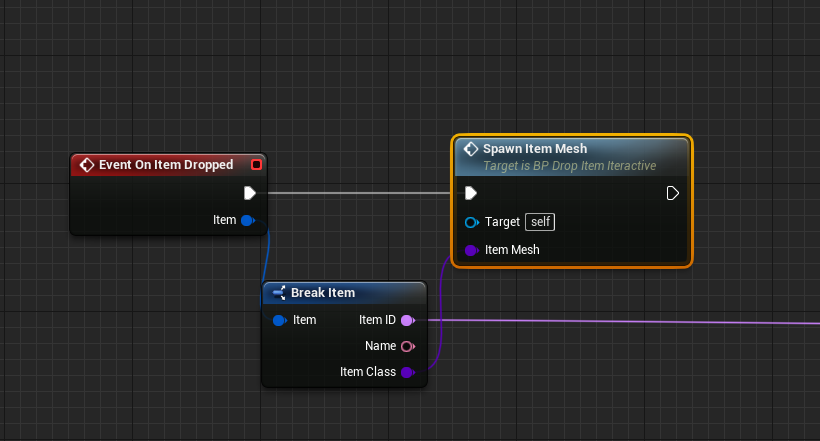
Open the BP_DropItemInteractive and find the Event On Item Dropped, which is the even we send when the player drops an item.
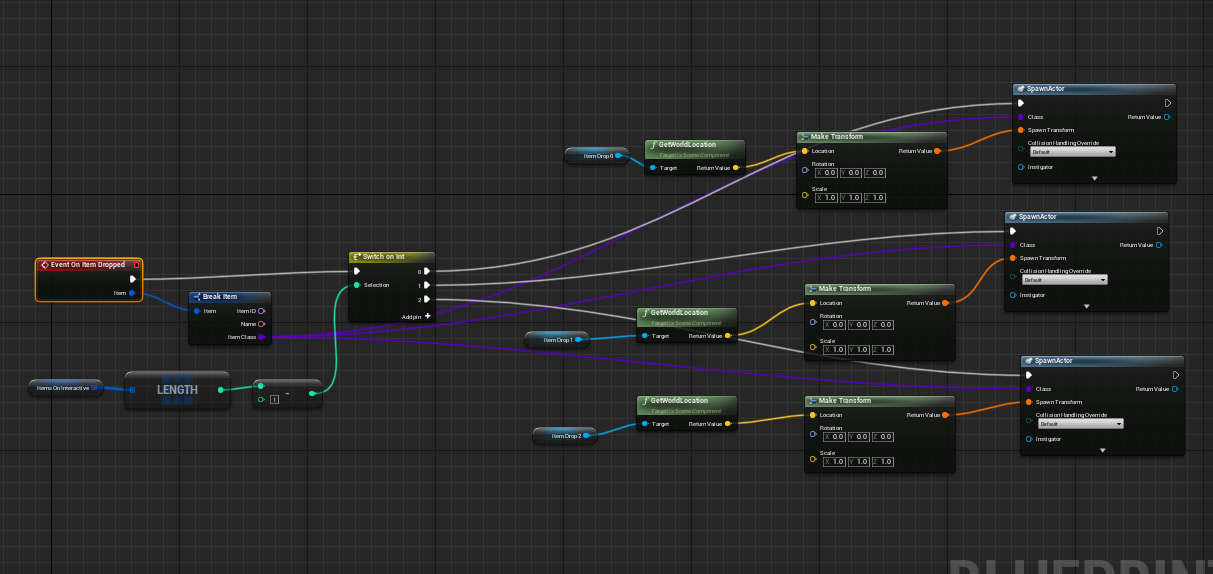
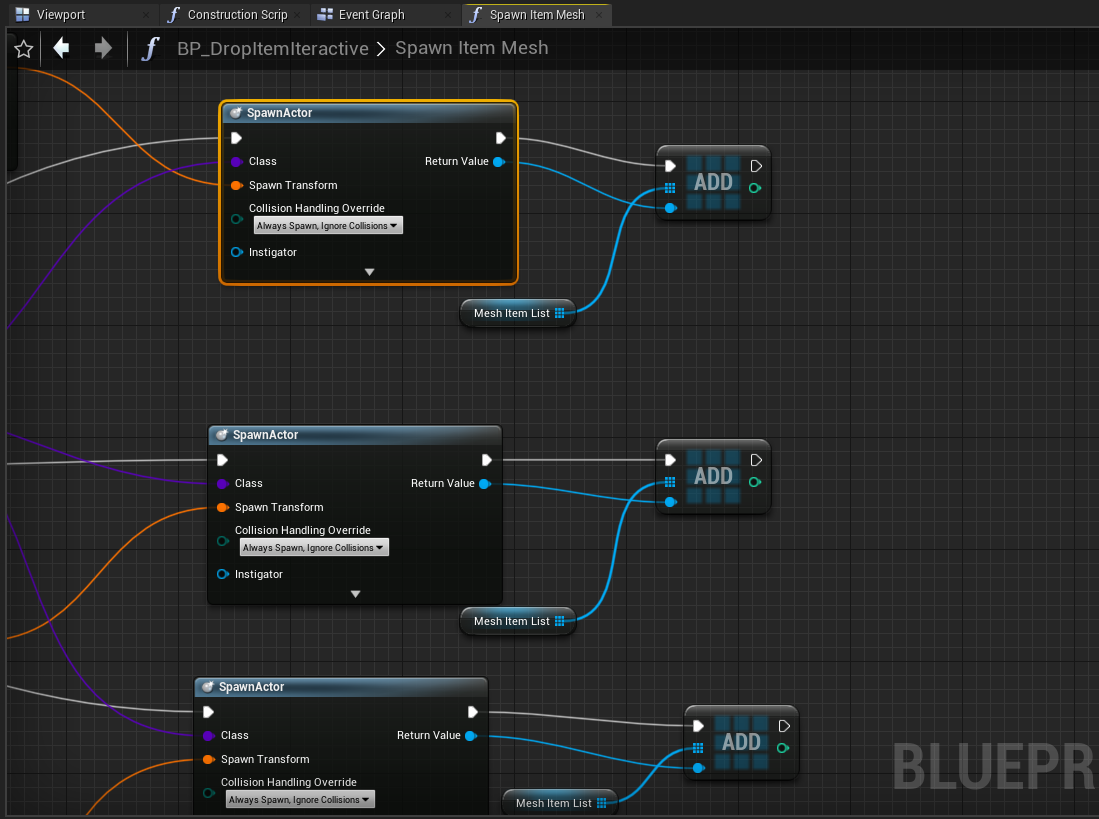
One thing to keep in mind when using Unreal is to do modules. We could wrap the mesh spawning logic inside a nice tidy function.
Select everything from the Switch statement (including the switch) and select Collapse to a Function.
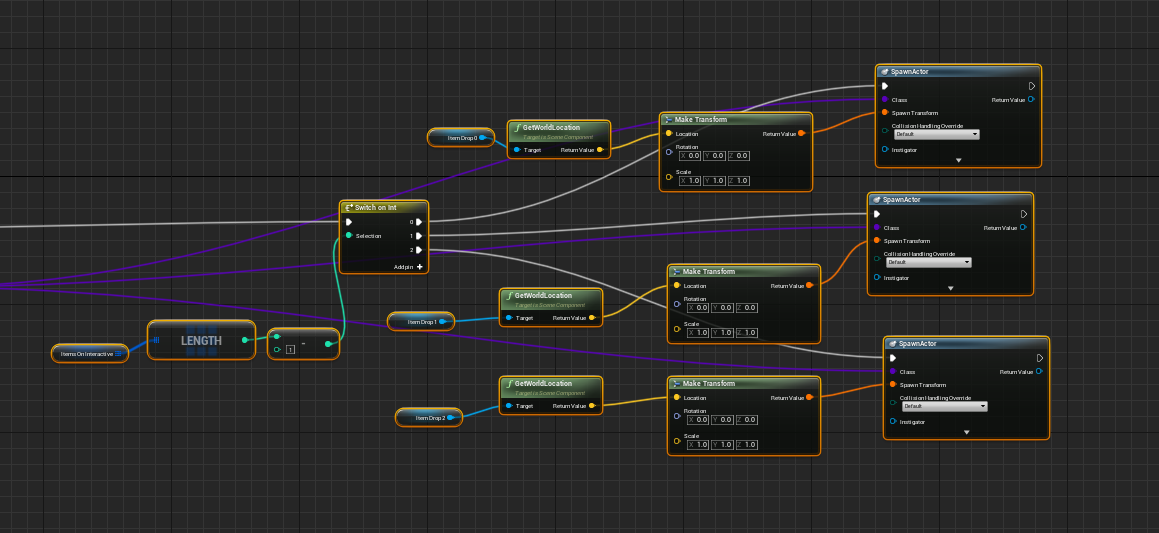
We could refactor this function more rename the function to something like SpawnItemMeshes.
We will also have one input of Class Type that will feed the Spawn Actor instead of 3.

The final result should look like this:
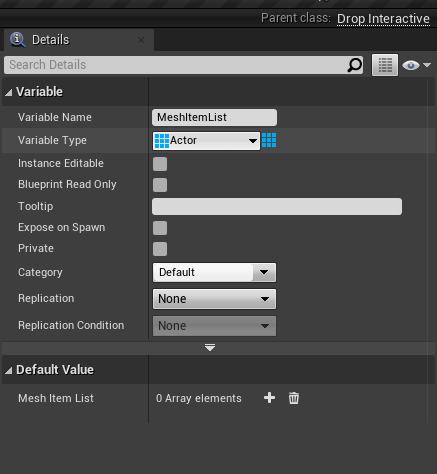
Let's create a list of actors on the BP, and add each spawned mesh on the list. We can iterate through this list to destroy each of them.
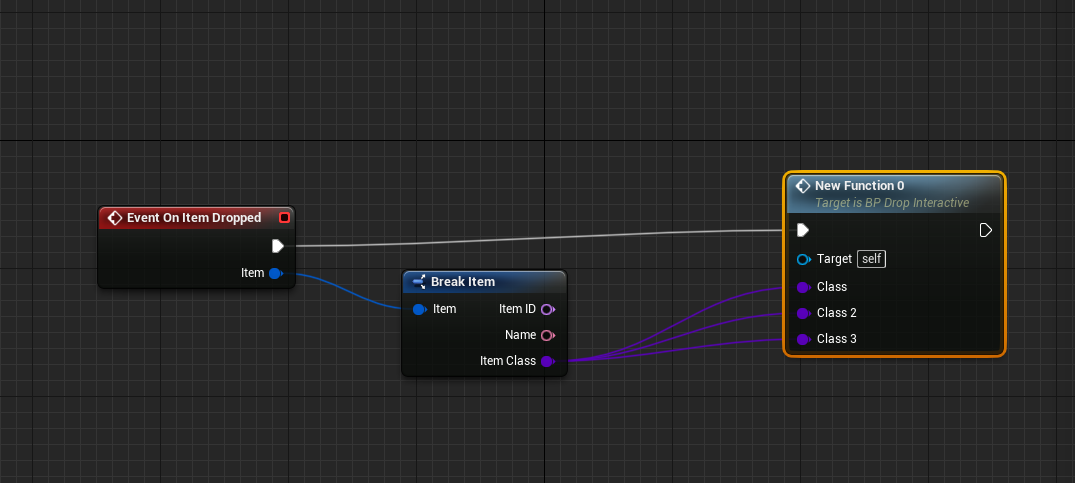
We can finally use the function CheckIfCurrentOrderCompleted and complete the rest.
Get the current game mode, cast to BP_GameMode and retrieve the ShopManagerComponet:
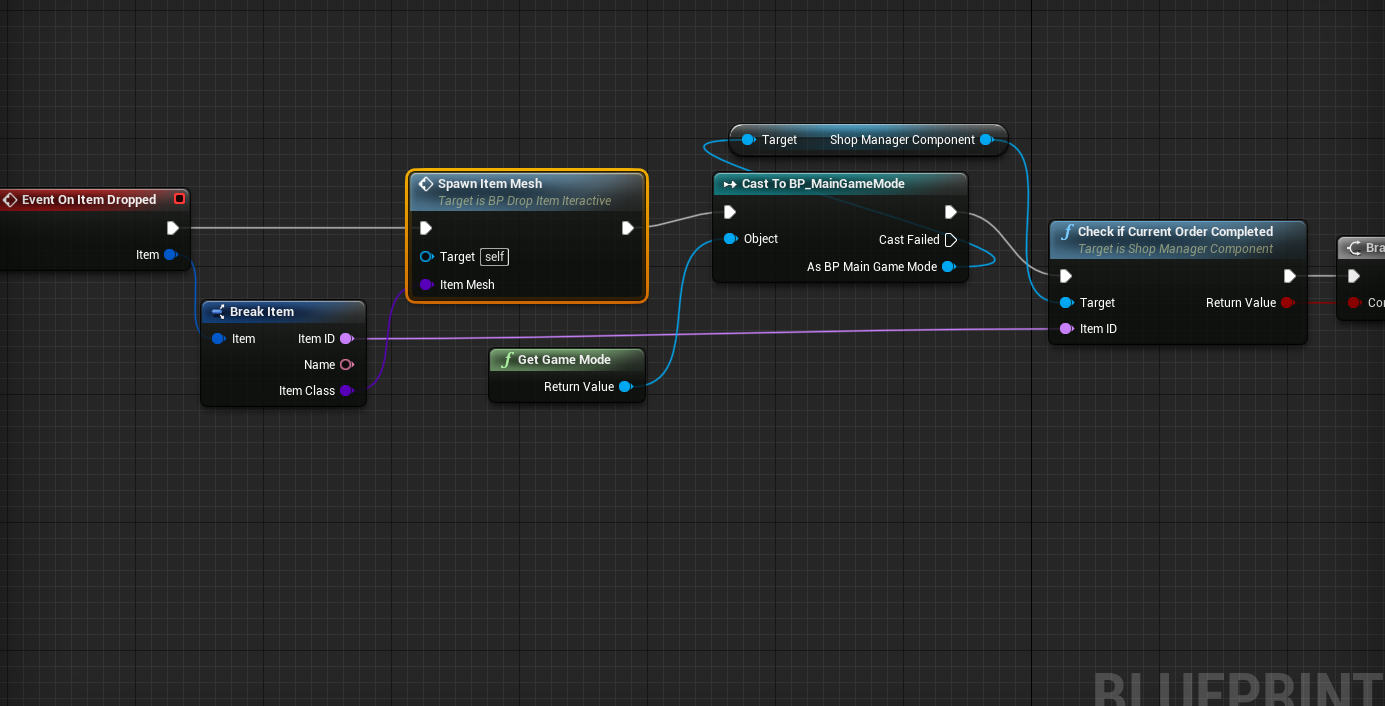
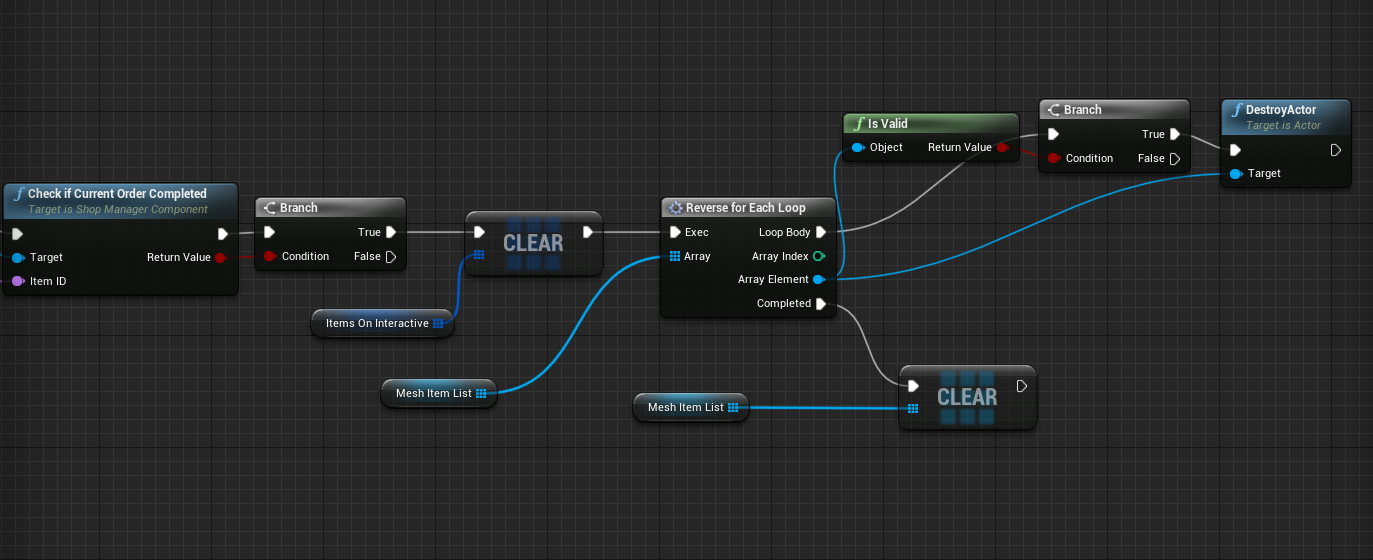
After that, pull a branch node to check if the function returns true.
If so, iterate through the list MeshItemList and destroy each actor.
When the loop is completed, clean the list so we can reuse it with the next customer.
This part is ready, and we can move on now to the CheckIfCurrentOrderCompleted Implementation and complete the customer logic!
Completing orders
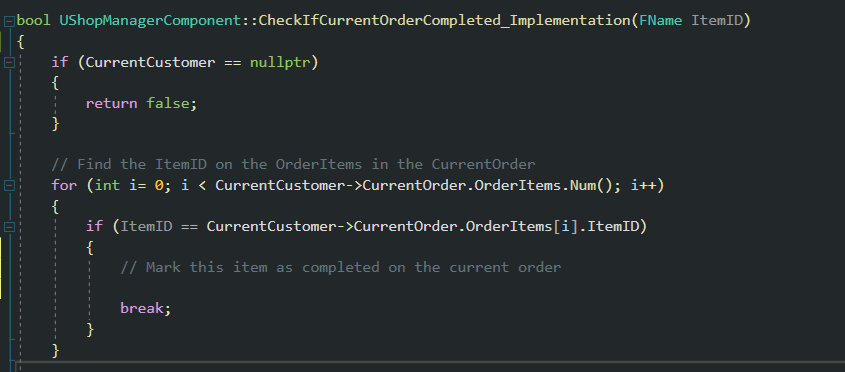
Let's go back to ShopManagerComponent.cpp to complete the implementation of CheckIfCurrentOrderCompleted.
Every time an item is dropped on the counter, this method is called passing the ItemID of the dropped item.
We also have a reference of the CurrentCustomer, and the customer contains the Current order.
With these 2 elements, all we have to do is iterate through the OrderItems and find the same item:
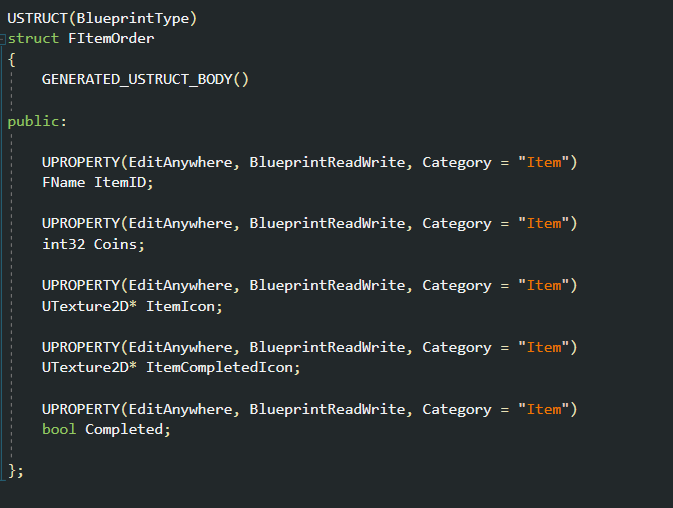
Before we continue, we are going to add a few variable members to the FItemOrder in Definitions.h.
- Coins: integer to represent the cost per item. We will use this to earn money.
- Completed: Boolean to represent if this item has been dispatched or not.
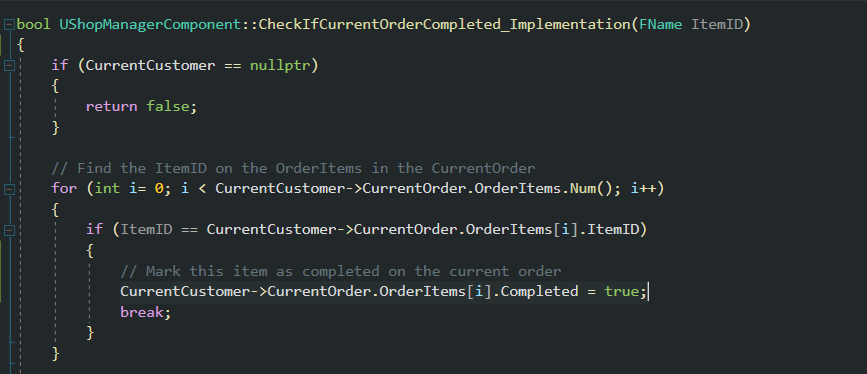
Let's go back to CheckIfCurrentOrderCompleted, and mark the found item as completed:
The next part is to check if all the items on the customer's order have been completed and get the total coins we are going to earn.
The simplest way is to iterate through all the items and check the Completed boolean variable.
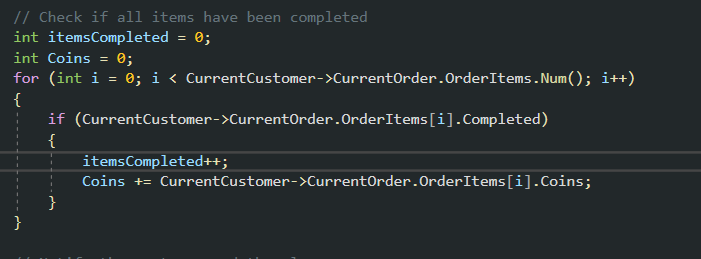
Finally, if the order is fully ready (the number of items is equal to the number of items on order), we can notify the customer and the player.
- Customer: we call the implementable event OnOrderCompleted.
- Player: We call OnOrderCompleted with the number of coins we are going to earn.
We return true when this happens, so the BP_DropInteractive will destroy the current items and clean the counter for the next customer.
We haven't implemented OnOrderCompleted on the Player Code; let's do that now.
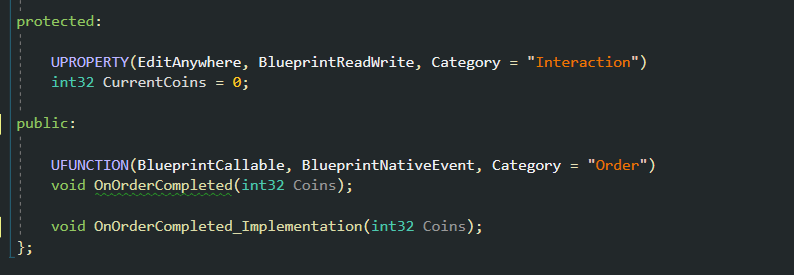
Open the CoffeeShopSimCharacter.h and add a protected CurrentCoins integer to keep track of all items.
Add the BlueprintCallable method OnOrderCompleted, where we pass the current amount of coins.
The implementation is very simple, we add the amount of coins to the CurrentCoins.

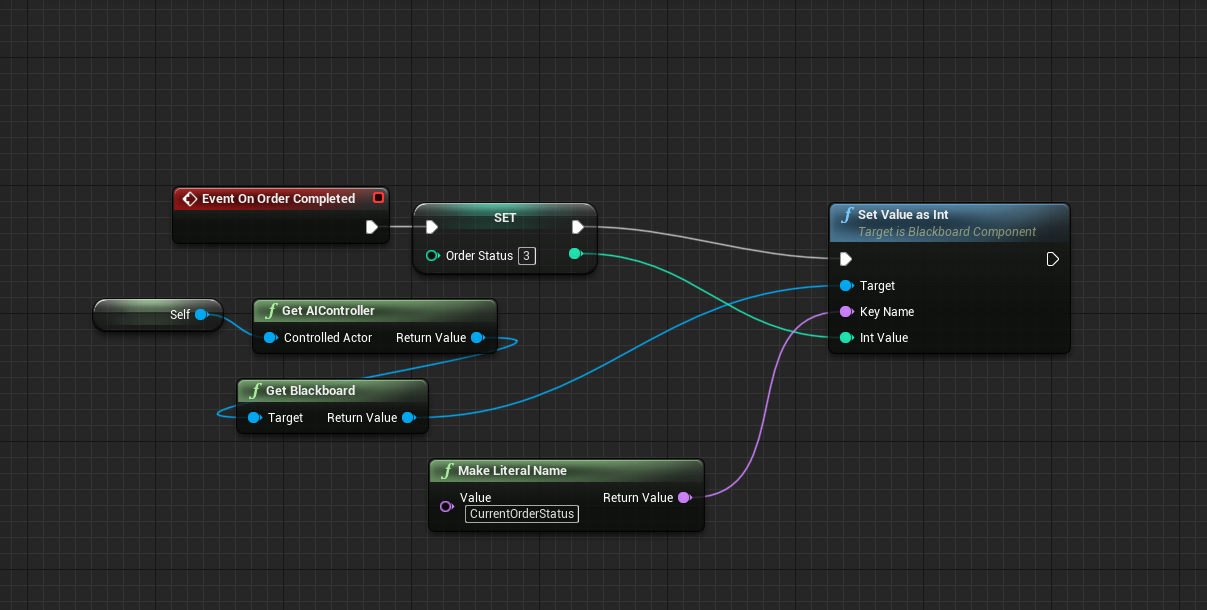
The last step is to implement the OnOrderComplete on the BP_BasicCustomer.
We want the customer to move away from the counter, happy with their order.
Our current behaviour tree is already prepared for this, so all we have to do is to set the variable CurrentOrderStatus to the value 3.
----
This chapter is completed, but we could add a few elements to make this nicer:
- Add in the Player UI to represent what items are completed
- Add in the Player UI the earned coins
- Create a Datatable for Items, with its price, icons...
- Refactor the Current Order in the NPC and use the ID only.
- If we leave items on the counter before the customer enters, the system doesn't work.
- Lock the drop interactive, so the player doesn't use it while checking items, add delays
I will leave you to add these elements with the current code we have. I might show you how to implement some of these elements in future tutorials.
* Note the CoffeeShopSim_Chapter4_Extended.zip includes some of this improvements!
Please let me know if you have any suggestions on things we could do in this project to make it better

Leave a comment
Log in with itch.io to leave a comment.