
Coffee Shop Simulator Tutorial in Unreal Engine 4
Coffee Shop Sim - Chapter 2 - Customer waits for player to complete order
In this second chapter, we are going to continue with the AI Customer.
Right now, the customer reaches the counter, plays an animation 3 times and goes back to their initial position. We will update this to make the customer wait at the counter and ask for their order.
You can download the CoffeShopSim_Chapter2.zip file to see the result. We are using Unreal 4.26.
You can follow along this chapter here:
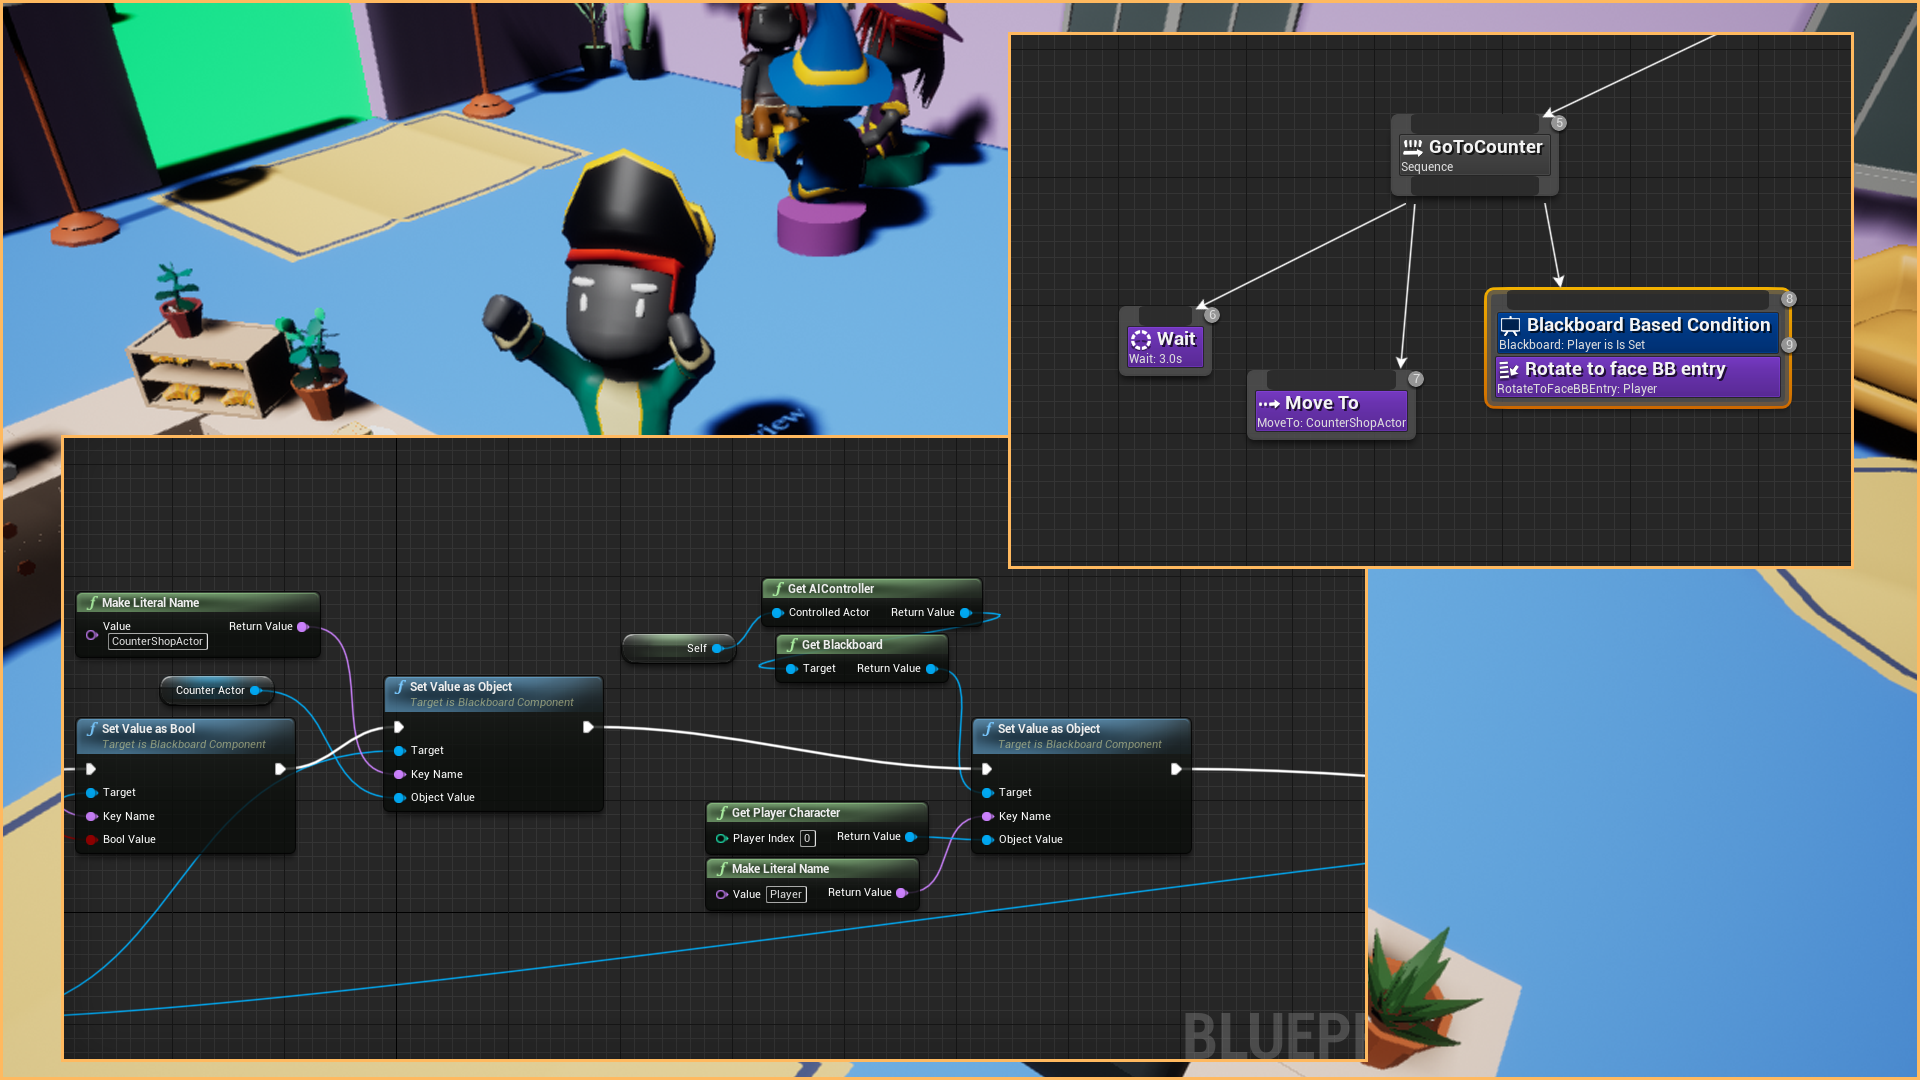
Making the AI Customer facing the player
When the customer reaches the customer, we are going to make it face the player.
We need a new blackboard Actor type key to set the player reference on the BB_Customer.
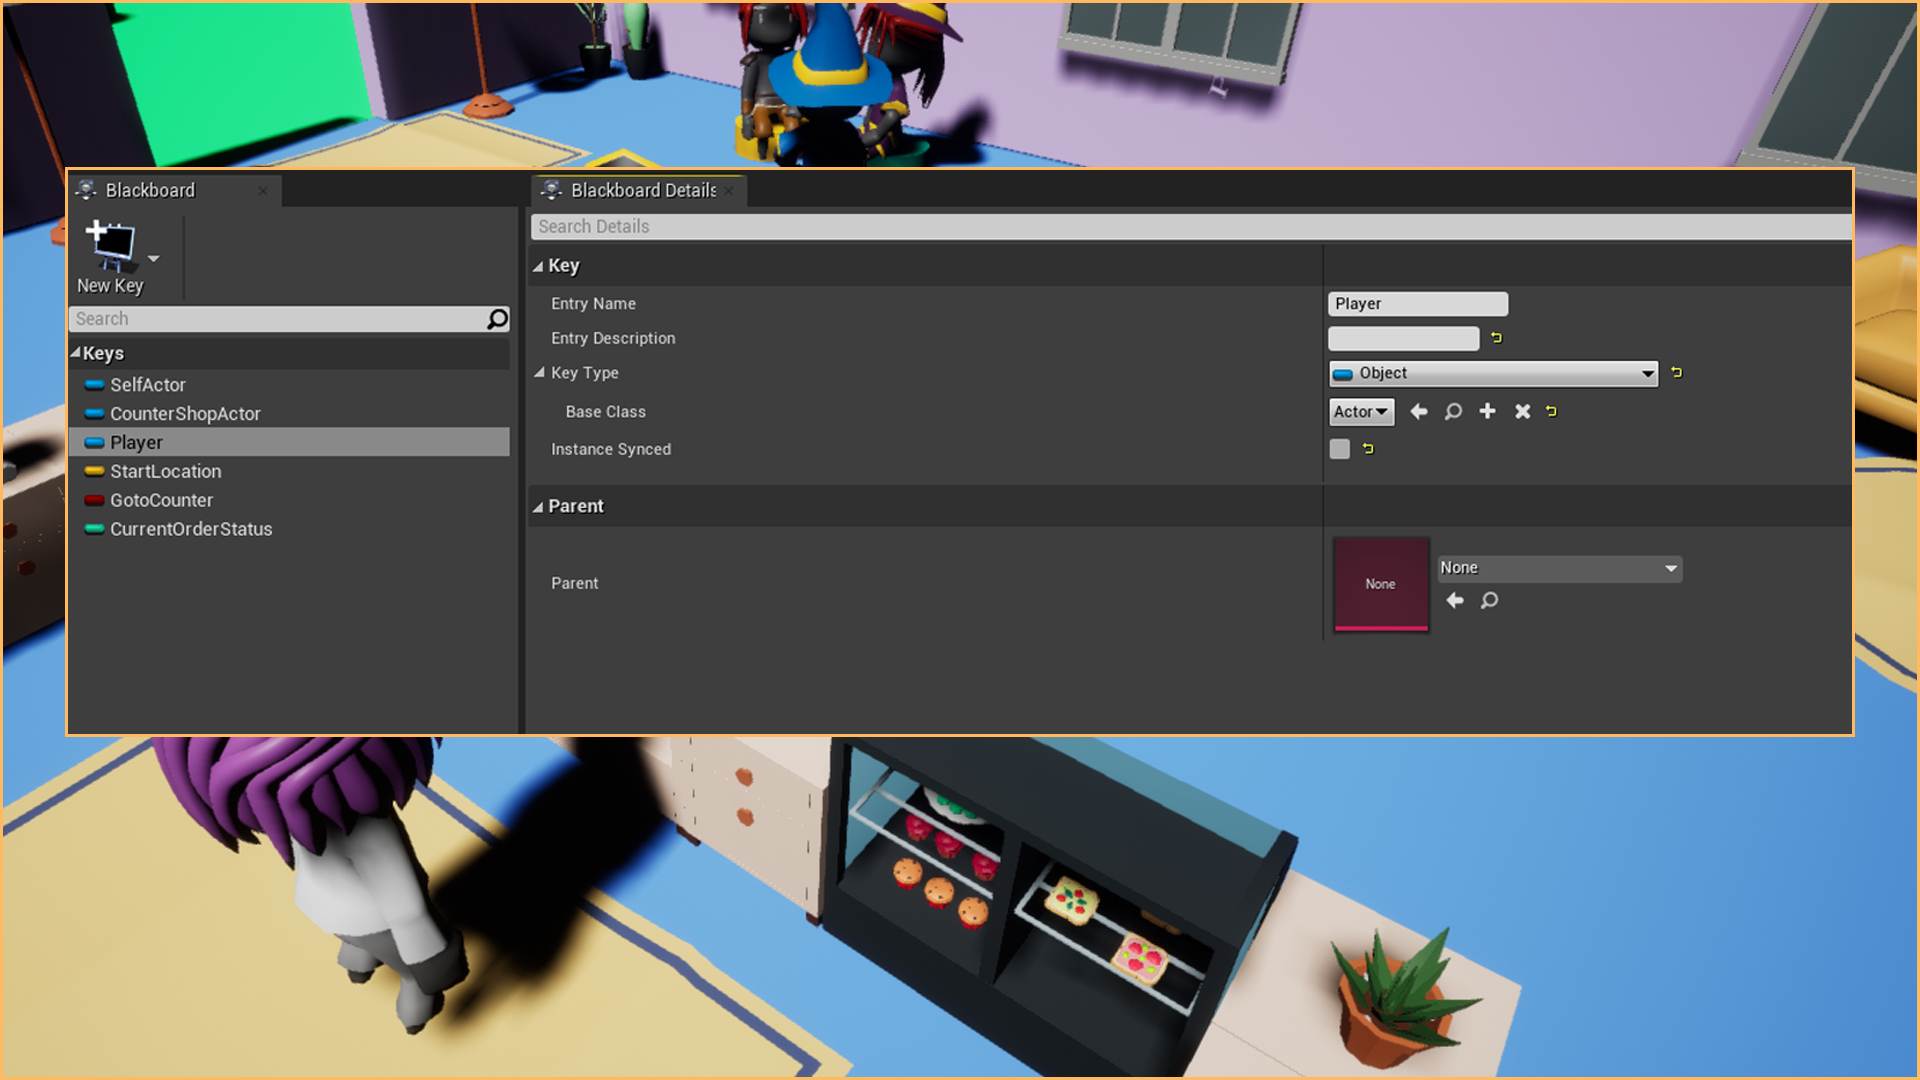
We have to set this new variable the same way we set the other ones on the BT_BasicCustomer, after we initialize the behaviour tree:
We can use this new Blackboard Key on the Behaviour tree to set the Rotate to face BB entry:
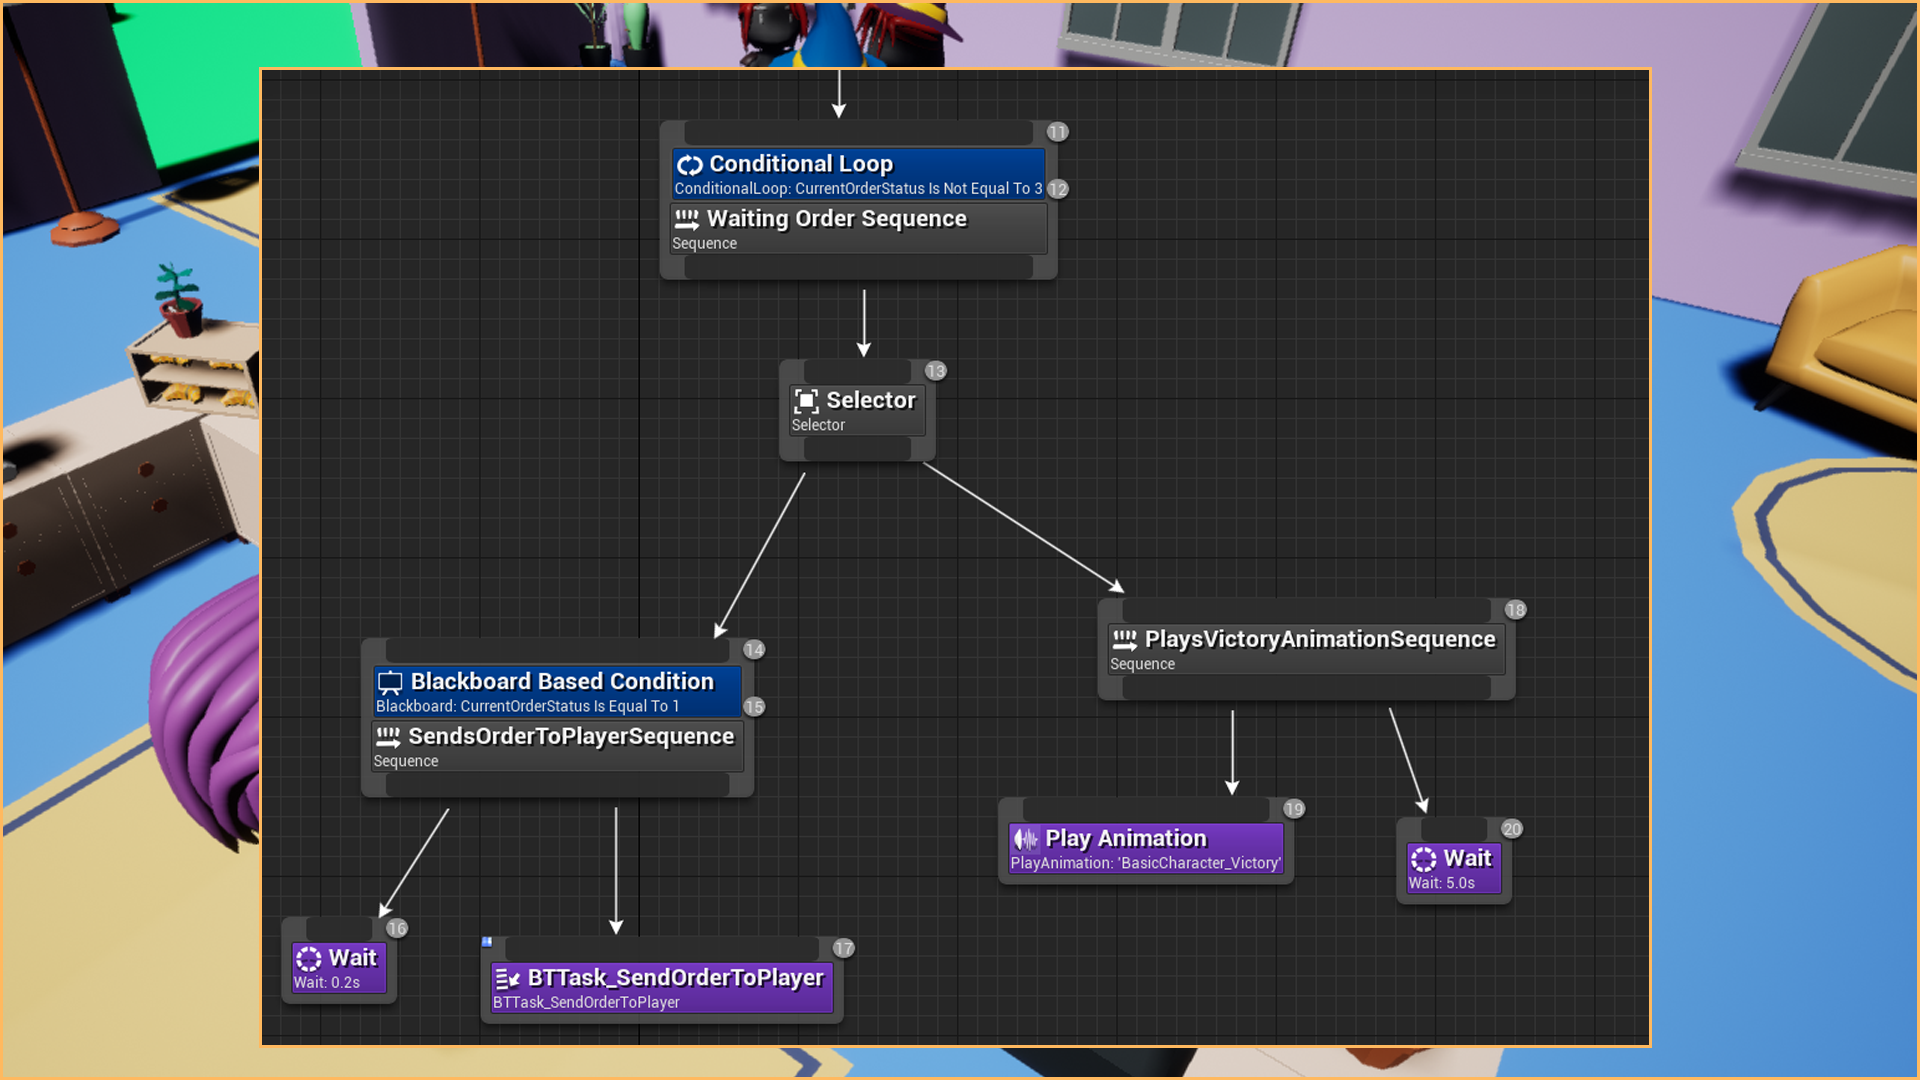
Making the AI Customer waits on the counter
To make the customer wait on the counter, we will use a Customer Order Status int variable that we will create on the Blackboard and the BP_BasicCustomer.
This variable will go through different stages:
- 0: No order
- 1: Pending order
- 2: The order has been sent to the player when the customer reaches the counter
- 3: The order has been completed, and the customer can move on. We won't do this step in this chapter.
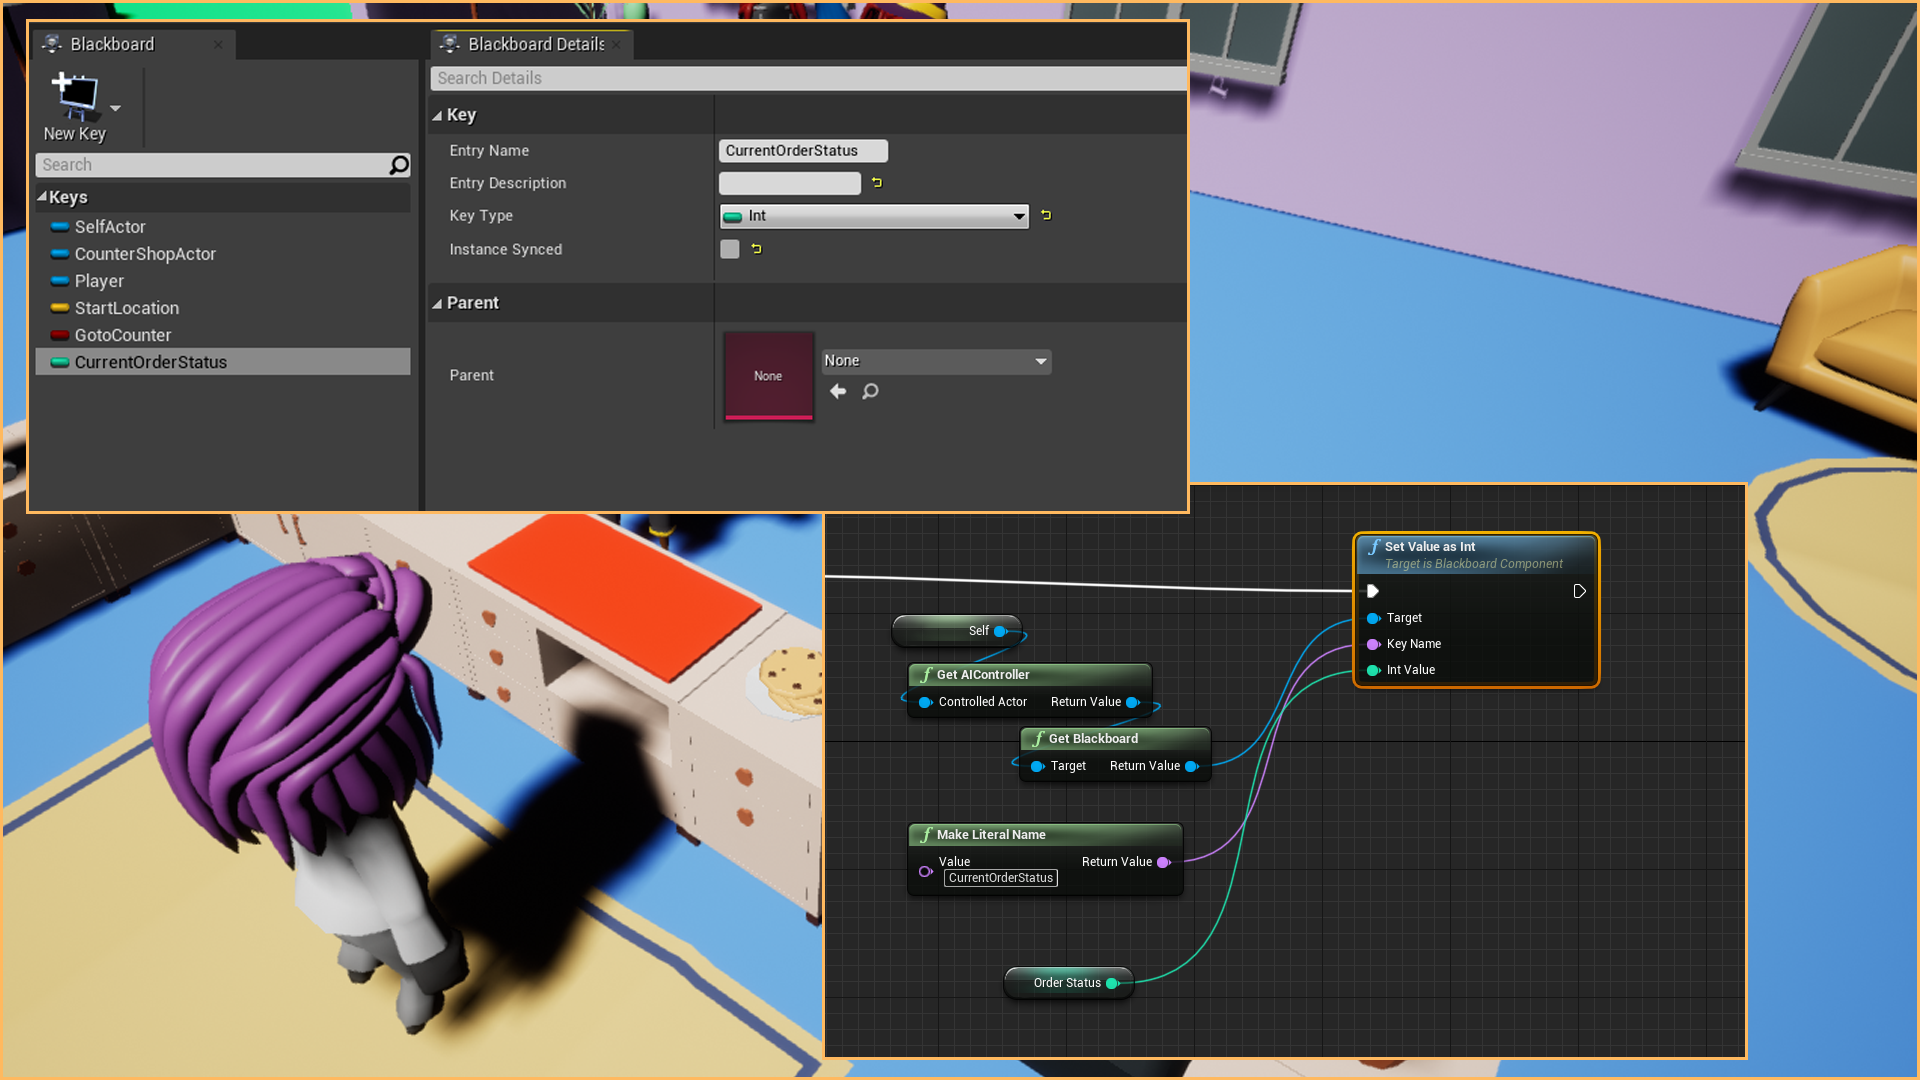
Create the new blackboard key as an int, and create the same one on the BP_BasicCustomer, set the value to 1 (this will indicate that there is a pending customer order).
Initialize this variable the same way you did for the others. This time use Set Value as an Integer node on the BP_BasicCustomer:
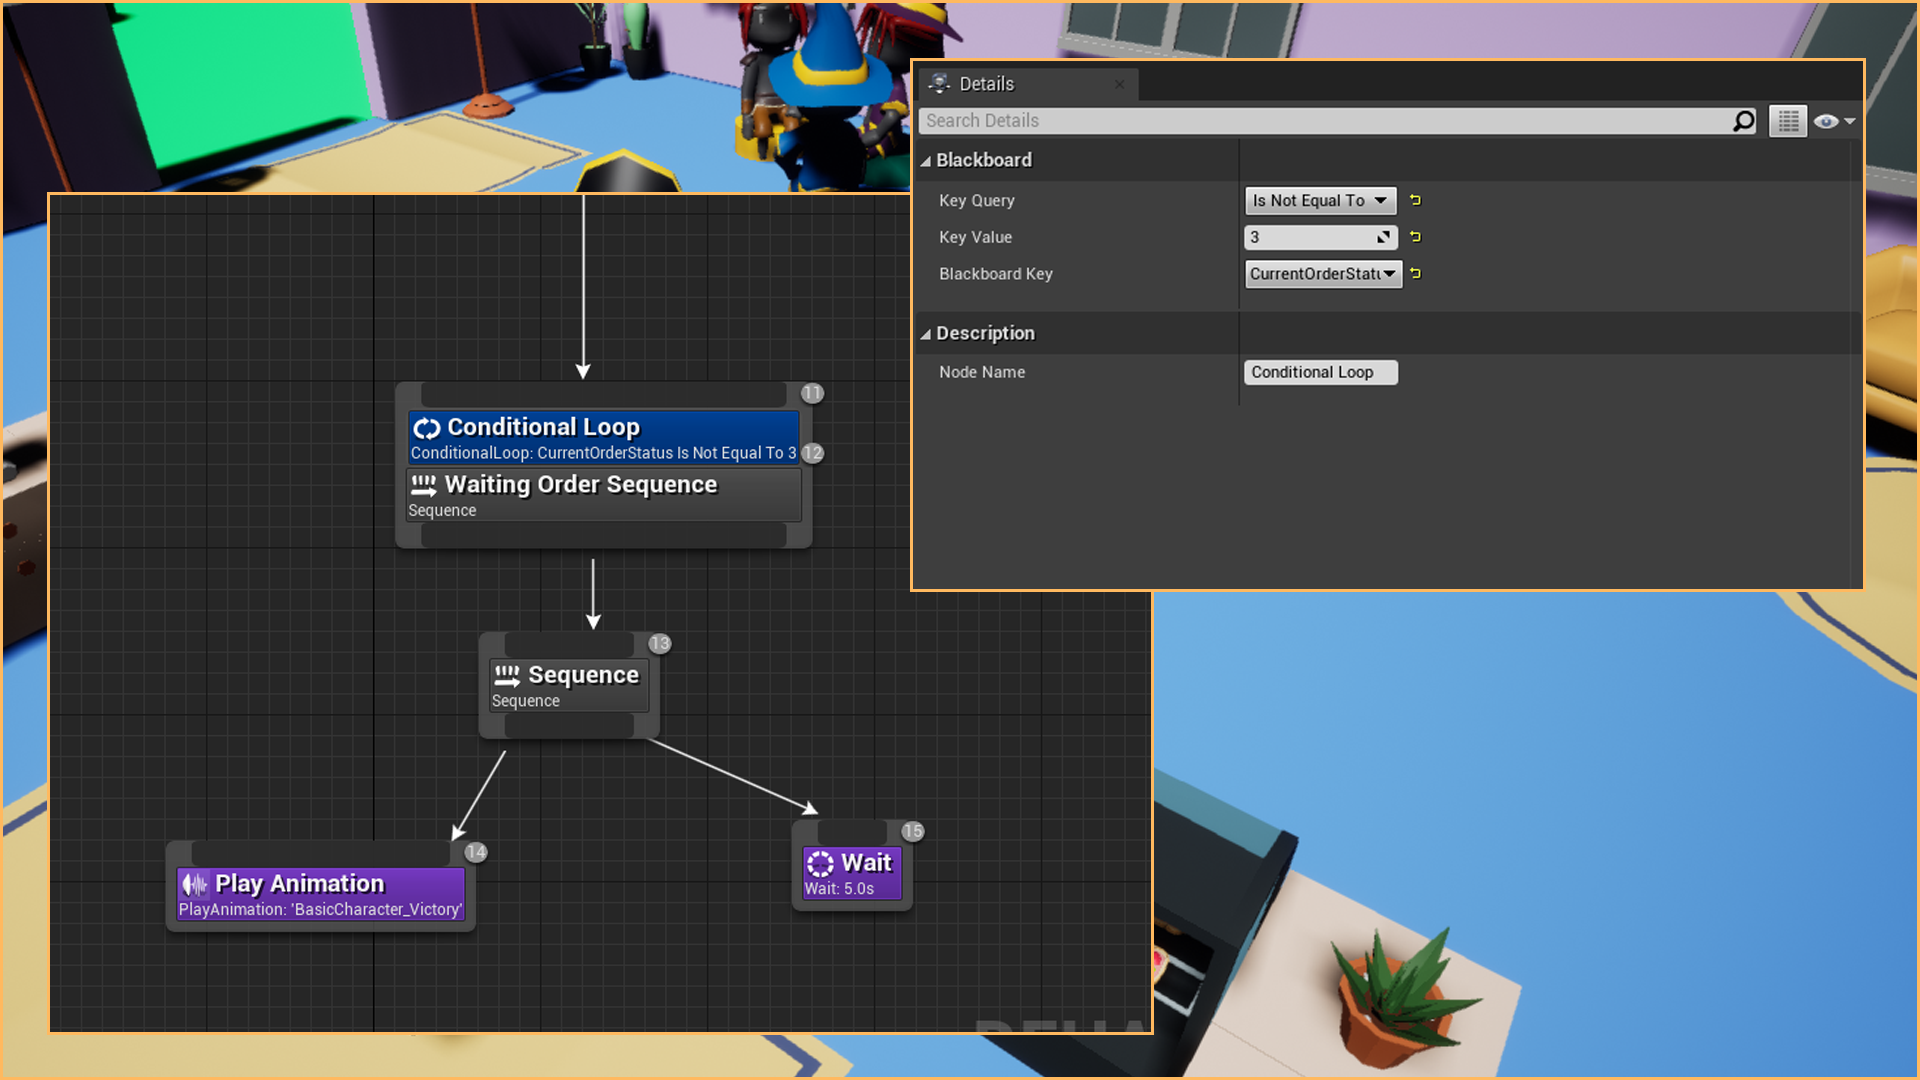
We will use this new key, CurrentOrderStatus, to make the behaviour tree stays on the second Sequence forever.
Create a new Sequence and connect it to the Main Sequence; you can rename it with something more meaningful such as Waiting Order Sequence.
Add a Decorator Conditional Loop on this Sequence and select the CurretnOrderStatus on the Backboard Key field. As a Key-value, select 3.
This will make the behaviour tree stays in this sequence block until the CurretnOrderStatus is 3.
Next time you try the game, the customer will approach the counter, face the player, and repeatedly play the animation Victory.
Creating the task to send the customer to the player
The first time the behaviour tree enters this second block, it will send the customer's order to the player.
To make that happens, we need a selector under the Waiting Order Sequence and a new Selector on the left side.
The Selector will pick one of the Sequences depending on which one is successful.
Add a new Blackboard Based Condition decorator using the CurrentOrderStatus Key as a condition. As a Key-Value set 1, the behaviour tree will execute this Selector only if the order status is 1.
We intend to do this once.
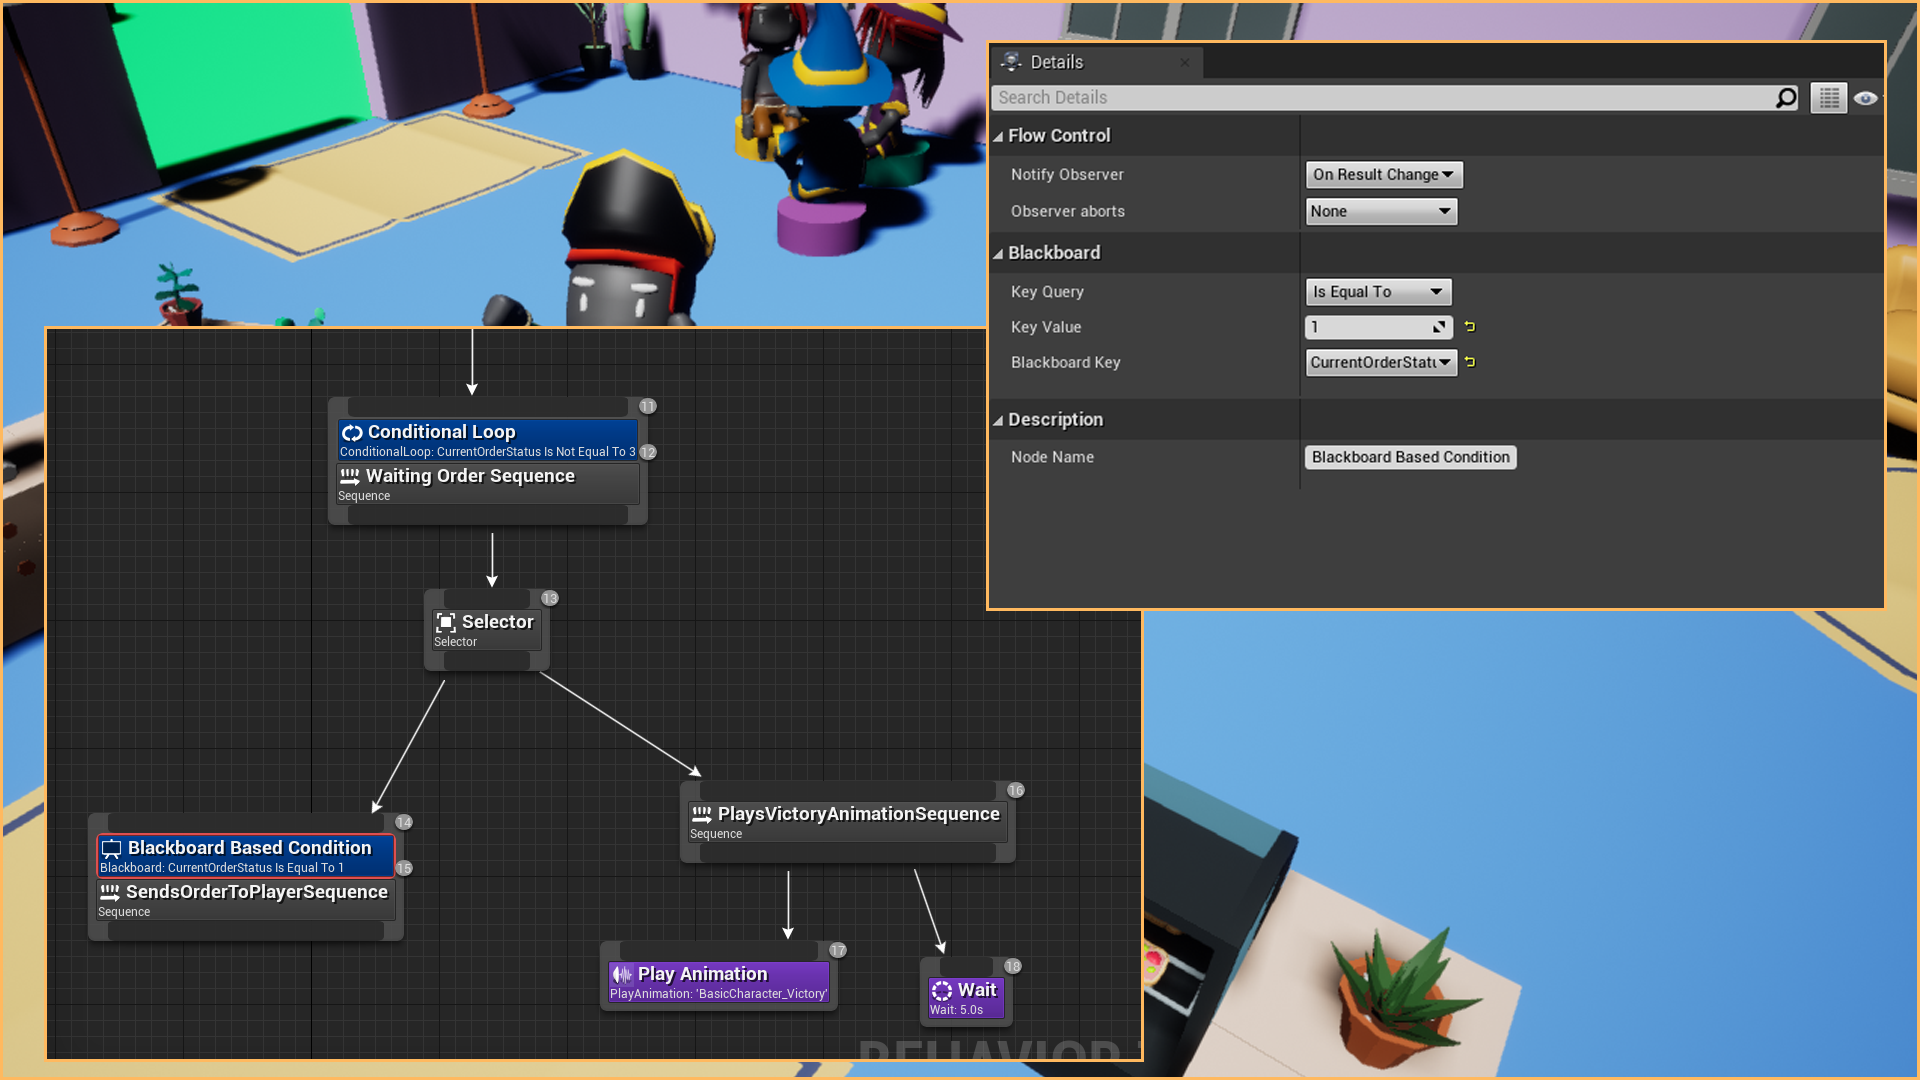
To prevent the behaviour tree from going in the first sequence repeatedly, we can change the value of CurrentOrderStatus using a custom task.
Select New Task on the top bar of the behaviour tree. Unreal will create a new one with a generic one located on the same content browser folder as the Behaviour Tree.
Change the name to BTTask_SendOrderToPlayer.
Add this new task under the SendsOrderToPlayerSequence.
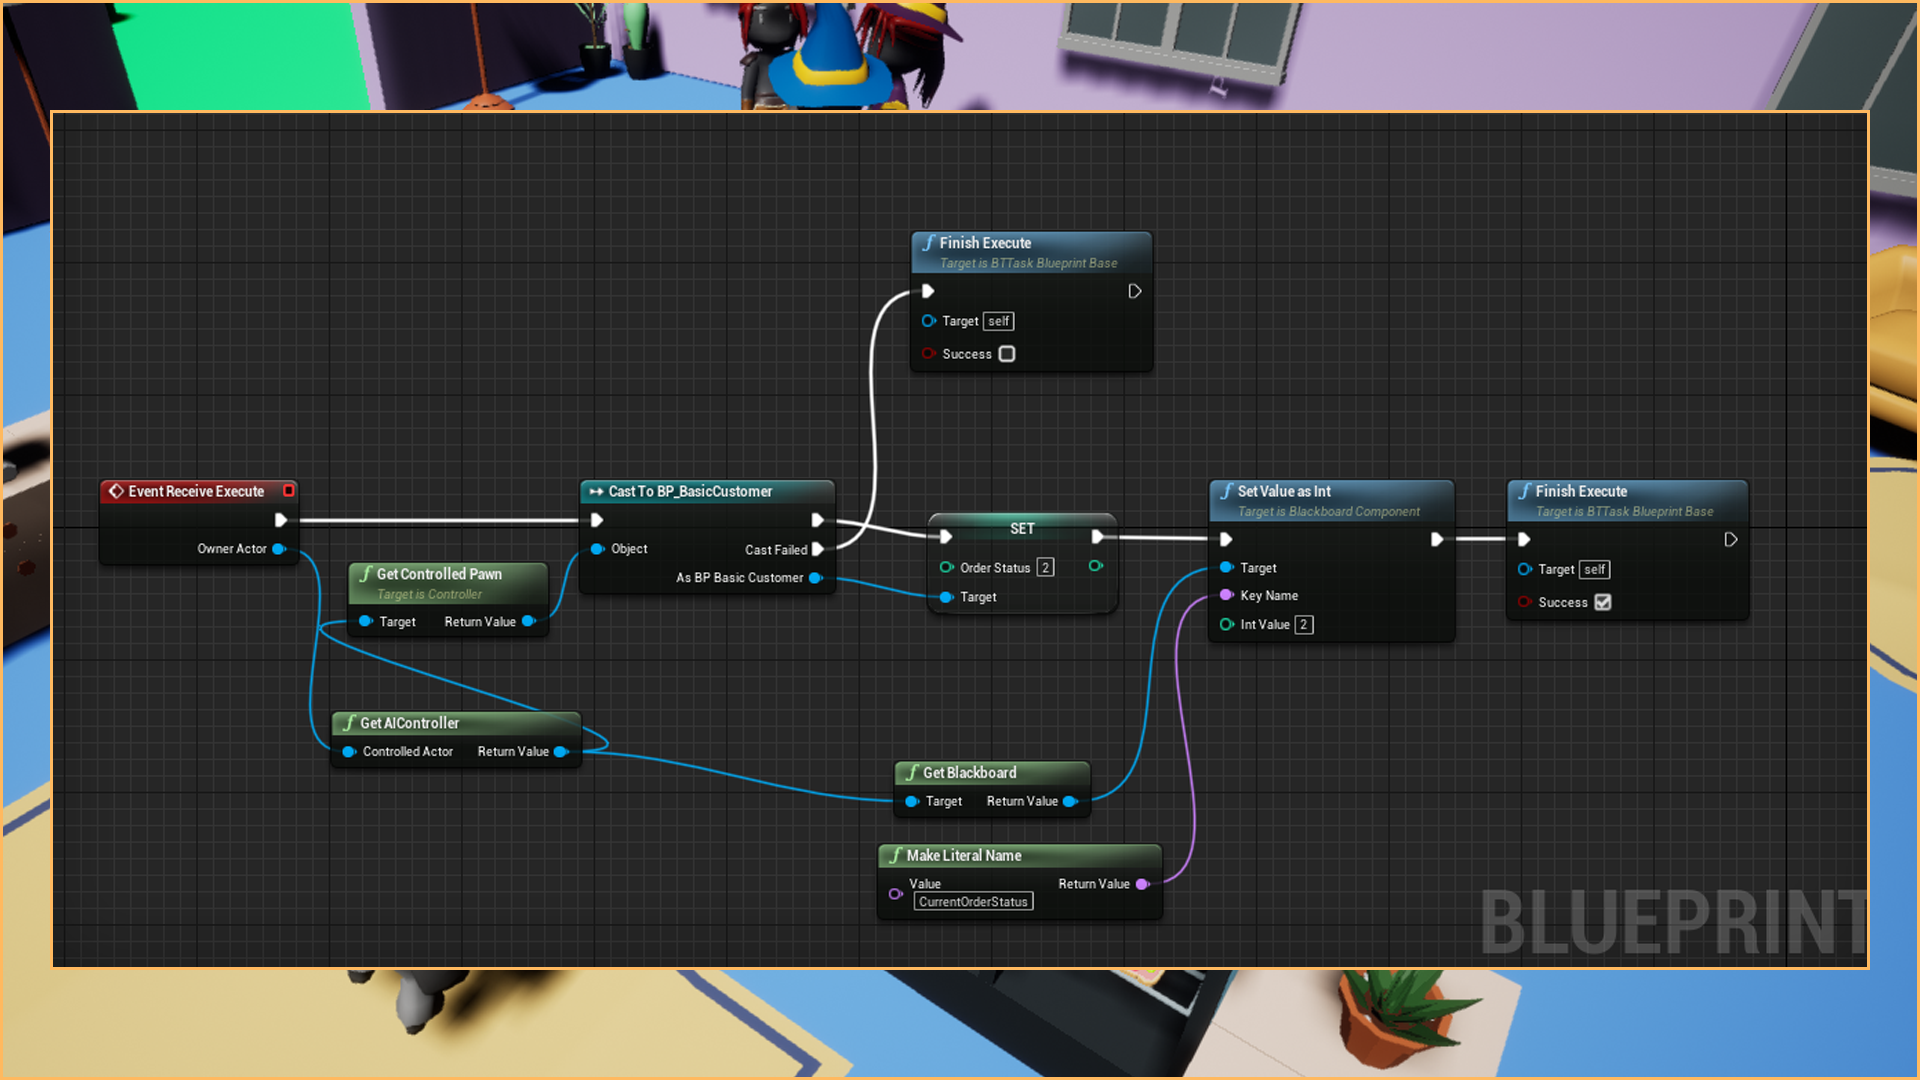
Open the task BTTask_SendOrderToPlayer, and add the override function Event Receive Execute (use the + button on the Graph left panel)
We can access the blackboard keys from here.
We will update the value of the current customer status on the BP_BasicCustomer and the blackboard key from here.
Set the Order Status on the BP_BasicCustomer
To do this, Get AIController from the Owner Actor pin, use GetControlledPawn and finally, a Cast to BP_BasicCustomer.
You can access the Order Status from this if the cast is successful.
Set the CurrentOrderStatus on the Blackboard.
From the Get AIController node, you can get the blackboard and use the node SetValue as Int to change the value of the CurrentOrderSatus.
The nodes Finish Execute are necessary to prevent the behaviour tree from getting stuck on this task forever.
Creating the Order and Customer structures in C++
When the customer reaches the counter, the customer's order and the customer information will be sent to the player. We are going to need some structures in C++ to represent the information.
We will implement the structures on the Definitions.h file. You can place the structures in other files, but I like to include an empty C++ for my data structures.
Add the include #include "Definitions.generated.h" to show the structures on Blueprint.
Structure FCustomer = Represents each customer
- CustomerID = It's an ID to represent each customer
- CustomerProfile = Texture 2D to represent the picture on the UI
Structure FItemOrder = Represents 1 item of many in 1 single customer's order
- OrderID = ID to identify where this item belongs to
- ItemIcon = Represents the item in UI
- ItemCompletedIcon = Represents the item in the UI when the customer has received it.
Structure FOrder = Represents 1 order with various items. Each customer will have 1 and only 1 order in this tutorial with up to 3 items per order.
- OrderID = The order ID, We don't need this in this tutorial but it can be handy in the future
- OrderItems = Number of items in order. It will be maximum 3 items per order.

After compiling the code, we can add public variables to the order and customer information on the BP_BasicCustomer. Make them public, so you can change them on the scene and set different orders per customer. The project files contain customer's pictures and item's pictures that you can use if you wish.

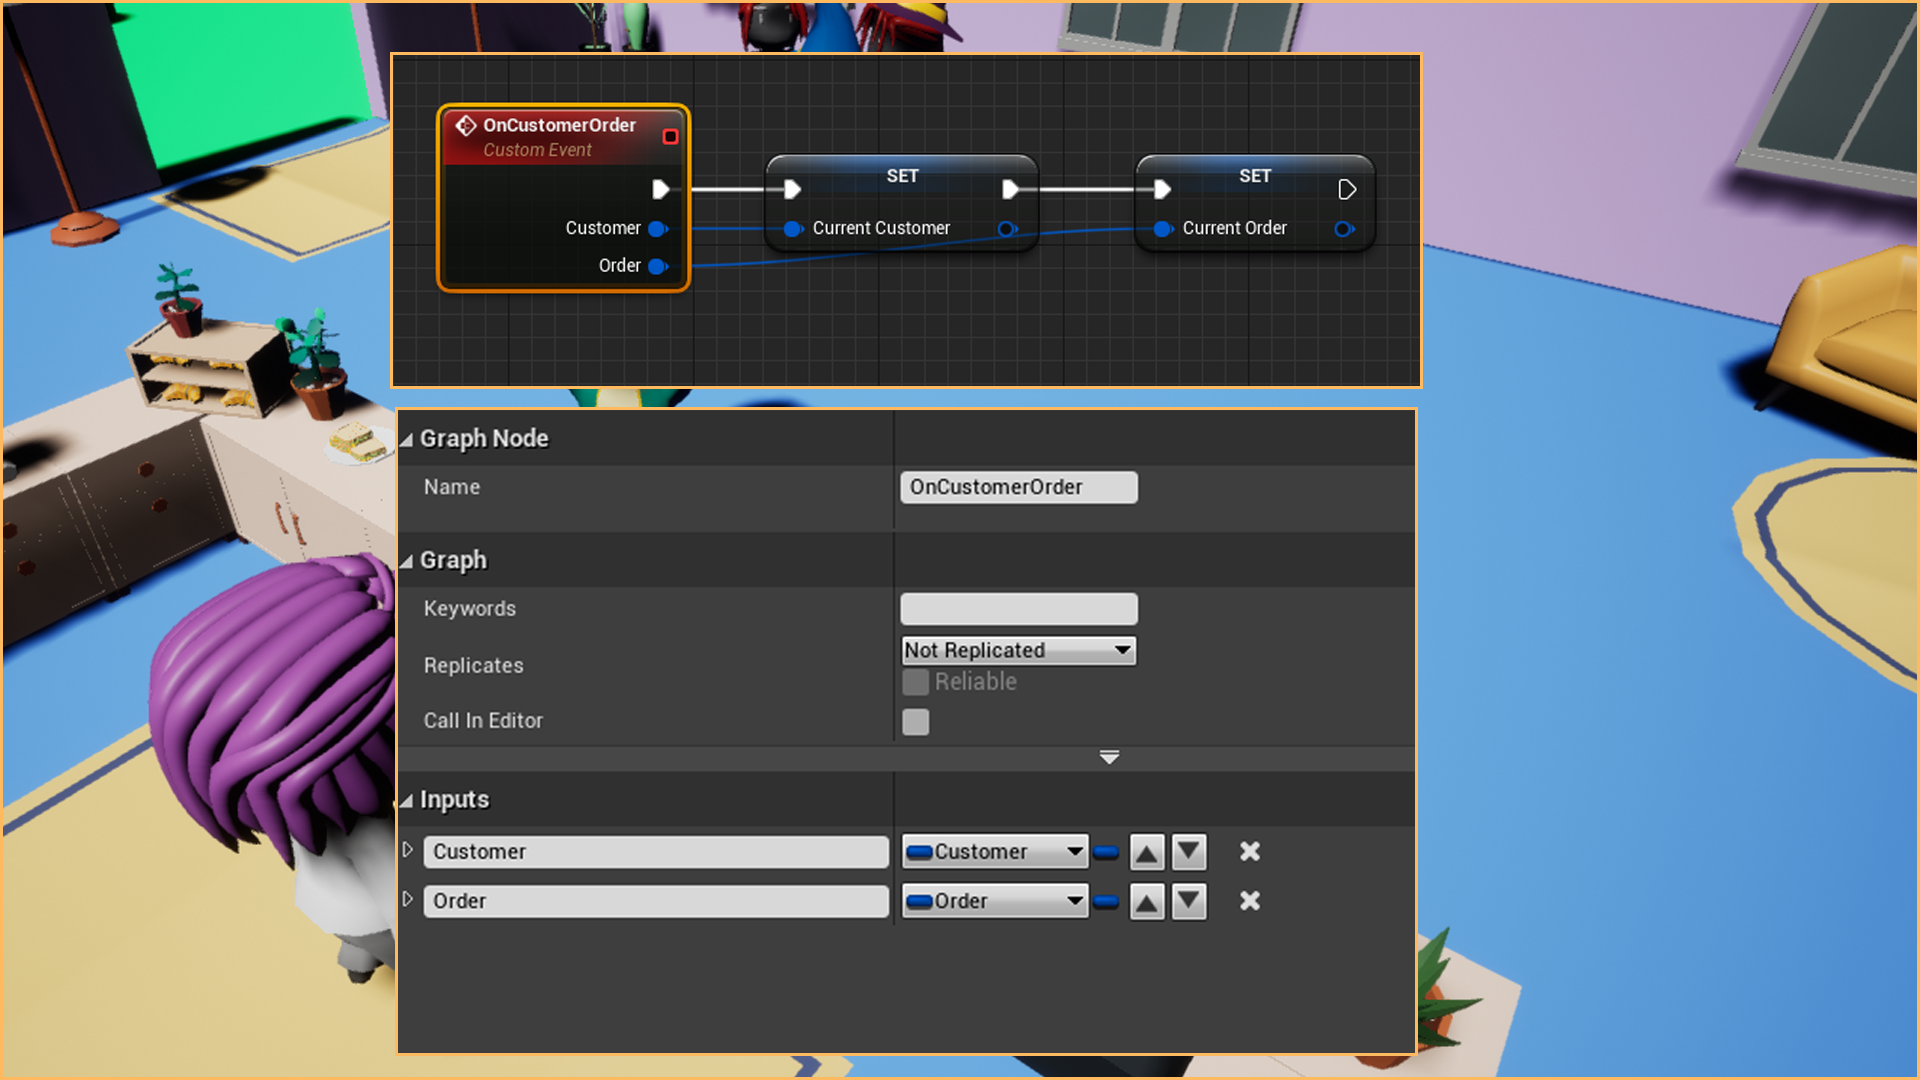
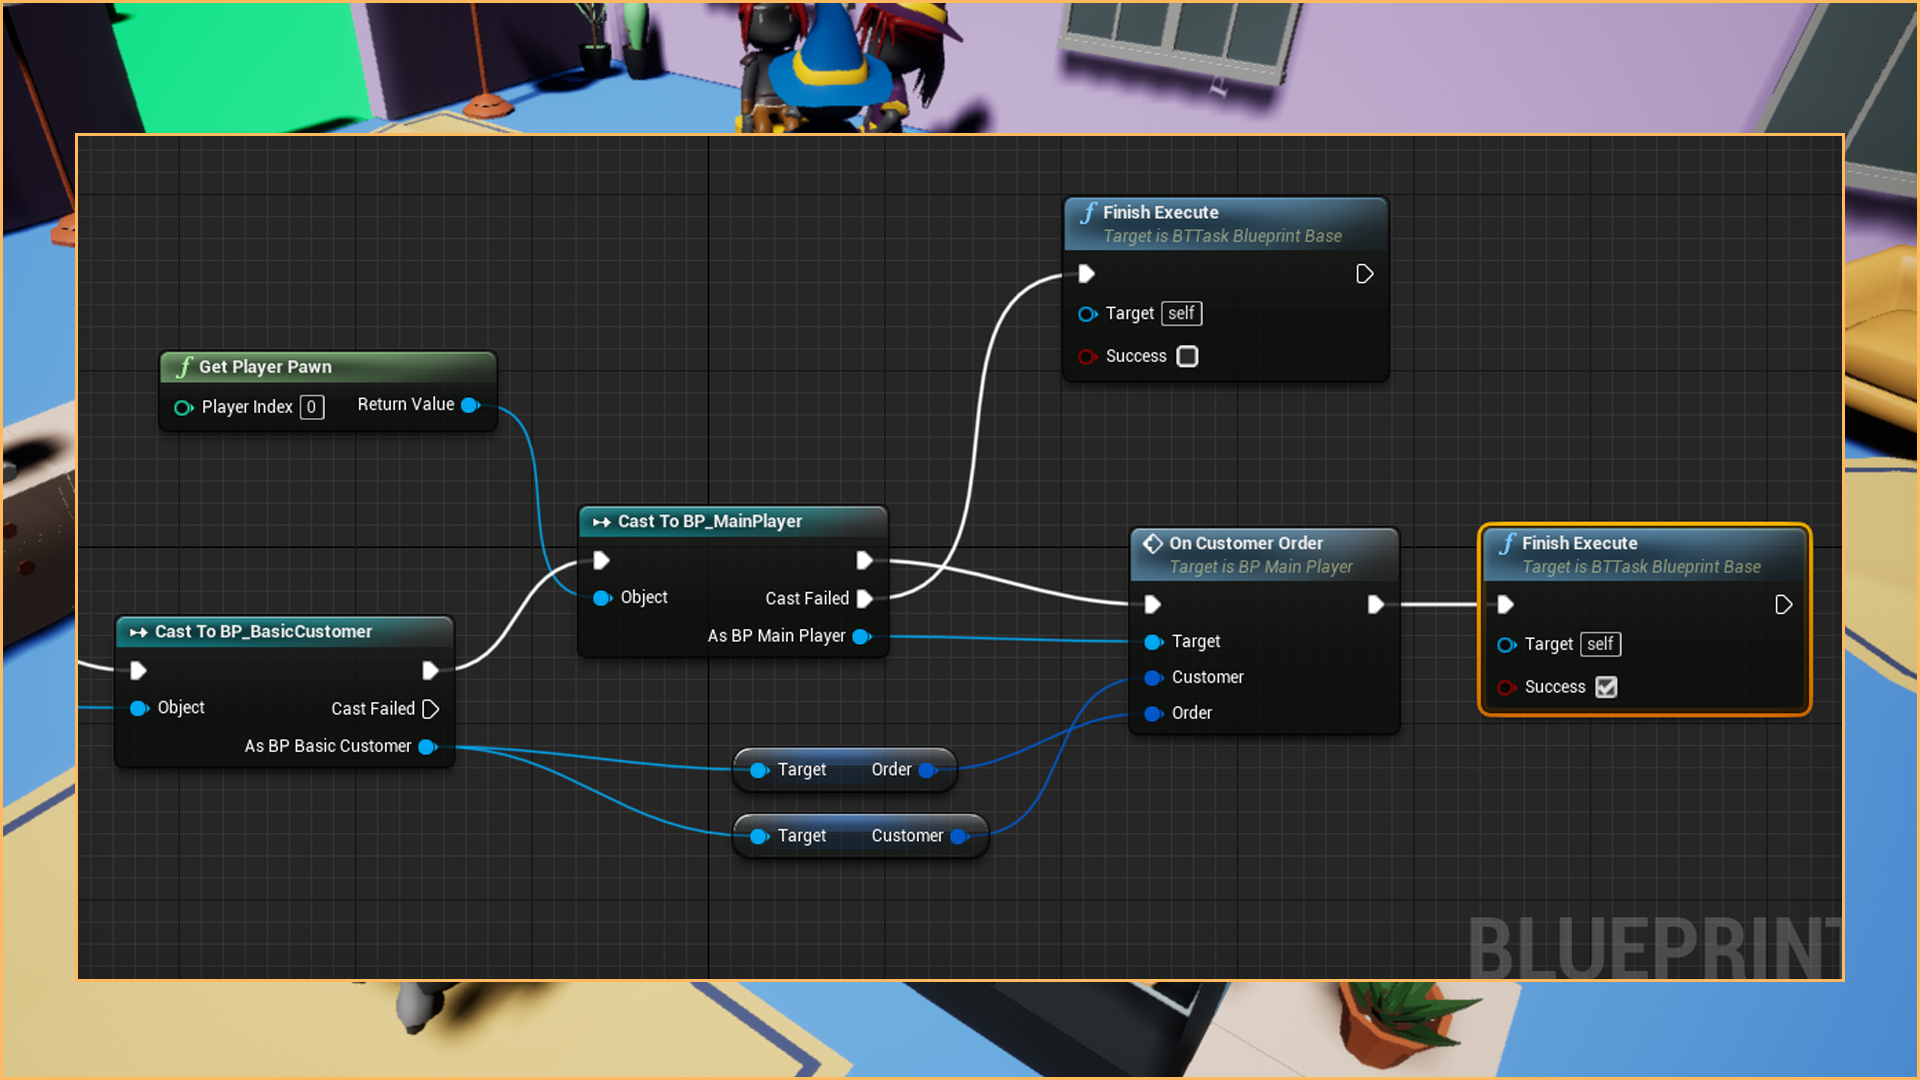
We are also going to need a custom event on the BP_MainPlayer to call it from the task BTTask_SendOrderToPlayer.
The event is going to need 2 input pins for the Customer and the Order.
I am also storing a reference to these elements on the BP_MainPlayer for later.
The last part is to call this event on the BTTask_SendOrderToPlayer.
You can get the BP_MainPlayer if you use the node GetPlayerPawn and cast it to BP_MainPlayer.
You can get the Order and the Customer on the BP_BasicCustomer cast node you previously added.
Don't forget to add Finish Execute at the end of each operation with success ticked or not, depending on the action.
Creating a UI to show the Order and Customer
The last thing we will do is create 2 Widgets to show the order when the player receives it.
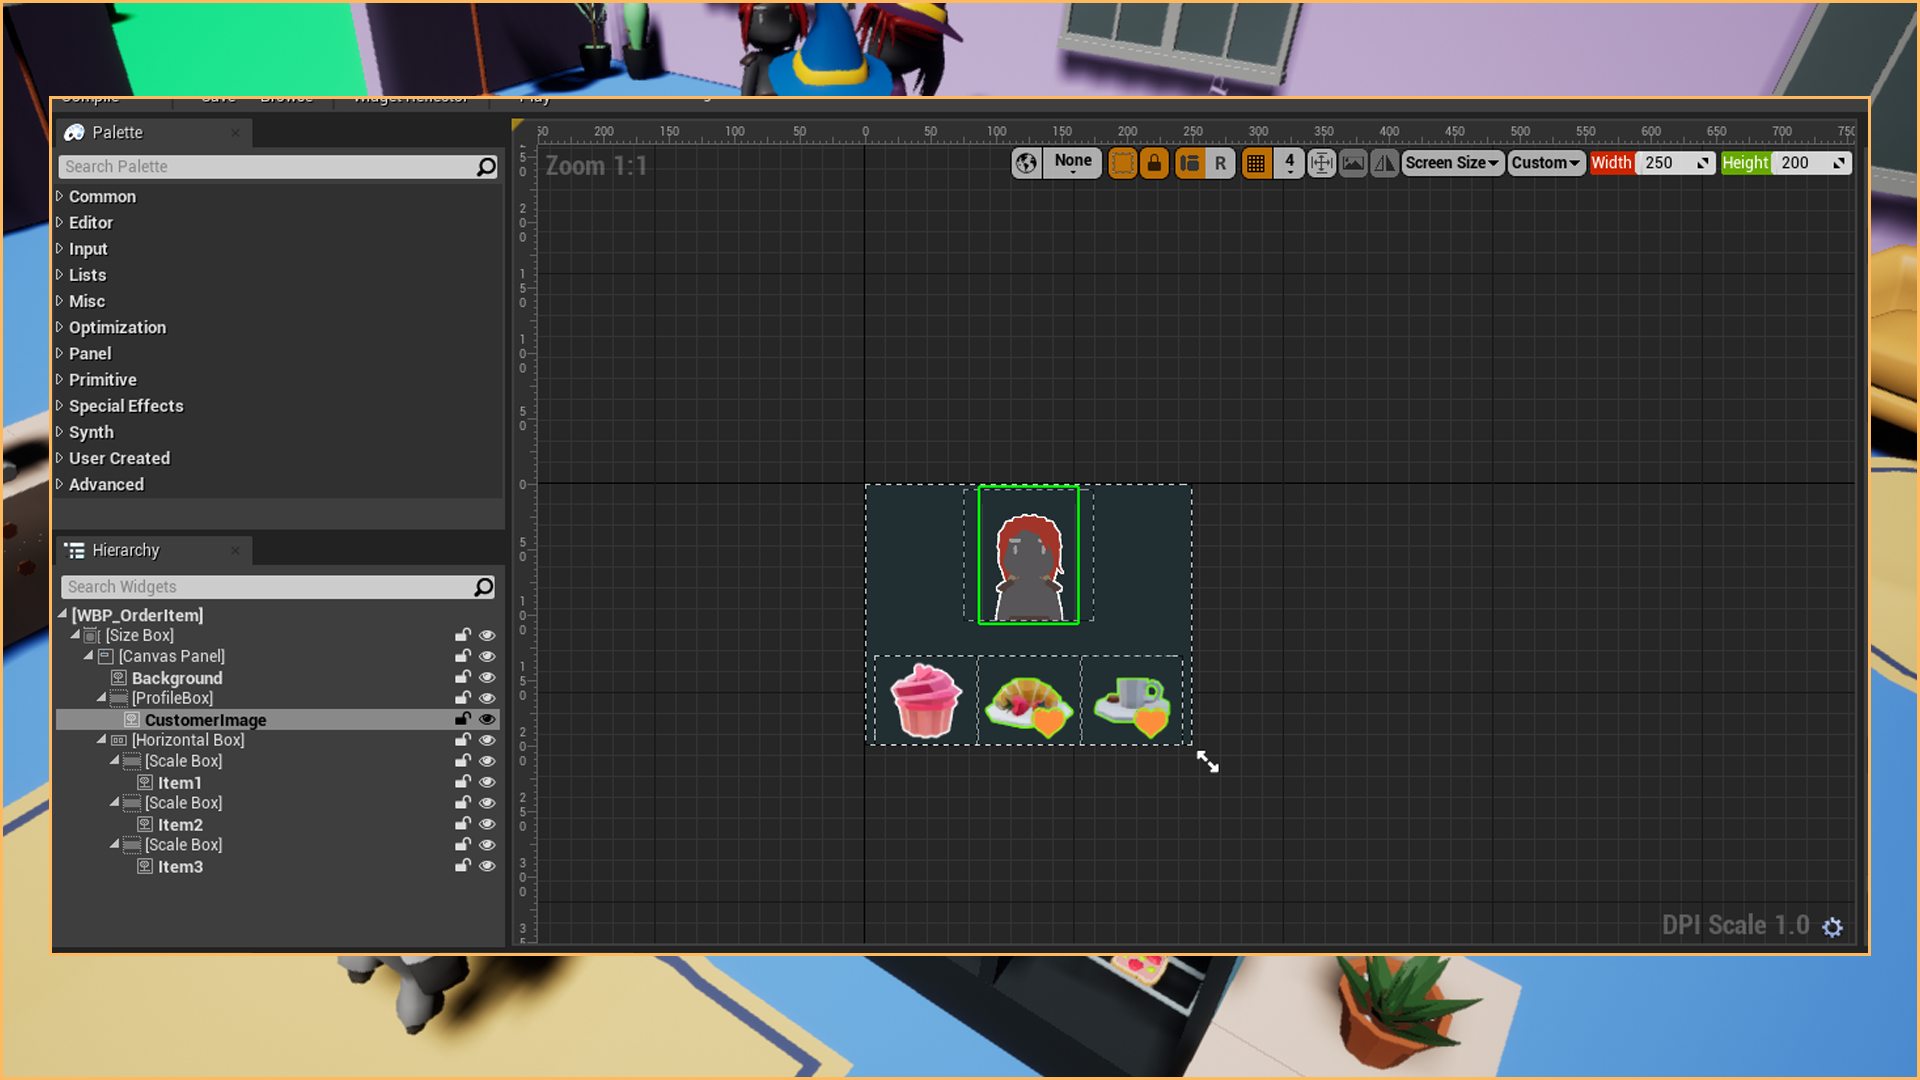
If you open the project, you will find WBP_OrderItem and WBP_PlayerUI. WBP_OrderItem represents 1 unique order with up to 3 items and the picture of the customer.
This widget is added to the WBP_PlayerUI. In this chapter, we are only going to deal with 1 order at a time. In the future, we will add a queue of orders.
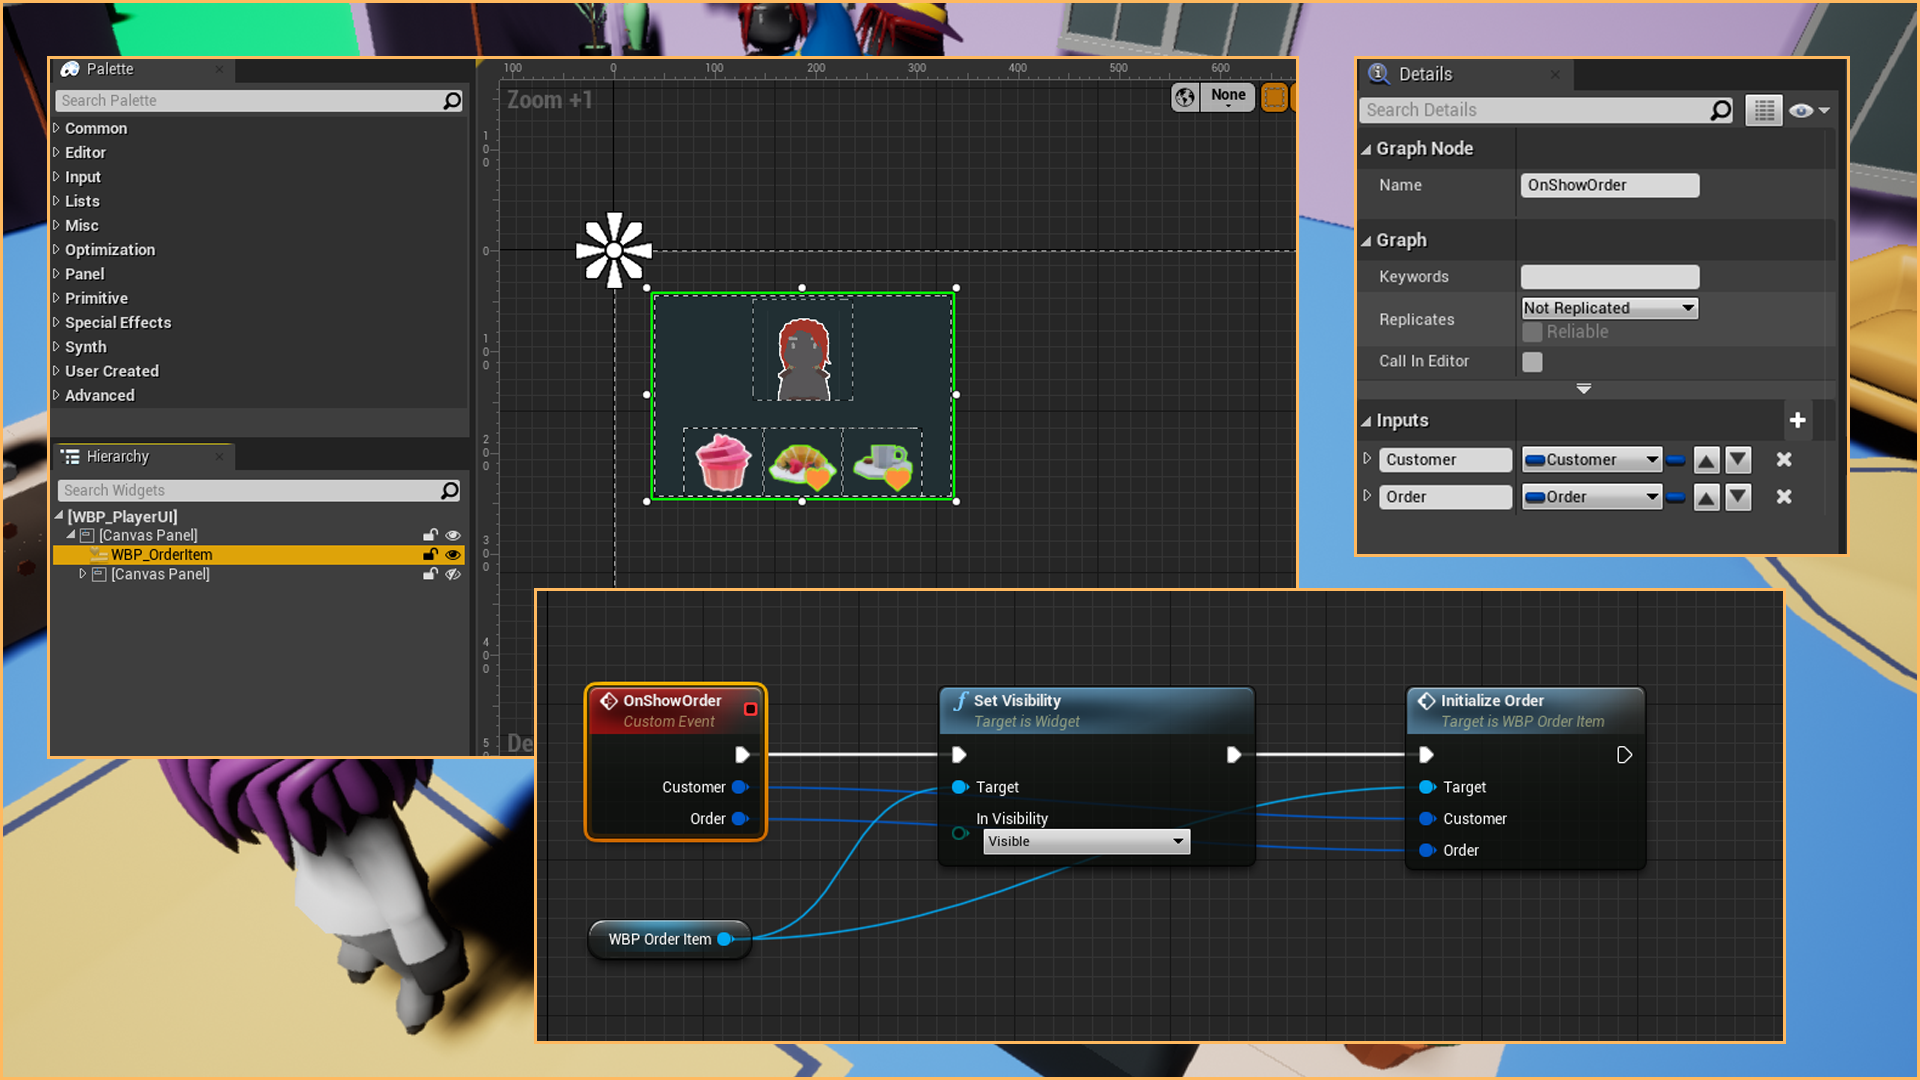
Create the WBP_PlayerUI and add an event OnShowOder on the Graph, which accepts 2 Inputs, the Customer Struct and the Order Struct.
We will call this event from the BP_MainPlayer.
This event will make the WBP Order Item visible and it will call the method Initialize Order that we are going to implement in the WBP_OrderItem.
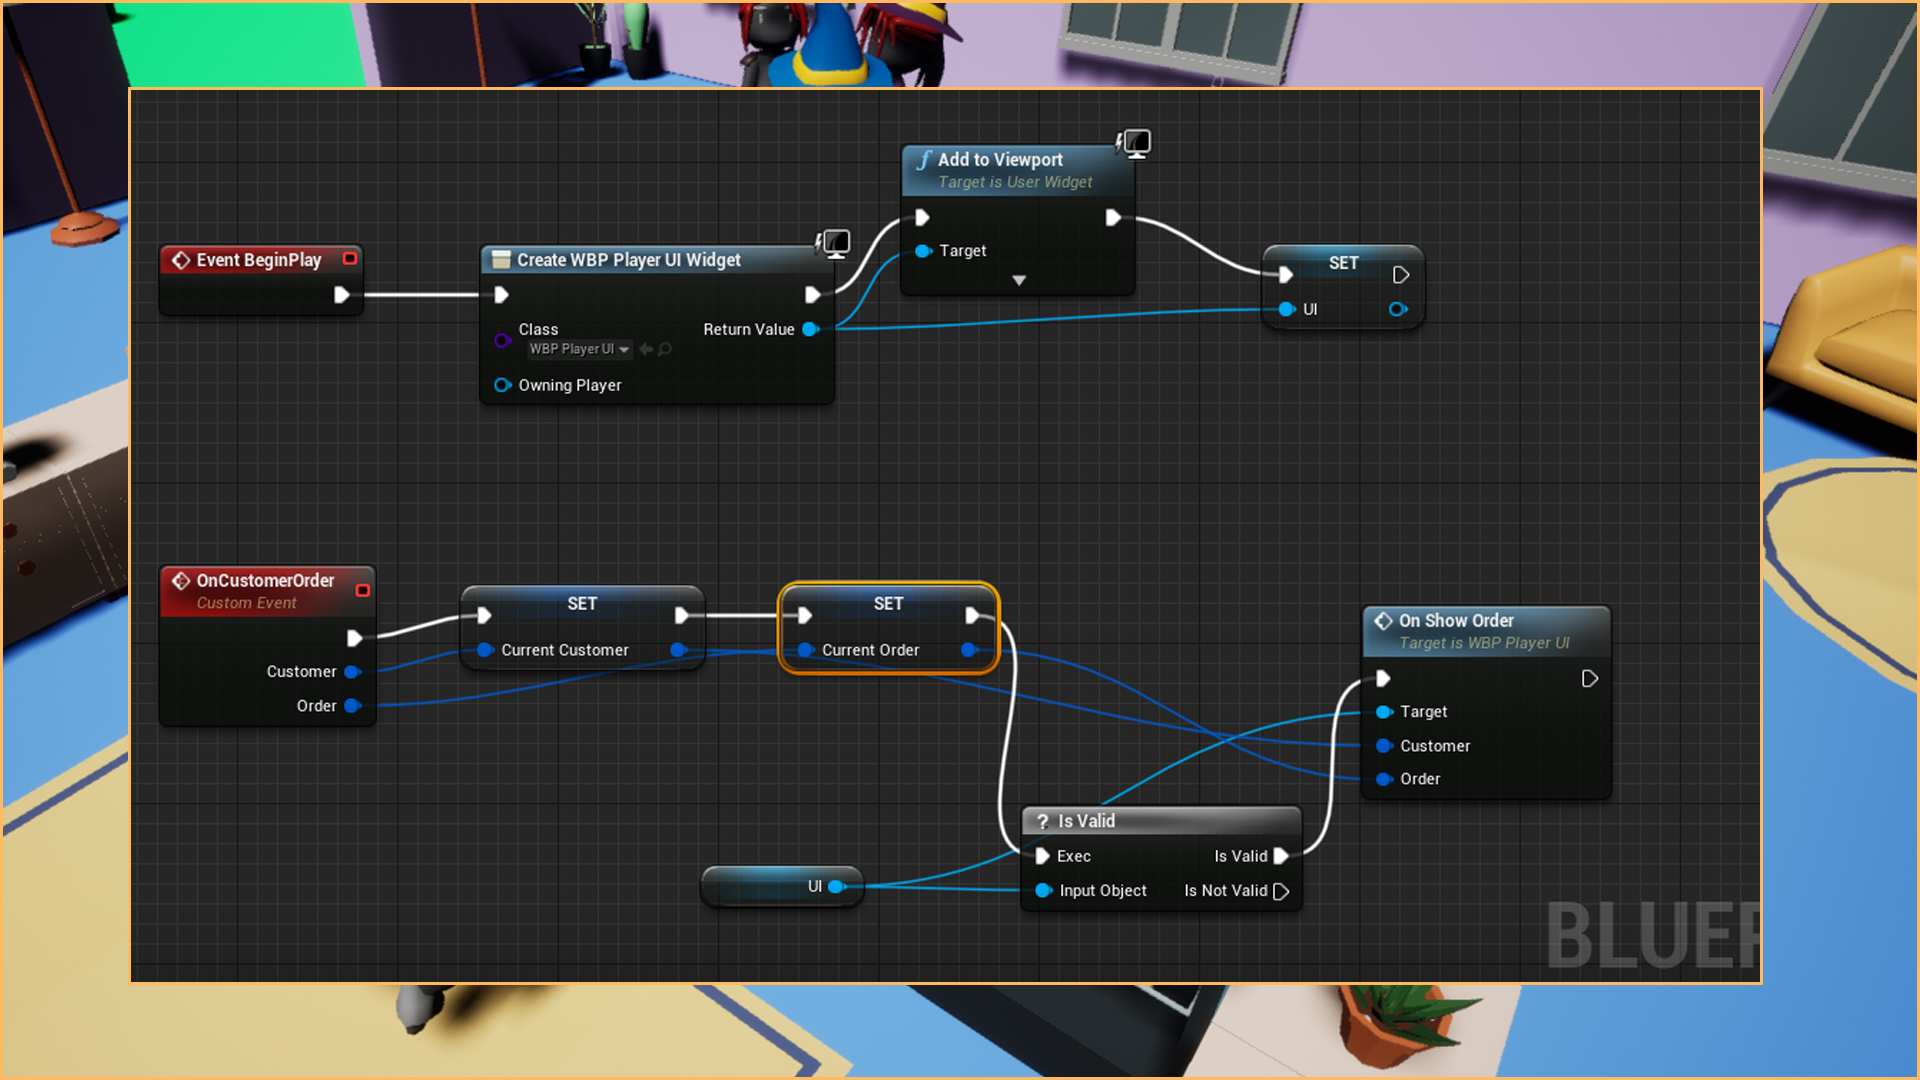
Before we move on to the WBP_OrderItem, go back to the BP_MainPlayer. On the Begin Play, create a User Widget and select the WBP_PlayerUI. Add It to the viewport and promote it to a variable to keep the reference for later.
The event OnCustomerOrder we created earlier, after the reference to the variables, call the method OnShowOrder and pass both the customer and the order. Remember we are calling OnCustomerOrder, from the task BBTTask_SendOrderToPlayer, so everything is ready!
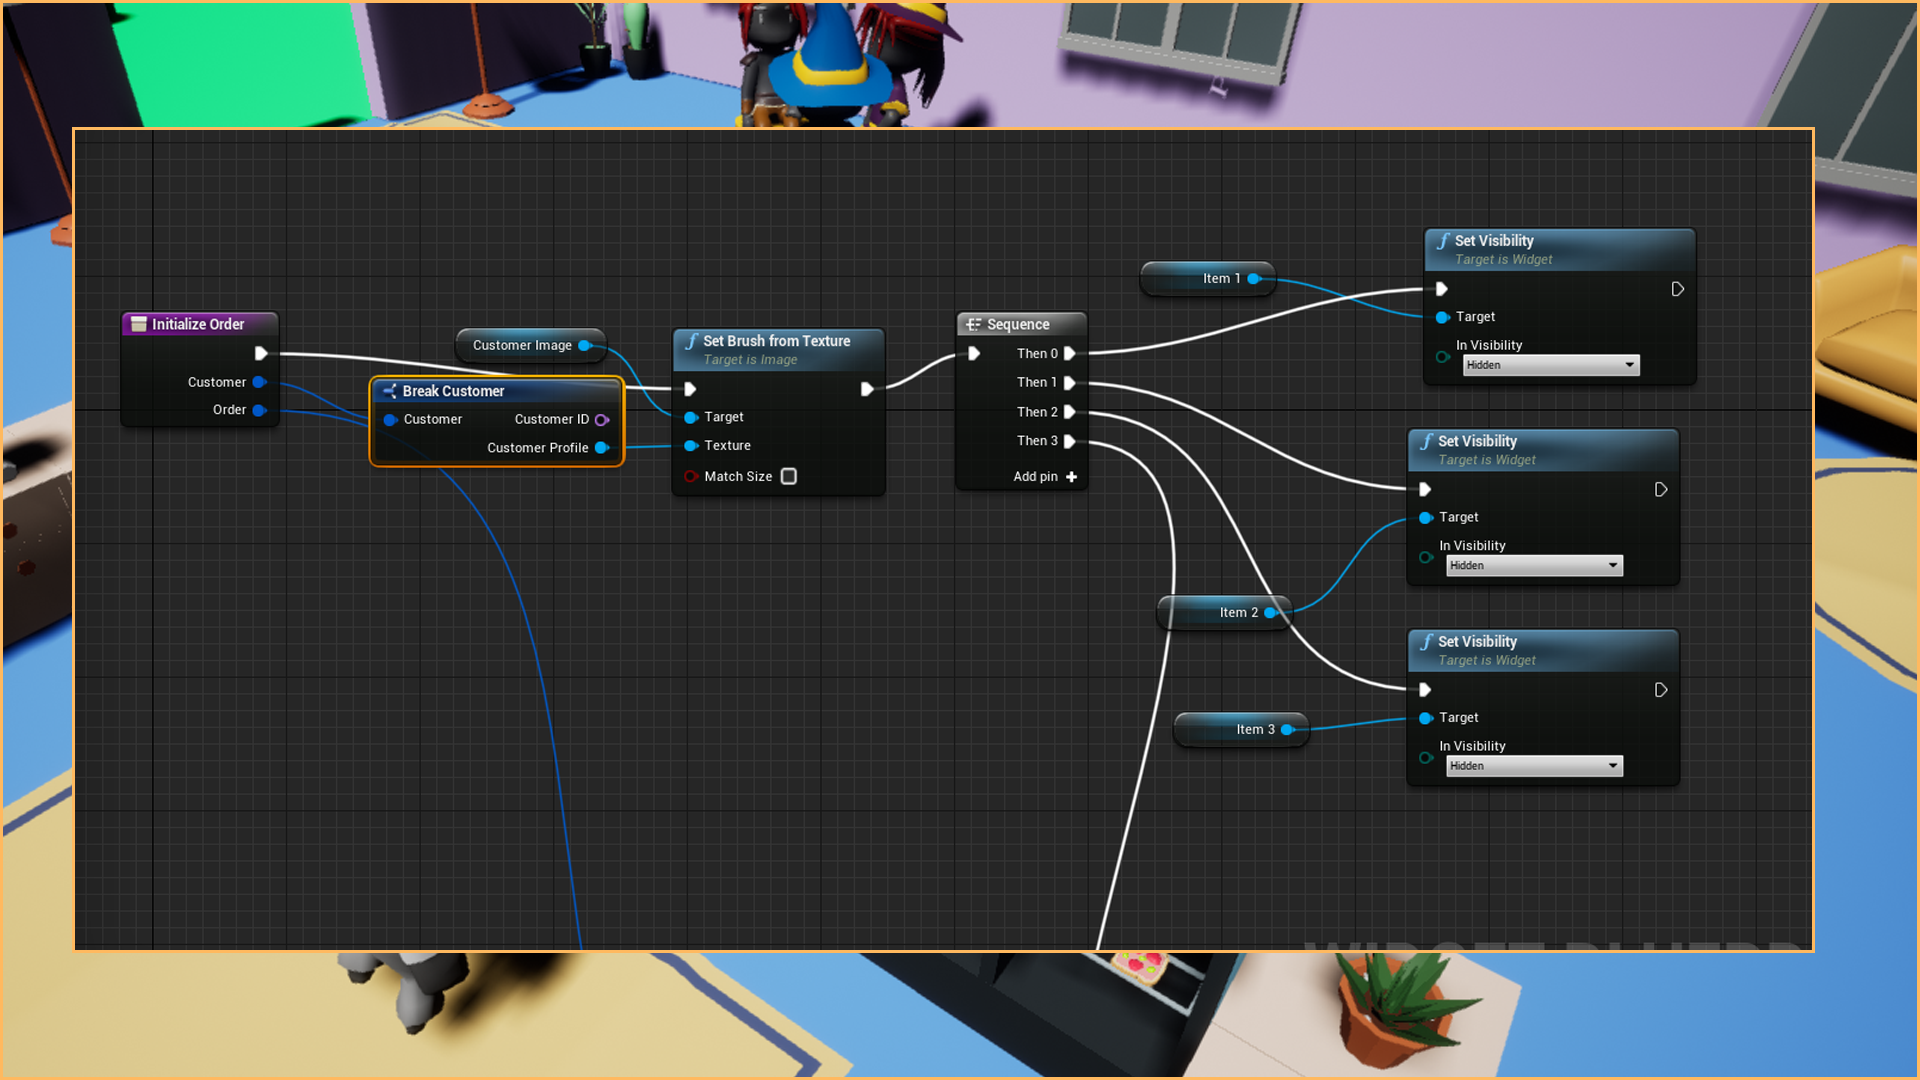
If you haven't already, create the User Widget WBP_OrderItem. This widget contains a CustomerImage Image and three images for each item.
On the Graph, create the public function InitializeOrder with the Customer and Order as an input. Because I know I only have 3 items, I only hide and show each element each time.
Every time we call these functions from WBP_PlayerUI (remember we have a reference to this widget there), we first set the Customer profile using the Customer struct that we receive.
After that, we first hide all items. When this part is completed, we then loop through the number of items we have on the Order, and we show them and set their ItemIcon.
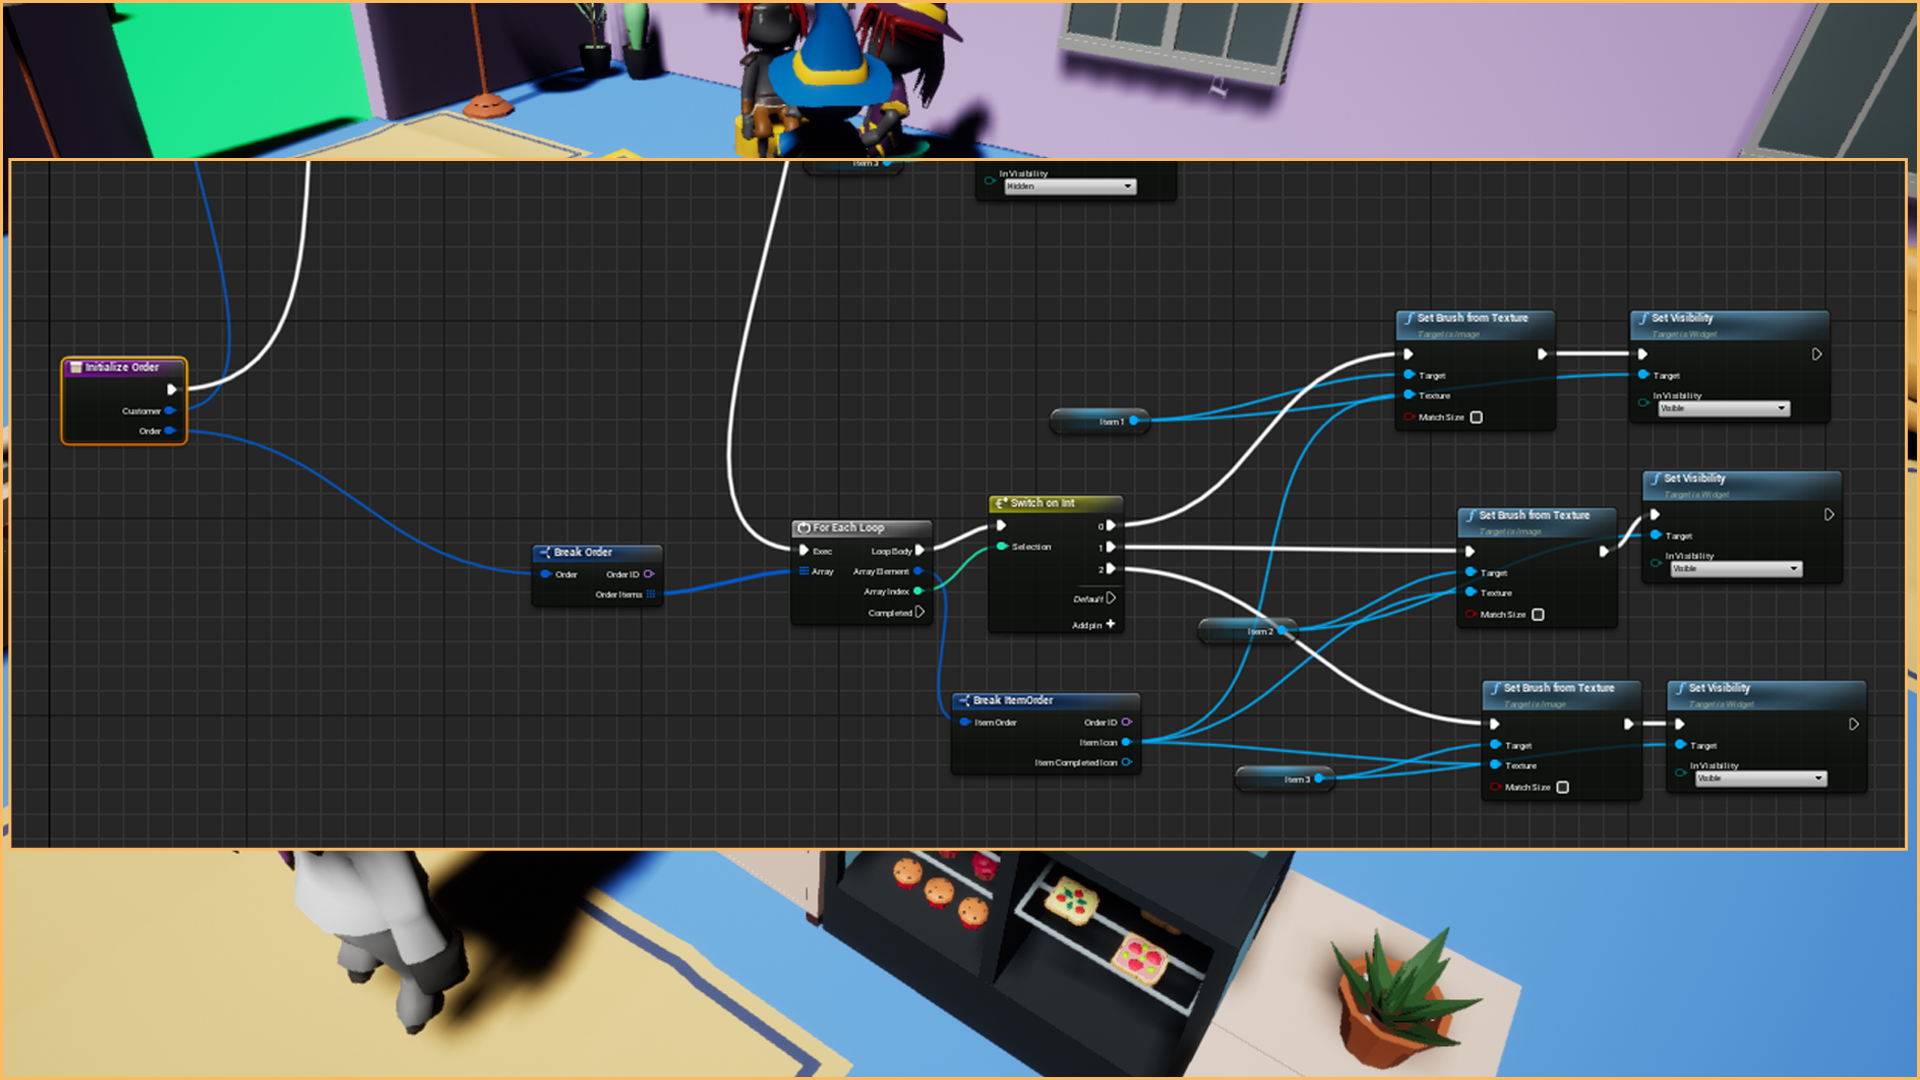
And with this last step, if you test the game, you should see the customer approaching and waiting for their order!
Leave a comment
Log in with itch.io to leave a comment.