
Coffee Shop Simulator Tutorial in Unreal Engine 4
Coffe Shop Sim - Chapter 1 - AI Customer
In this first tutorial, we will implement a customer who approaches the counter, waits for a few seconds, and exits the coffee shop. The customer will repeat these actions in a loop.
In later episodes, we will extend this AI behaviour, and the customer will wait at the counter until they receive the order.
To follow along with this tutorial, you can download the starter template, which has a ready map, blueprints to represent the customer, and a few C++ classes.
We will use Unreal 4.26 for this project.
Watch the video tutorial here:
Preparing the Customer AI
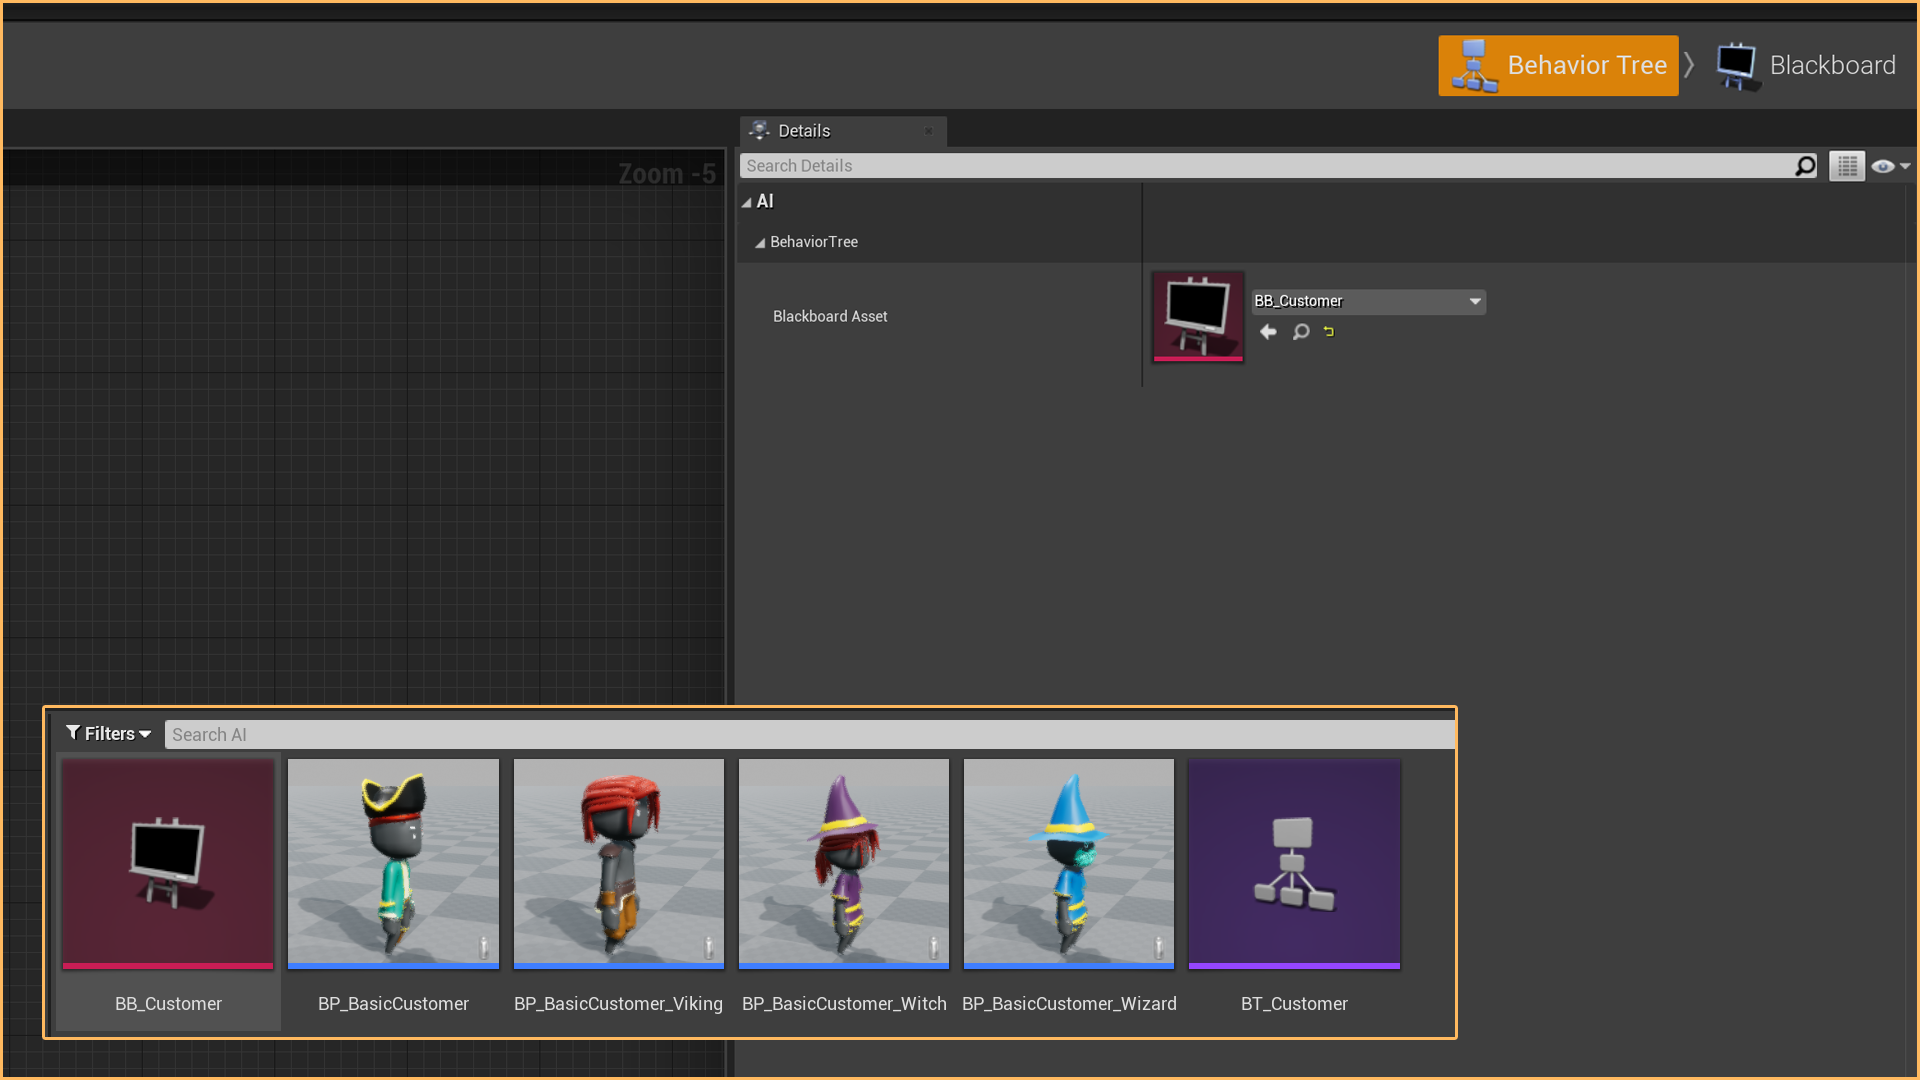
There are four blueprint customers ready to use, and you can find them on the folder AI under Game.
The Blueprint BP_BasicCustomer is the base blueprint for the BP_BasicCustomer_Viking, BP_BasicCustomer_Witch and BP_BasicCustomer_Wizard.
If we add functions, variables or any other public or protected element to BP_BasicCustomer, these blueprint children will inherit them.

To make the customer walk from the starter point to the counter, we need a Blackboard and a BehaviourTree.
Create them under the AI folder by right-clicking and selecting Behaviour Tree and Blackboard under Artificial Intelligence. We will refer to them as BB_Customer and BT_Customer.
If you open the behaviour tree BT_Customer, on the Details panel, you should see the BB_Customer selected, if it is not you can select it on the drop-down list.
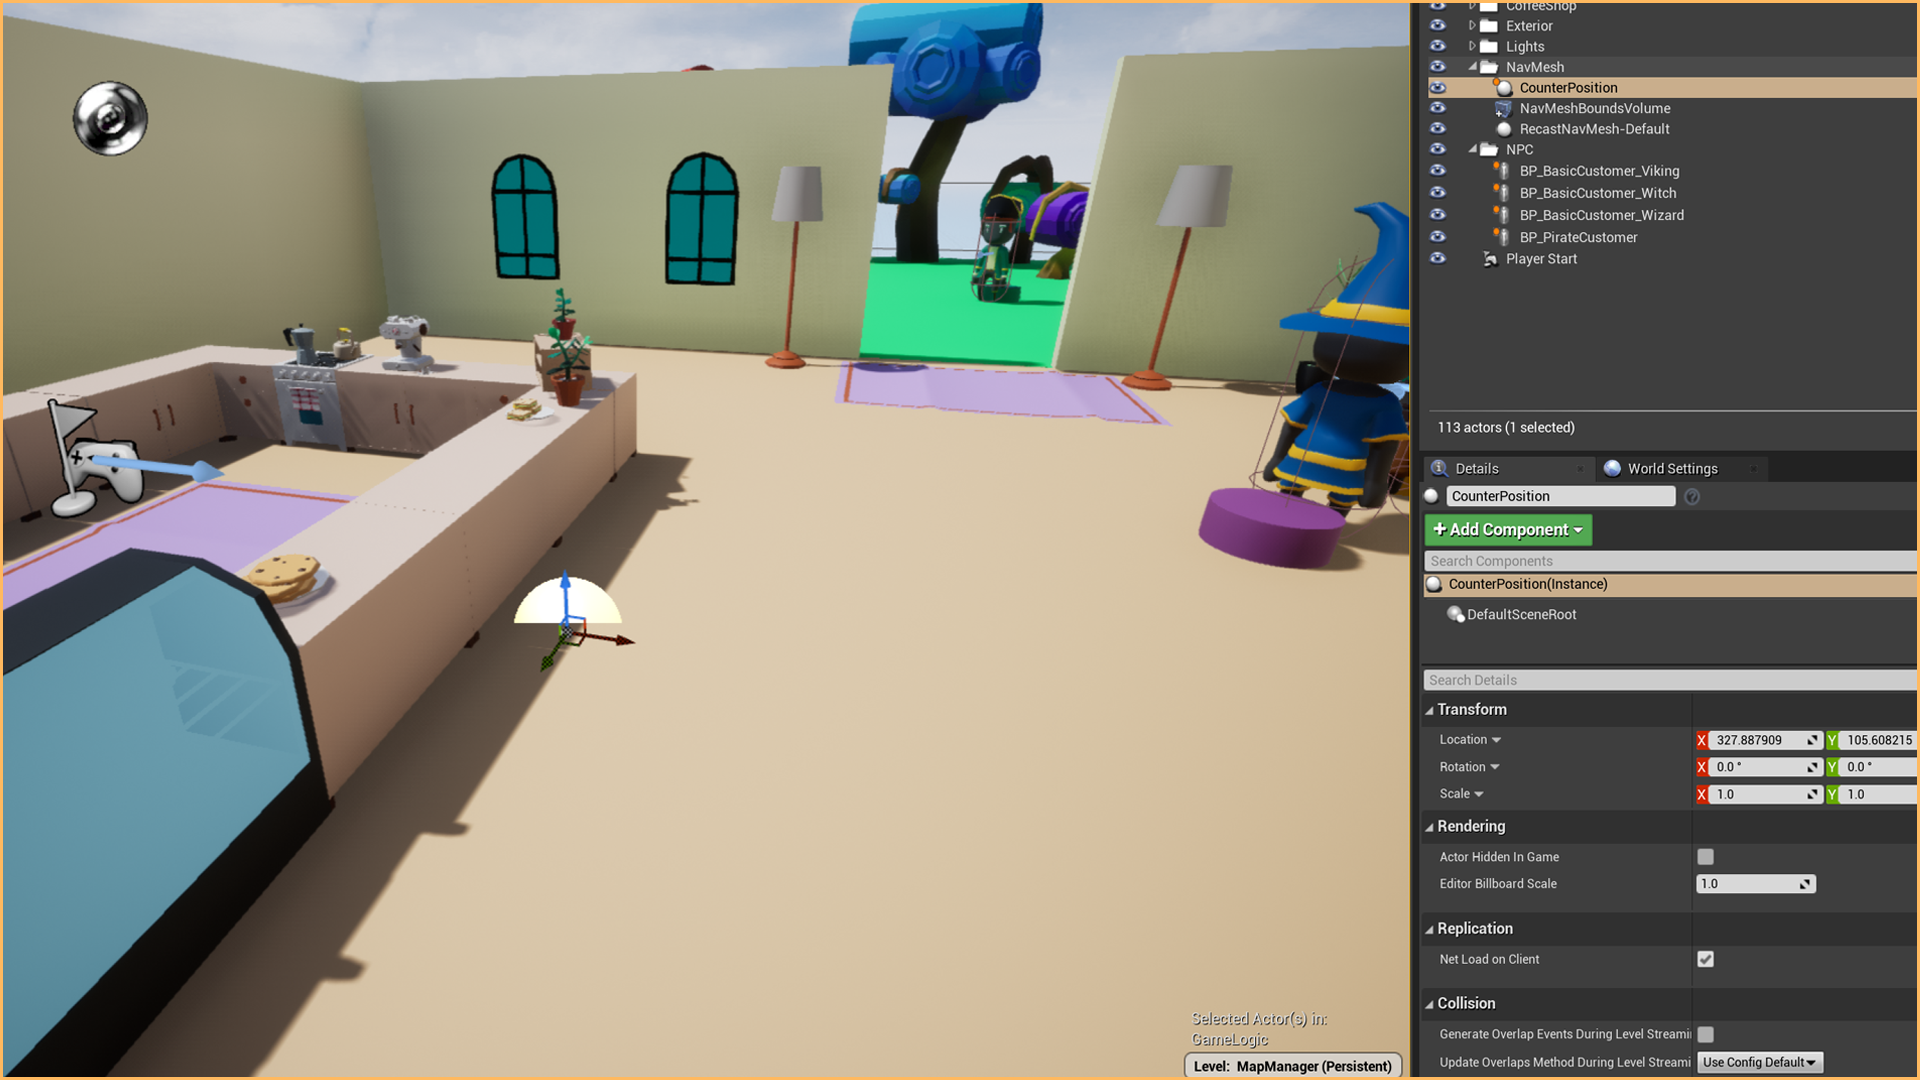
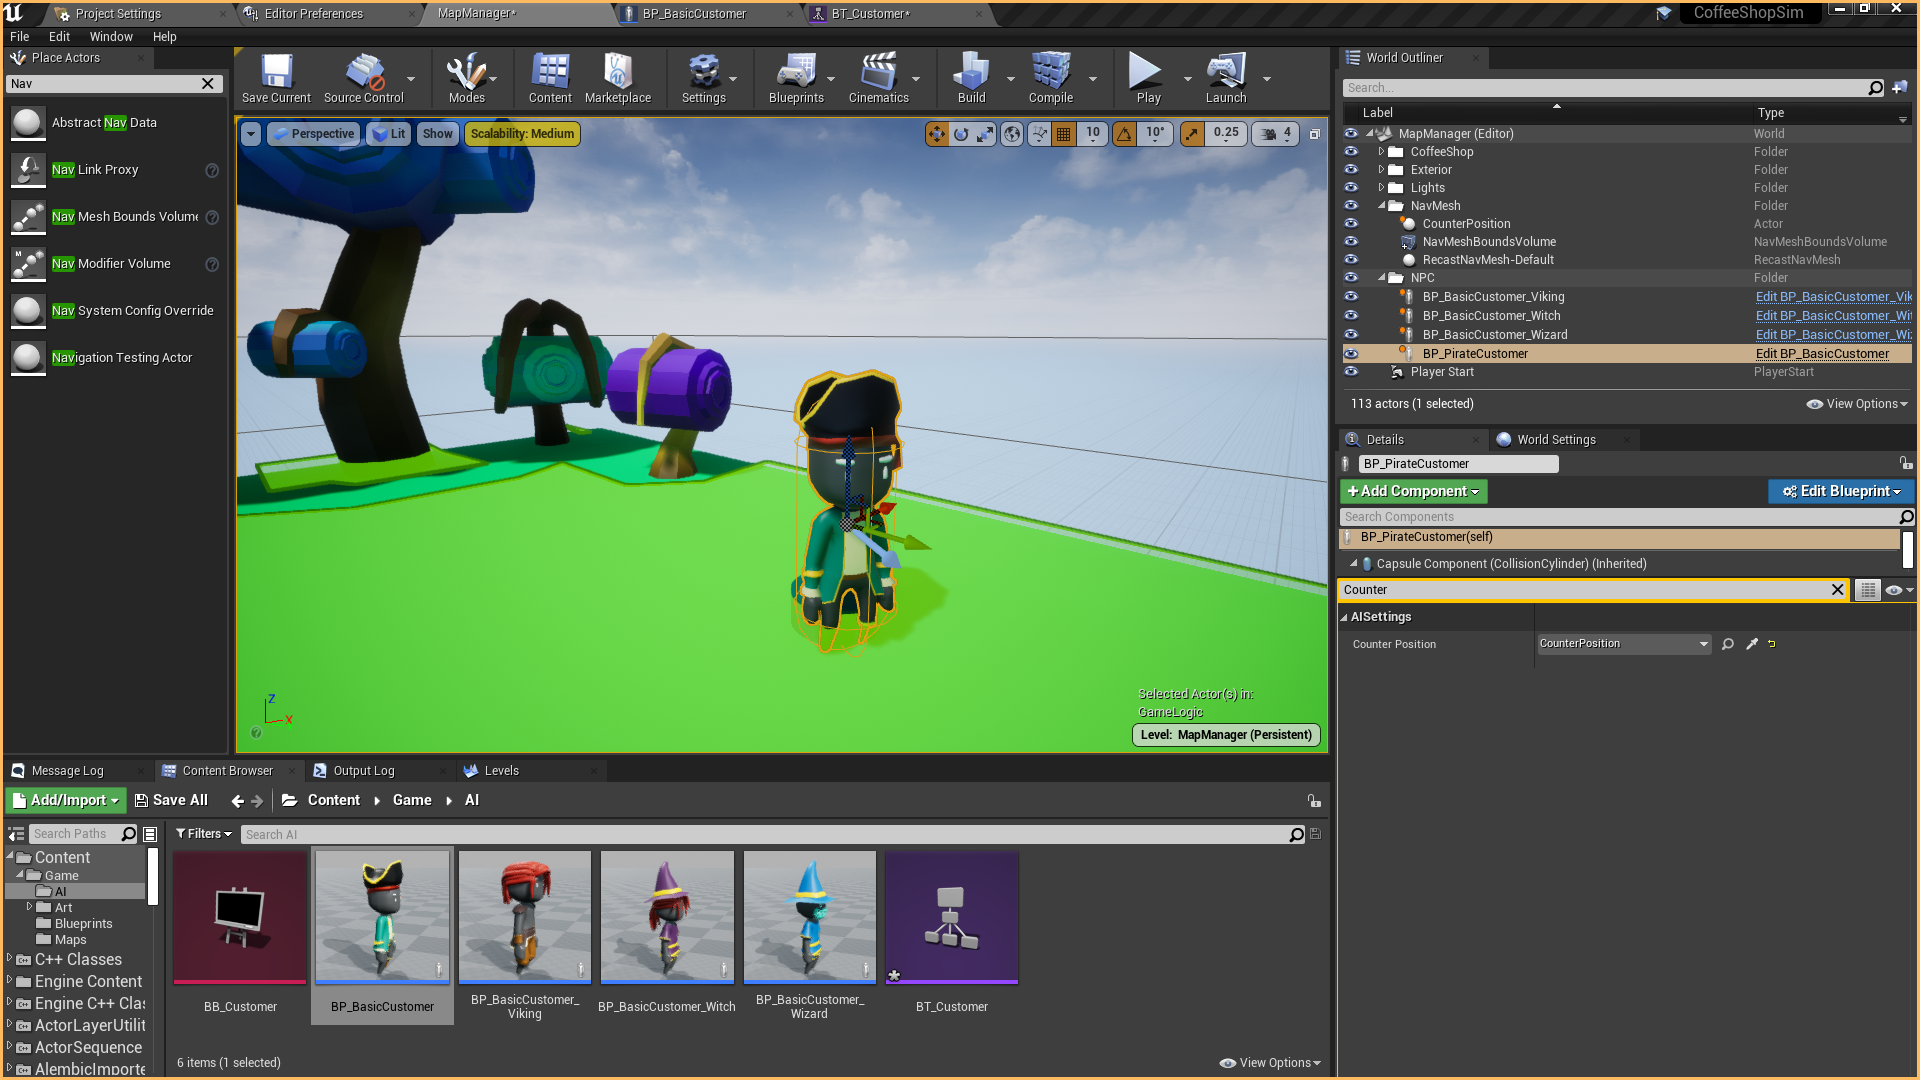
You will also need an empty actor placed in front of the counter so that the customer can head to that specific point.
You will also need an empty actor placed in front of the counter so that the customer can head to that specific point.
If you are using the template, the map contains a Nav MeshBoundVolume that covers everything.
You can create one by dragging the Nav mesh Bounds Volume object from the Place Actors menu on the left side.
If you press the P key, you should see the area covered by the volume in green.

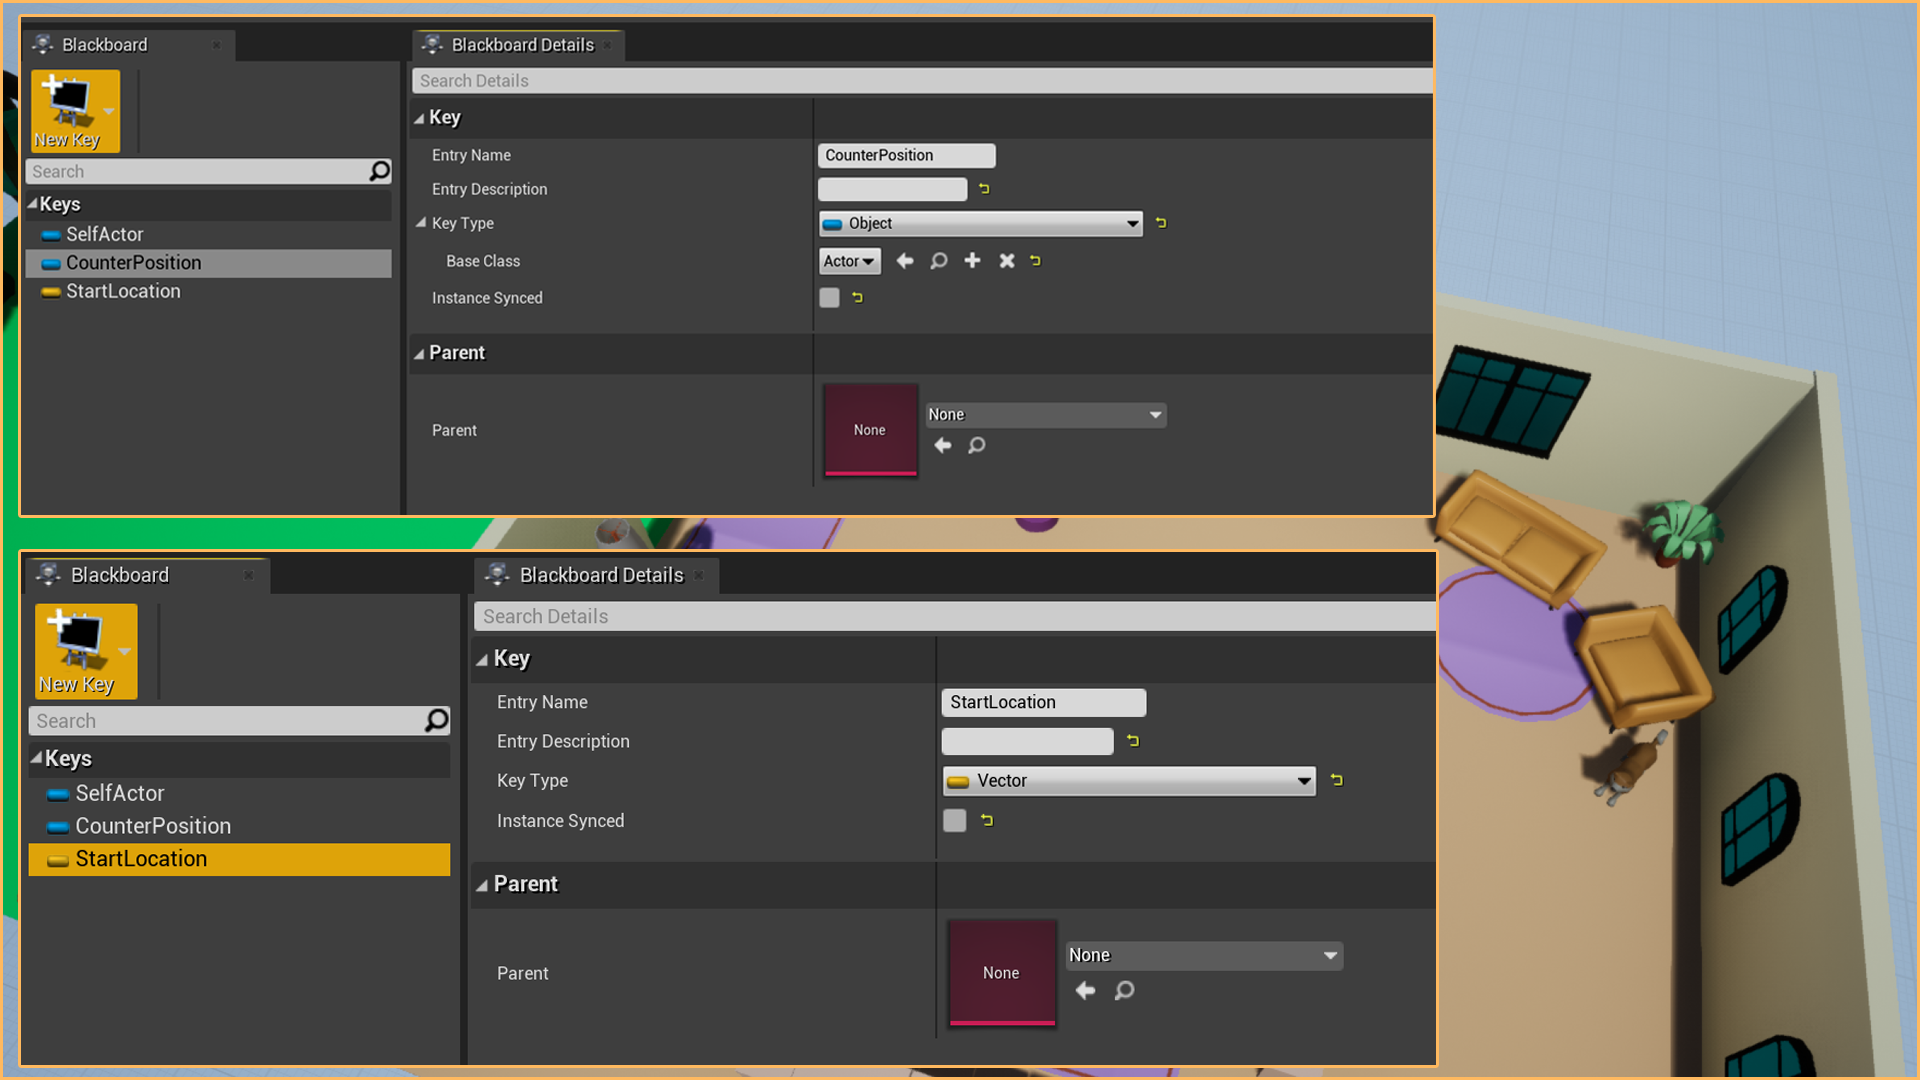
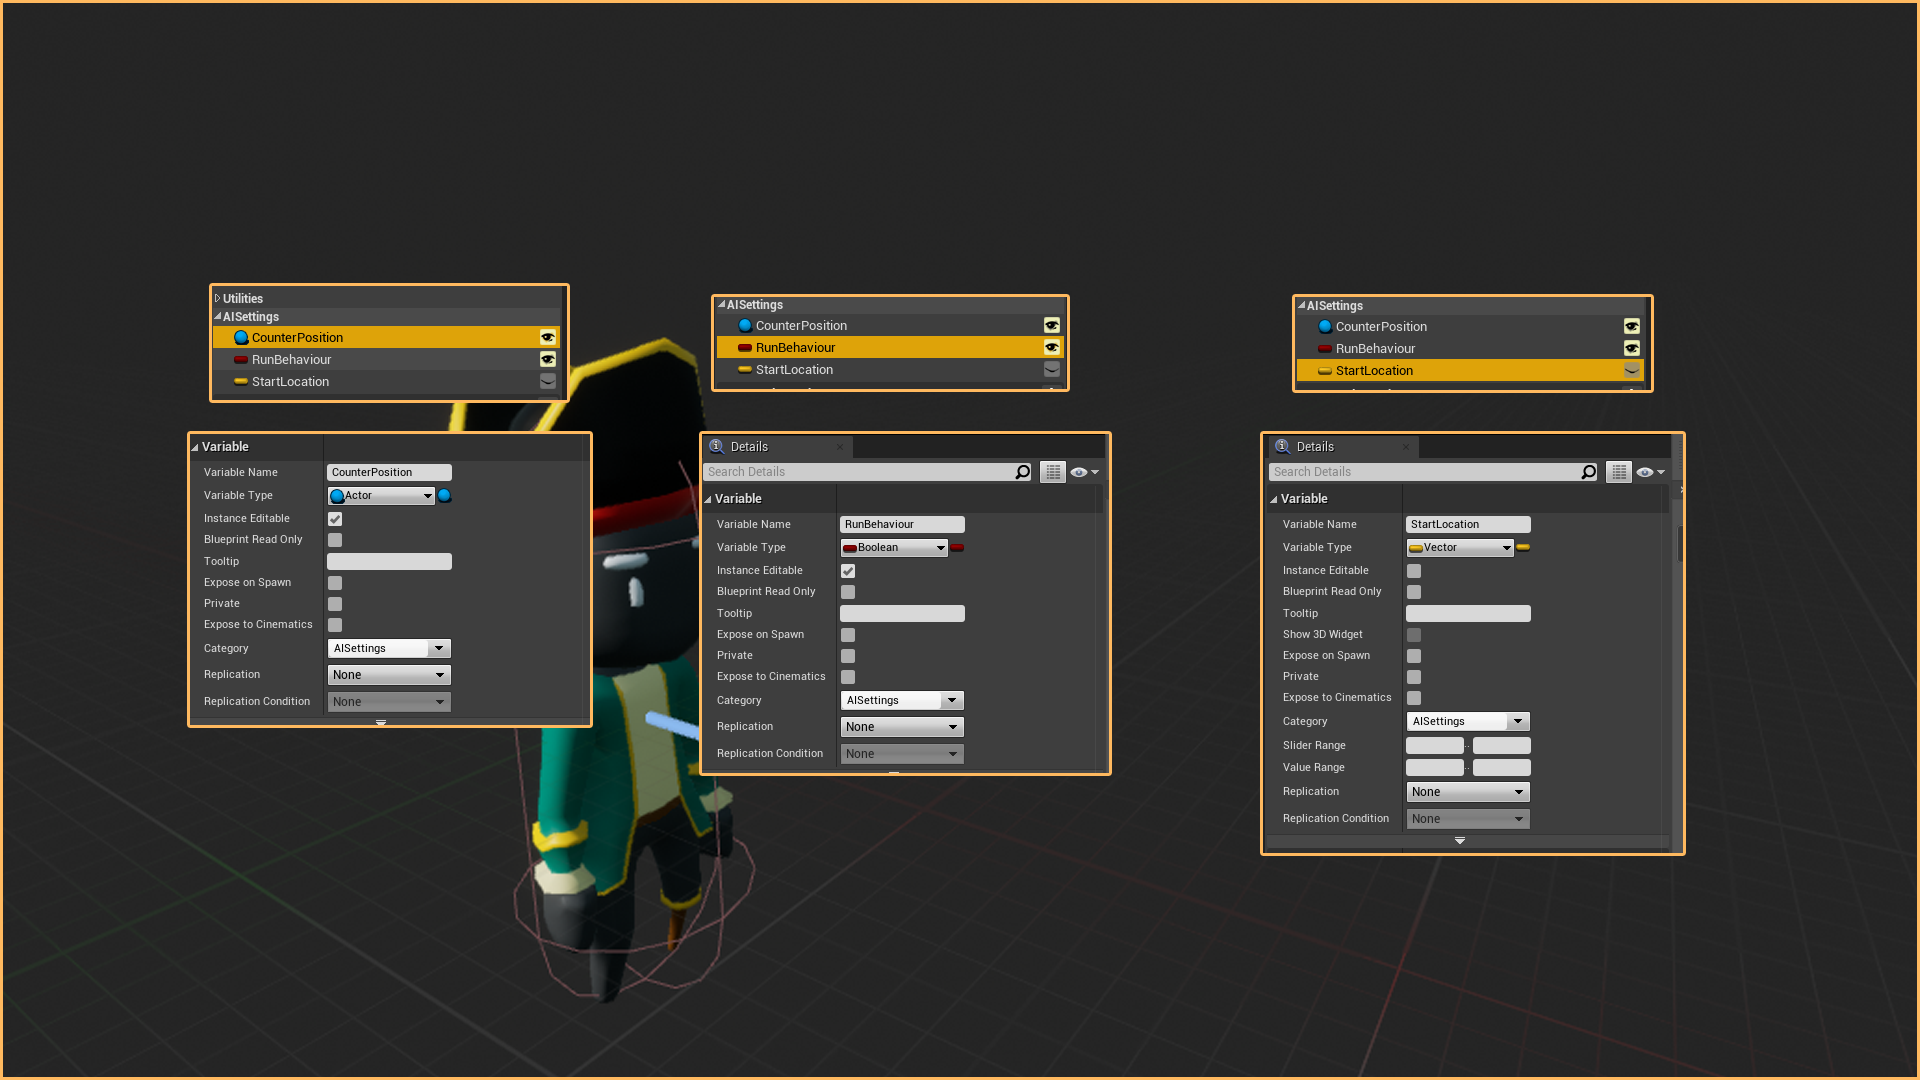
Open the Blackboard BB_Customer and create the next variables:
- CounterPosition: Actor type object used to make the customer move to the counter
- StartLocation: Vector type variable. Used to make the customer walk back to its origin.
We will use both variables on the Behaviour tree and set them on the blueprint BP_BasicCustomer.
Linking the Behaviour tree with the blueprint BP_Customer
Before we can add any actions to the customer, we must link the behaviour tree on the BP_Customer.
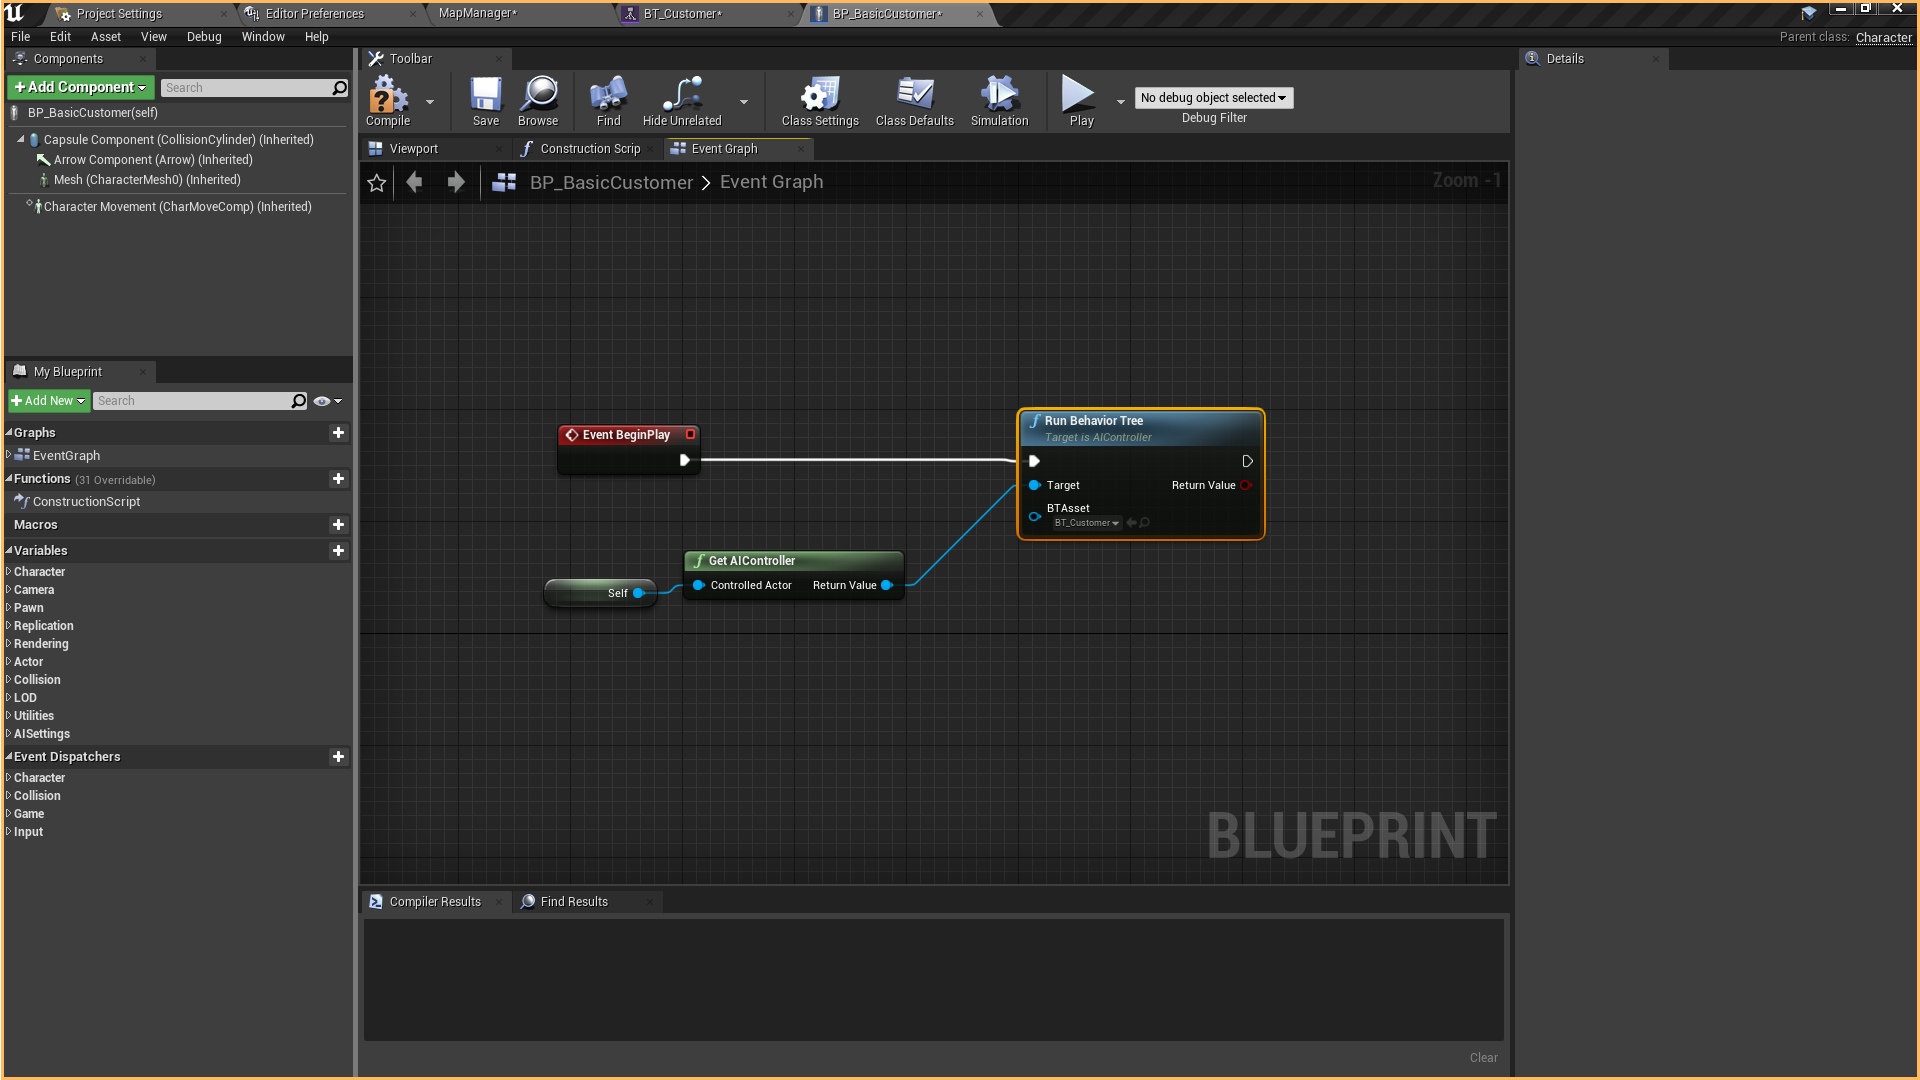
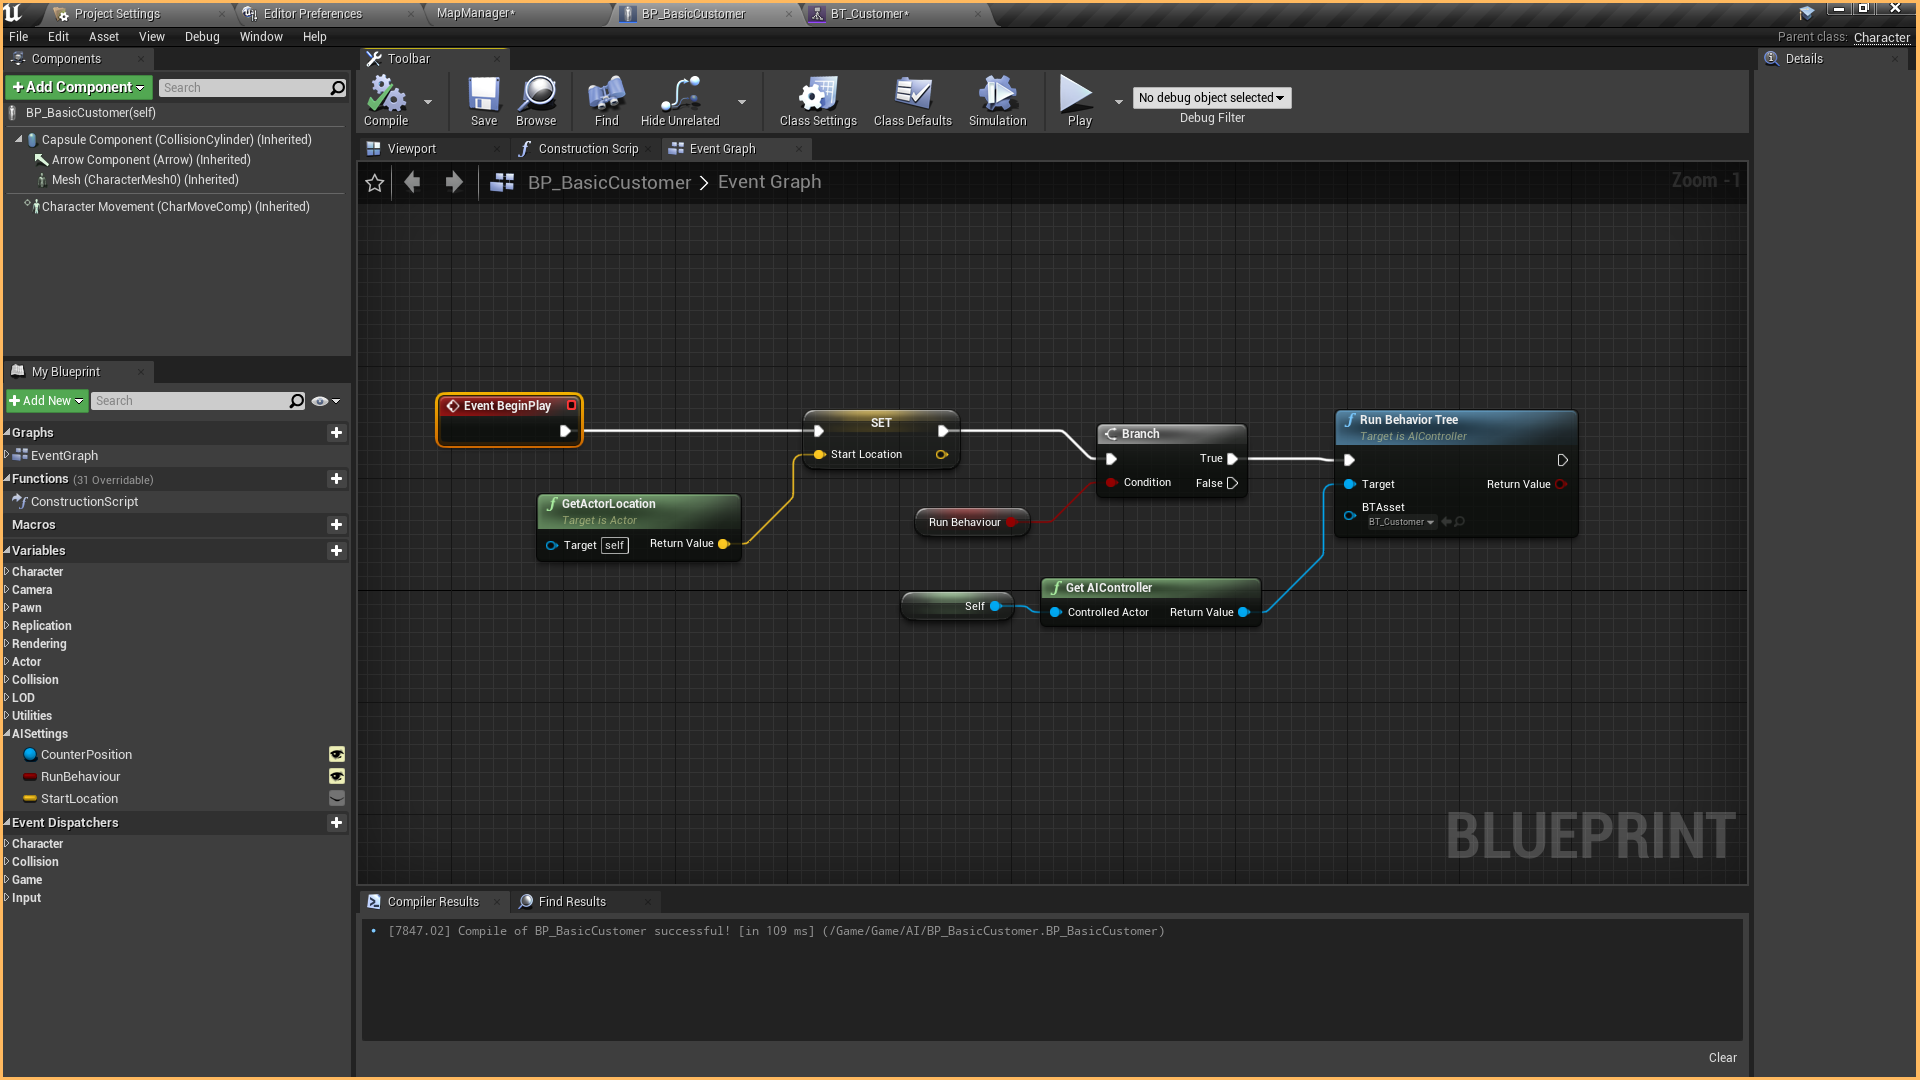
Open the Event Graph on the BP_BasicCustomer and drag the node GetAiController. Add a reference to the, so the node knows what AIController get.
On the Return Value, drag the nade Run Behaviour Tree and select BT_Customer on the parameter BTAsset.
Finally, connect the node Run Behaviour Tree with Event BeginPlay; this will make the Behaviour tree run as soon as we press play.
Nothing is going to happen if you try, as the Behaviour Tree is empty.
Let's create public variables on the BP_Customer, to use later on the Behaviour Tree:
- CounterPostion: Actor type. Reference to the counter actor position on the map.
- StartLocation: Vector type. Initial Location of the actor when pressing play.
- RunBehaviour: Boolean type. It indicates whether we allow the blueprint to run or not. This variable is helpful to prevent this blueprint's children from running the behaviour. This variable should be true by default.
Set the CounterPostion by selecting the BP_BasicCustomer on the Map, and selecting the CounterPosition Actor in the DropDown.
Set the StartLocation variable by using the node GetActorLocation, connect the Set to the BeginPlay.
After that, drag the RunBehaviour variable and use a branch to indicate if the behaviour will run or not.
The result should look like this:
Adding the customer's behaviour
Finally, we are ready to add tasks to the customer. Open the behaviour tree BT_Customer.
These are the tasks or actions the customer is going to do:
- Wait 3 seconds at their start position
- Customer moves to the counter position actor
- When it reaches that position, it will play an animation and wait 3 seconds. It will do these two actions 3 times.
- When the loop ends, the customer plays a defeat animation, moves to the start location, and waits 30 seconds.
It will repeat these actions in a loop.
On the Behaviour tree, create a Sequence pulling a cable from the Root Node. This is the initial sequence to hold the rest of them.
From the initial sequence, create another one to wrap the actions 1 and 2:
- Add the Task Wait and set the wait time to 2 seconds.
- Add the task MoveTo, and set the CounterPosition Blackboard Key on the Blackboard section of the details:

If you test the game now, you will see that the customer waits and then walks towards the counter.
For action 3, create a new sequence and connect it with the initial sequence.
Add the task Play Animation, and select BasicCharacter_Victory on the Animation to Play.
The animation will work because this blackboard is connected to the basic skeletal character, and it is compatible. Make sure to select compatible animations!
Add a Wait task and set it to 3 seconds.
Finally, add a decorator loop on the sequence and set the number of loops to 3.
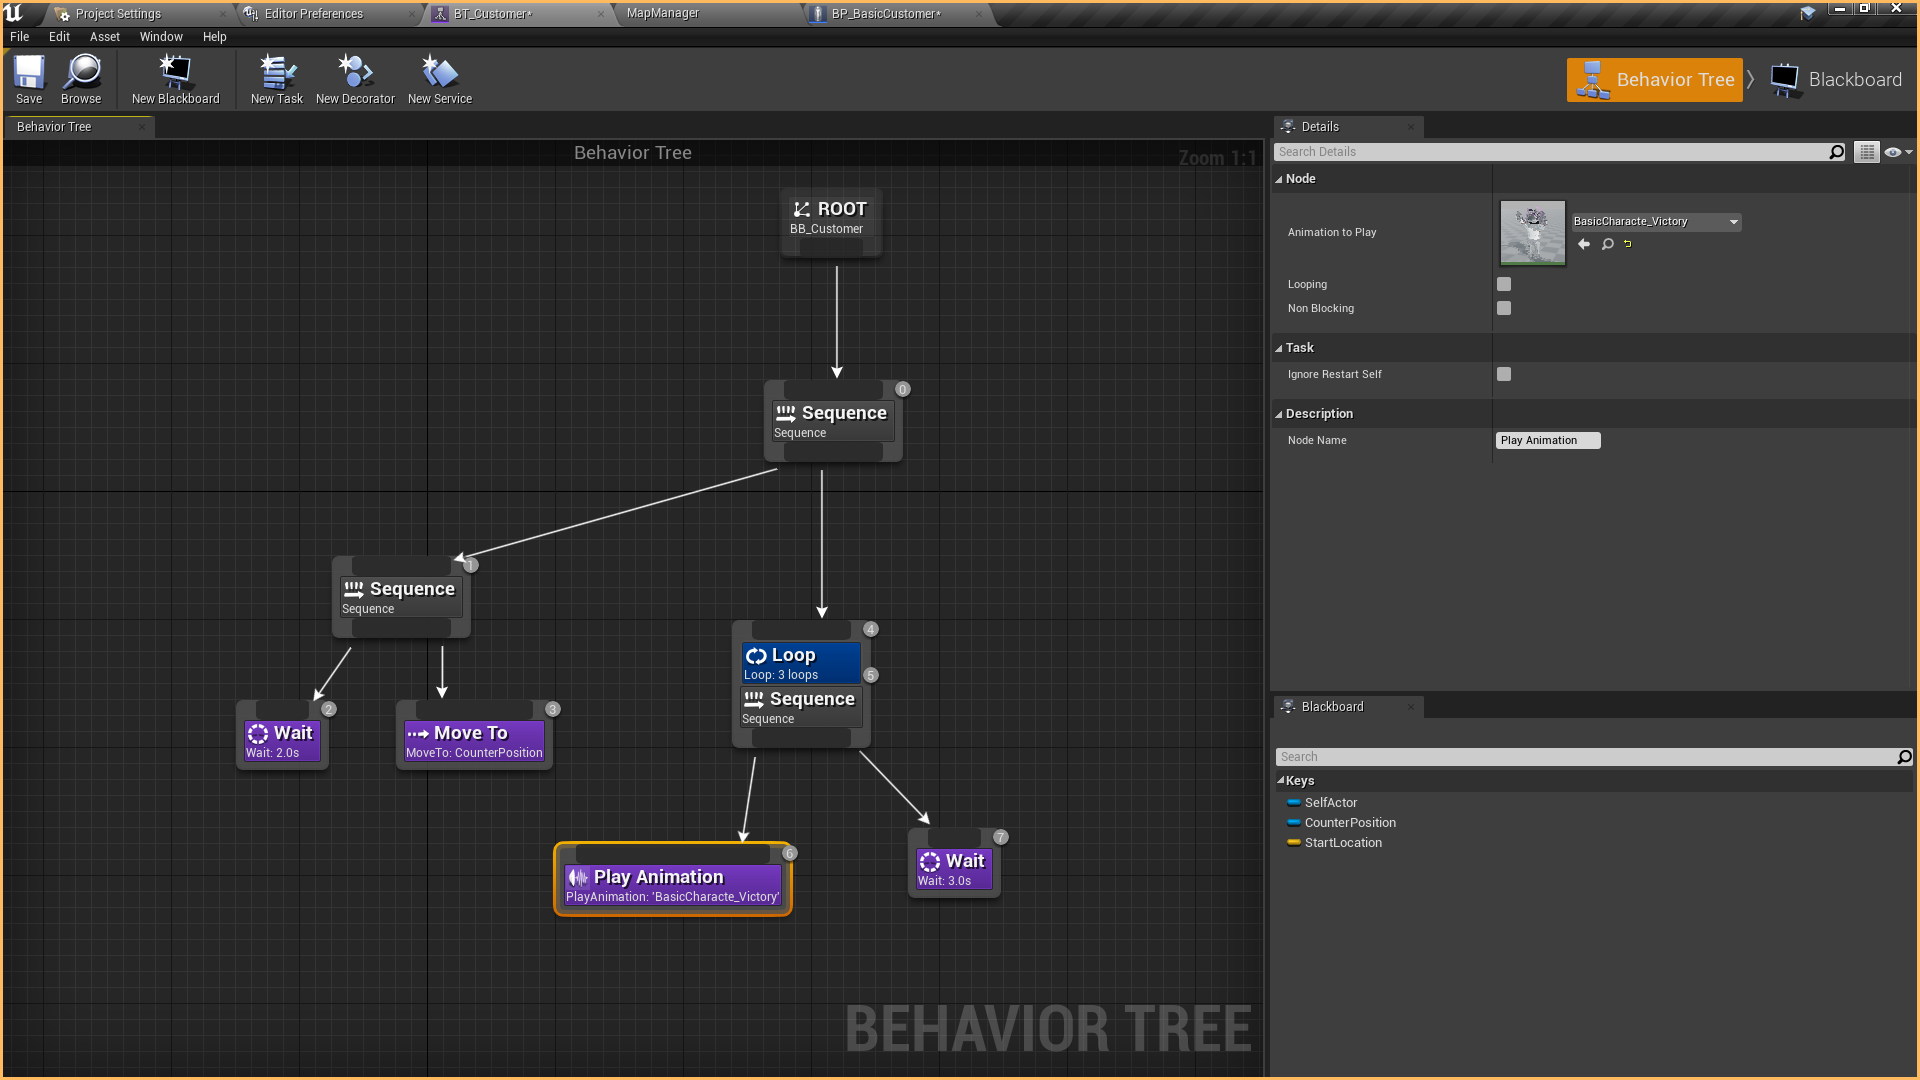
For the fourth and last action, we need a new sequence again:
- Add a Play Animation task and select BasicCharacter_Defeat
- Add a Move To action and set StartLocation on the Blackboard key.
- Add a Wait task and set the time to 30 seconds.

If you test the game now, you will see the whole sequence playing in a loop!
This is plenty of content for the first chapter; in future chapters, we will modify this behaviour and make the customer wait at the counter until their order is fulfilled.
We will add management of customers and orders. Things are going to get interesting!

Thanks for reading this tutorial; if you have doubts or questions, feel free to join my discord, we can talk about Kitori Academy, my new game or programming stuff!
Leave a comment
Log in with itch.io to leave a comment.